Yesterday, while it was cold and raining outside, I spent a few hours inside the greenhouse putting together part of our new irrigation system for the propagation bench.

The greenhouse propagation bench (click any image to enlarge)
Over the last 20 years I’ve installed countless drip irrigation systems in our gardens, and the gardens of family and friends. No two systems have been the same, but this is the first time that I’ve had the opportunity to set up a system for a greenhouse, and it’s our own greenhouse, so that makes it even more exciting.

To make the best use of the benches in the greenhouse, we need a reliable method for watering the plants
Our greenhouse will be used primarily for seedling propagation. Much of the kitchen garden is planted successively with crops throughout the spring and summer. The vast majority of those plants are started from seed, and sown in flats or plug trays.

Most all of our vegetables are grown from seed
Once large enough the young plants are transplanted into the garden.
Once the plants develop a healthy root system, they're either potted into larger containers, or transplanted into the garden
Only a few crops, primarily some of the root vegetables such as carrots, are direct-sown in the garden. Everything else will spend at least some time in the greenhouse. This helps to minimize damage to the seedlings from hungry birds, and slugs, when the plants are most vulnerable.
Even as the kitchen garden winds down, during the fall and winter months, that doesn’t mean we’ll run out of plants in the greenhouse. Propagation of woody cuttings, and some native plant seeds, will occur during the months when the food gardens are less busy.
The weather here in winter is generally more wet than cold, so it’s likely there will always be something growing in the greenhouse throughout the year.
One challenge was deciding how to organize the greenhouse to be the most efficient for our needs.

Before installing any irrigation, all of the greenhouse benches were first sealed to resist water
We installed plenty of bench space for seed starting and propagation, but the plants also will need regular water. Even during a warm sunny winter’s afternoon seedlings can dry out very quickly, and dragging a hose through the greenhouse is cumbersome.
We’ve chosen to devote one long bench specifically to seed propagation, and the other for propagating cuttings, and potting on transplants. Each bench, however, will need a different watering setup.
Individual drippers set into pots are fine for cuttings and more mature plants, but seedling propagation usually requires a more even distribution of moisture across the entire soil surface to ensure even germination.

It's important to keep the soil evenly moist when germinating from seed
For the propagation bench we’ve chosen to go with an overhead mister system.

Each mister is composed of three pieces that can be easily disassembled if they become clogged
Preassembled kits are available from various vendors of greenhouse irrigation supplies, but as we use a lot of drip irrigation components all around the farm, we chose to put together our own so we could use materials we already had. We just needed to purchase the actual mister assemblies for this project.

Assembled mister fitting
The misters need to be suspended above the seed trays at an even height across the bench. As the rafters of the greenhouse are too high to attach the misters to, we first constructed a simple stand to suspend the misters from.
In large setups, trellis wire can easily be used to support the misters, but we wanted something more flexible, and portable, in case we need to rearrange the greenhouse during the growing season.
We’re using PVC pipe for the stand, and chose not to glue any of the fittings, so if not required for a time, the stand can be dismantled and stored flat.

The irrigation system doesn't weigh much, so a lightweight PVC stand is more than sufficient
This simple stand consisted of 20 feet of 1/2-inch PVC, two 1/2″ slip-elbows, four 1/2″ slip-T fittings, and six 1/2″ inch end caps (to prevent dirt getting inside the ‘feet’).

A few simple tools are all that's needed. Clockwise from left, pruners (to cut the irrigation tubing), a tape measure, tubing hole punch (to install mister fittings), and a PVC pipe cutter
An 8 foot length of pipe was cut in half, and a 1/2″ PVC slip-T positioned in the center for a middle support leg. An entire 8 foot length of 1/2″ PVC is likely to sag over time without some support in the middle.

To save your hands, it's worth investing in a quality hole punch, and replacing the punch tips when they become dull
A 1/2″ elbow was fitted at each far end, and attached to a 24″ section of pipe to form the vertical support legs.

A simple slip-slip elbow connects the horizontal support to the legs at each end
For stability, an additional slip T was placed at the bottom of each leg to hold two 12″ horizontal supports to prevent the stand from tipping forward or backward.

A slip-T fitting was used at the base of each leg to hold the feet
With the stand constructed, the next step was to cut 1/2″ drip irrigation flex pipe to fit the stand.
Starting at the far end, we attached a threaded drain end-cap to the end of the 1/2″ flexible water line.

This end cap seals the far end of the water line, but the threaded cap can be removed to flush the line
This will allow us to flush the system through should one or more of the misters become clogged.
We cut a section of 1/2″ tubing the height of the stand, and to prevent too much torque at the ends of the pipe, we fitted the ends with 90 degree locking elbow connectors.

These fittings have threaded 'locks' at each end, that clamp against the water line, preventing blowouts under pressure
As we have very high water pressure here, we always use locking connectors on 1/2″ tubing runs. The elbows will help the pipe to lay flat against the stand, and will ensure the tubing doesn’t twist, and knock the misters out of alignment.

The elbow holds the tubing flat against the stand, and prevents the line from kinking
The next length of tubing ran the entire 8 feet across the top of the stand, connected again at the opposite end through a 90 degree elbow.

Zip ties secure the water tubing to the stand. These ties are UV resistant as they'll be exposed to a lot of sunlight
The flexible water tubing was secured to the stand, loosely at first, using zip-ties.

The water line (black) was run parallel to the stand (white), and fitted loosely with zip-ties until the misters were installed
Holes were punched into the tubing using a 1/8″ hole punch at each point along the tubing where a mister assembly would be installed. The misters were positioned 16″ apart to ensure even coverage above the seed trays. This is where attaching the water line to the stand loosely at first helps. If the line is too snug, it makes it difficult to position the punch around the tubing.

The hole punch is positioned to pierce the UNDERSIDE of the tubing, as the misters will hang below
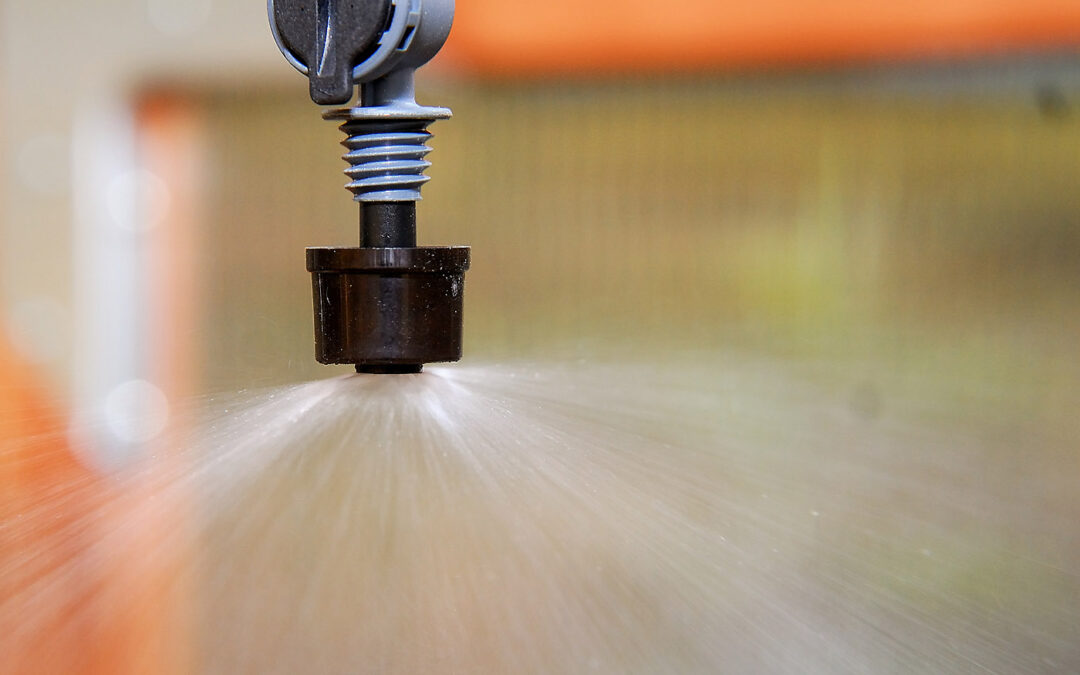
The mister assemblies we chose were selected specifically because they have an anti-drip device, that prevents dripping on the plants after the misters are turned off, as persistent dripping can lead to seedling damage.

The tip of the mister assembly is pushed into the hole punched into the water line
Once the misters were installed down the length of the tubing, additional zip-ties were installed to secure the 1/2″ water line securely to the stand.
Because of our high water pressure we fitted the water inlet with a pressure regulator to ensure even watering, and prevent the misters from being blown off the line.

At the water inlet end of the line, a pressure regulator was installed
Also, as we irrigate with well water, we placed a fine mesh particulate filter after the pressure reducer, but before the first mister assembly, to prevent the misters from clogging.

A particulate filter was installed after the pressure regulator, but before the misters (blue arrows show direction of water flow)
One pending addition to the system, as soon I pick up the parts, is to insert a few 1/2″ shut-off valves along the length of the water line, between some of the mister assemblies. This will enable us to turn the water off to selected misters, and leave others on, if the benches aren’t completely filled with seed trays, giving us more control over watering.

Once the water was connected we could test the misters (note to self, move the camera BEFORE turning the water on)
The permanent mainline PVC irrigation pipes won’t be installed up to the edge of the greenhouse until our soils soften up a little more in the garden from the rains. That’s one of our tasks for this winter. For now we’re temporarily running the misters using a standard hose end connection. Once the rigid permanent water lines are installed though, the 1/2″ main waterline will be permanently installed, and connected to an irrigation control valve, and timer, so seedling irrigation can be automated, and adjusted throughout the growing season.

Now the mister system is installed, we'll never dry out our seedlings too much again!
The temporary hose hookup though will eliminate the need to hand water the seedlings in the meantime, freeing up more time for other projects…and we seem to have no shortage of those at the moment.
In our next greenhouse irrigation post, we’ll be setting up a new (to us) irrigation system on the rear bench in the greenhouse to water transplants, and potted plants, but first…I have some seed sowing to do!


I love projects like this! It helps to draw things out,( for me), to forestall any problems with material ammounts and construction, but then when you crank the water on for the first time it’s so satifying to see your system work. Great inspiration for others, too, who would plan a similar project.
It was fun to see it come to life as we turned the water on. I wasn’t sure how far these sprayers would spray, or if our water pressure was going to be an issue. What I loved about this project was it was economical to do. We had everything here already, with the exception of the mister assemblies. 🙂
You all do things up right at Curbstone Valley Farms. Very nicely done!
Thanks Amy 😉 Some of that is out of necessity. With only two of us, and over 7 acres, anything we can do to free up time around here for other tasks on the farm helps. It’s amazing how much time I can spend having to water seedlings and plants on hot days, so getting everything set to almost take care of itself, is a huge time savings!
This is something I’ve been putting off – I’ve been hand spraying so far in my greenhouse. But you’ve really encouraged me. To show this post to Rat 😉
The thing I hate about hand spraying, for me, is our greenhouse is nowhere near the house, and my seedlings can suffer accordingly, especially when temperatures soar in the afternoon and I don’t make it out to the gardens in time. It’s also a challenge with our water pressure, not smashing young tender seedlings with the hose water. The misters I think will provide a more gentle, and even spray, than I ever could by hand…and it only took a couple of hours to set up! 🙂
This is a well thought out greenhouse, Clare. It is nice looking too. The one at the farm is irrigated with overhead misters and more. You are going to have a wonderful time growing in the greenhouse. I just wish the one I use was closer to me because I don’t get there as much as I would like in winter when I would really use it. Great job!
I’m so excited about growing everything in the greenhouse. Honestly, now that we finally have it installed, and getting it organized, I don’t know how we’ve gone this long without one! I’m really hoping the misters will help to improve germination, and reduce the rate of seedling loss to over-drying too.
I am so impressed and envious of your greenhouse! A greenhouse is on my wish list but will be several years down the road before it becomes a reality. Yours looks big! I love the step by step instructions how you installed the irrigation system. I recently attended a lunch and learn on how to install your own system.
It was on my wishlist for a long time too. Early on I don’t think we were really growing enough plants to justify the cost, but in the last few years it became clear it was more of a necessity, than a luxury.
I’ve taught a number of people over the years how to install, and maintain, drip irrigation systems. Once you’re familiar with the pieces and parts, they’re very simple, and very liberating to have installed. The plants always seem better for them, and they can help to save a huge amount of water too. 🙂
I really admire how handy you are and how you explain what to do so clearly. I made a decision not to have a greenhouse when I started my nursery and so far I haven’t regretted it. I grow a lot of my own plants but in the ground.
That’s interesting Carolyn, I would have assumed that most all nurseries would have a greenhouse tucked away somewhere. For us, I think it’s because we’re growing so many vegetable seedlings throughout the year that a greenhouse becomes a necessity. Having trays and trays of lettuce seedlings in my living room from March to November has made it difficult to know where to asks guests to sit when they visit 😉 At least now I’ve been able to get the potting soil out of the house!
Clare I so admire all you do. I have always wanted a greenhouse but alas do not have the space or cash at this point. Maybe someday. For now I will be growing seeds with my grow cart and lights. It will be a good starting ground that I can learn from…and all your wonderful posts teach me even more…
We barely had the space (flat, and level space that is), and yes, a greenhouse can be very much a budget buster. It will take a little while for this greenhouse to cost justify itself. Up until now though, I’ve been like you. Although probably not as organized. My grow cart was a window seat, and various portable tables, and an old lighting rig from a large aquarium with UV-lamps in it. Wasn’t pretty, but it was functional 😛 I am really enjoying the greenhouse though, and it’s nice to have the house back!
Oh wow! I am in awe of what you do – so handy and talented, I don’t know if I could even attempt this. I would LOVE a green house but don’t have space for it. At the moment I don’t really mind buying seedlings, although I recently started planting seeds and am watching them now as they grow. Some are ready for transplanting which is exciting (for me:)
Sounds like you will be set up great now in the watering department! I’m still doing hand watering, but your project may inspire me work on installing something similar at HA. It would be nice to get away for a couple of days and not have to worry about losing all the seedlings. We would have to deal with freezing temps early in the season, so that would mean having a permanent water supply with pipes installed below the frost line. A bigger challenge would be dealing with all the flats I keep up on the shelves.
Thank goodness I’ve never yet lived in a climate dry enough to need an irrigation system, this looks awfully complicated. But I tried to pay close attention, maybe my dream greenhouse will appear one day and then I’ll need to remember how this was done!
A very informative post, i am sure many doing such projects will benefit from it. I am amazed at your knowledge of engineering things, e.g. torque, etc. These things sound hi-tech for me and I will not be able to follow. LOL. It is good i am not faced with installations like this.
Watering is a chore never mind misting. I never look forward to any of that but this would certainly be such a time saver and great for the little seedlings aswell. Will you have to heat it aswell in the winter?
Love the watering system, Clare. I am still trying to decide what to do with our raised beds in the hoop house. I didn’t mind hand watering this year as there were only 4 small beds, and with the drip… well, it about drove me nuts with all the little tubes running everywhere, so we took that out after we returned from our Montana trip. Will have to rethink all of that. Love your greenhouse!
Clare,
What a well thought out system! We have watering issues here, mainly because of low water pressure. We do however direct sow most of our seeds in the ground. Meg sows greens heavily and we thin them as needed by eating them. Soon we’ll have kale and lettuce.
Wow, yours is a lot more involved then mine. You even have nifty labels on your pictures!
I like the idea of a greenhouse. Your is spectacular, by the way.
Amazing! That will save you so much time. You have done such a fantastic job of building the greenhouse and now, adding the irrigation system.
As always, you pay meticulous attention to detail! Your irrigation system should save you a lot of work and help ensure your seedlings get off to a good start. Your greenhouse should be a great success. If I ever build a greenhouse or a chicken coop, you will be the one I contact for advice!
Wow! Your greenhouse is fab. Great the have a watering system installed. It all looks very professional.