We’ve been planning for a greenhouse in the vegetable garden area for some time. Initially we had expected to construct a shed in this part of the garden, but instead we decided that a greenhouse would prove to be a much more efficient use of the space, and be much more useful throughout the seasons for seed starting, plant propagation, and occasional sheltering of cold sensitive plants.
A greenhouse will help to extend the growing season, and provide much needed seed starting space in the garden
We seriously considered designing, and constructing, our own greenhouse, but with so many other projects still awaiting completion here we thought we’d first assess our kit-greenhouse options.
After some sleuthing, we found one greenhouse kit that caught our eye in a catalogue, but not having seen one in person, we were reluctant to purchase it sight unseen. However, as luck would have it, the manufacturer of that kit was on the exhibit floor of the San Francisco Flower and Garden Show this last March, with an example on display of the exact model we were considering.
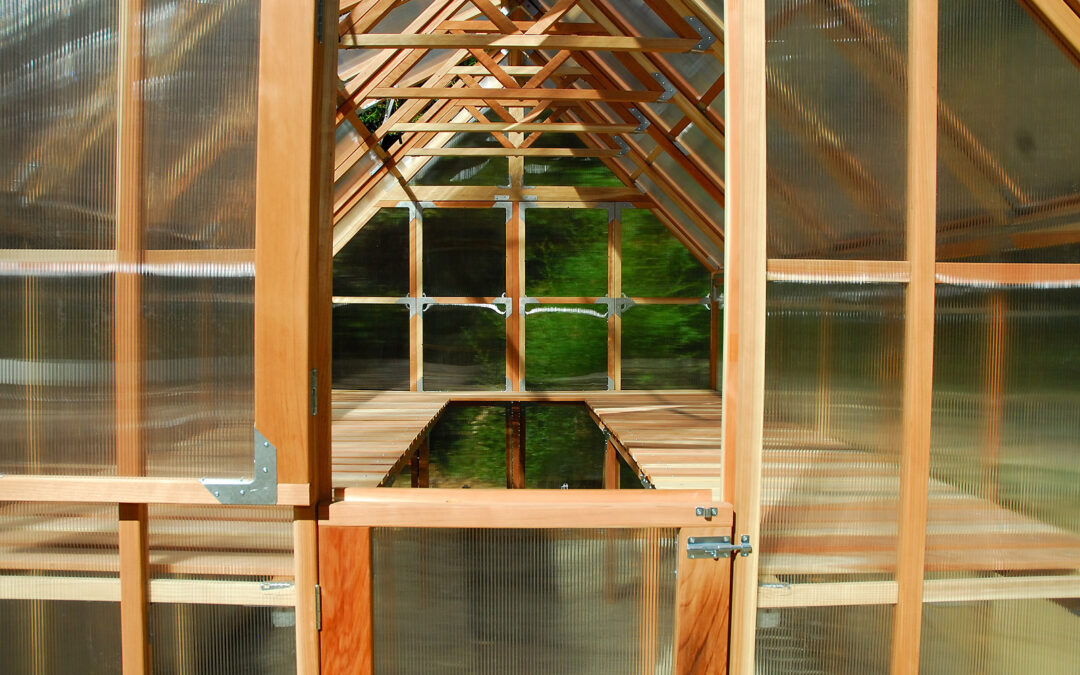
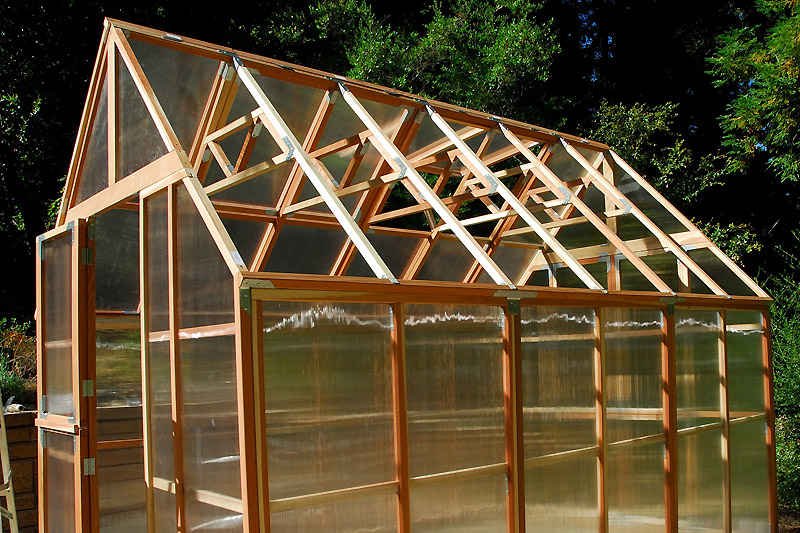
We were pleasantly surprised to find this greenhouse was very sturdy (unlike most we’d seen up to that point). This kit is constructed from Pacific Coast Redwood, and twin-wall polycarbonate panels, instead of glass.
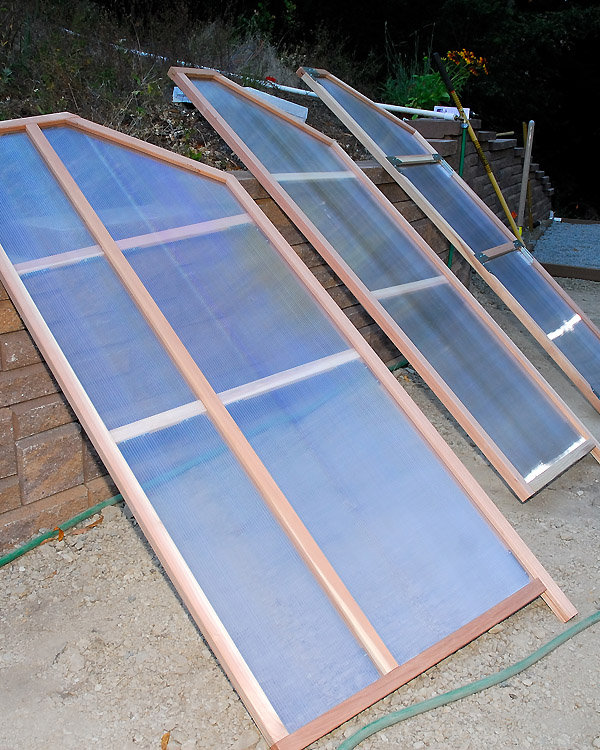
The greenhouse is comprised of preassembled redwood and polycarbonate panels
Although most traditional greenhouses are constructed of glass, polycarbonate has a number of advantages. Single pane glass is heavy, and doesn’t insulate against the cold very well. Polycarbonate panels are light weight, and the airspace between the walls of double or triple-wall polycarbonate helps to prevent rapid heat loss and gain.

Twinwall polycarbonate has an airspace between the walls to help moderate heat loss and gain
Glass also is potentially hazardous if it breaks (especially if the glass isn’t tempered), which was a concern here as we are surrounded by very tall trees that occasionally fall over, or drop limbs without warning.
Most importantly though, glass doesn’t diffuse the sunlight entering the greenhouse, and can actually intensify the sunlight as is passes through the pane, which can lead to scorching, and burning of tender young plants.
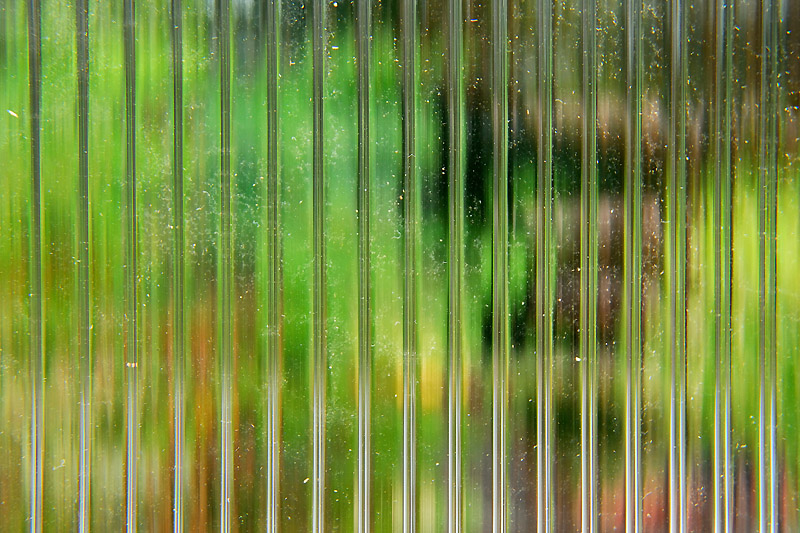
These polycarbonate panels help to diffuse sunlight as it enters the greenhouse to prevent scorching of tender plants
So although glass greenhouses are beautiful, polycarbonate is generally more practical, and isn’t prone to the opacification that some other types of plastics are when exposed to UV light.
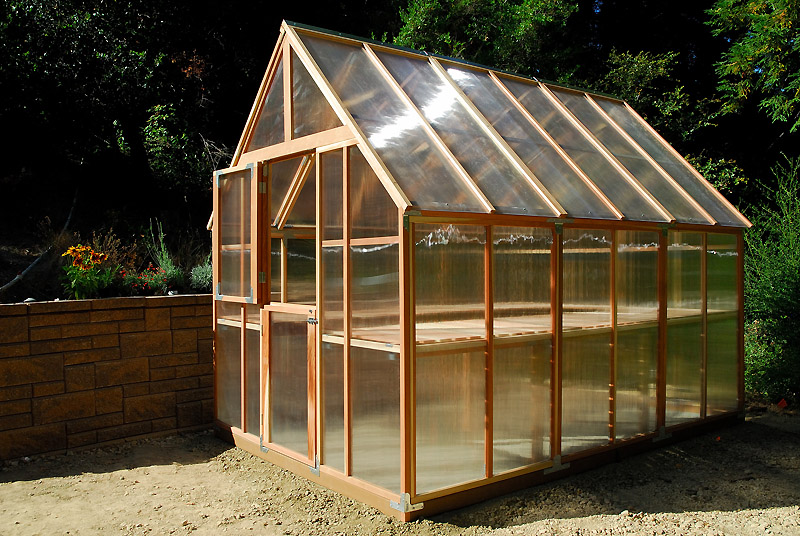
After considering numerous options, we felt this was the best kit we could find locally, so we ordered the 8 x 12 foot greenhouse, which arrived in early May. Unfortunately, other projects had priority at the time, and we couldn’t install the greenhouse without first constructing a retaining wall in the garden. The recent completion of the garden wall though, finally paved the way for the greenhouse’s installation this weekend.
We began the installation late on Saturday afternoon. The first task was leveling the base for the foundation, which was fairly straightforward. Although no special base is required for this kit, we did add a few inches of base rock (with fines), both to improve stability and drainage, and compacted and leveled the area.
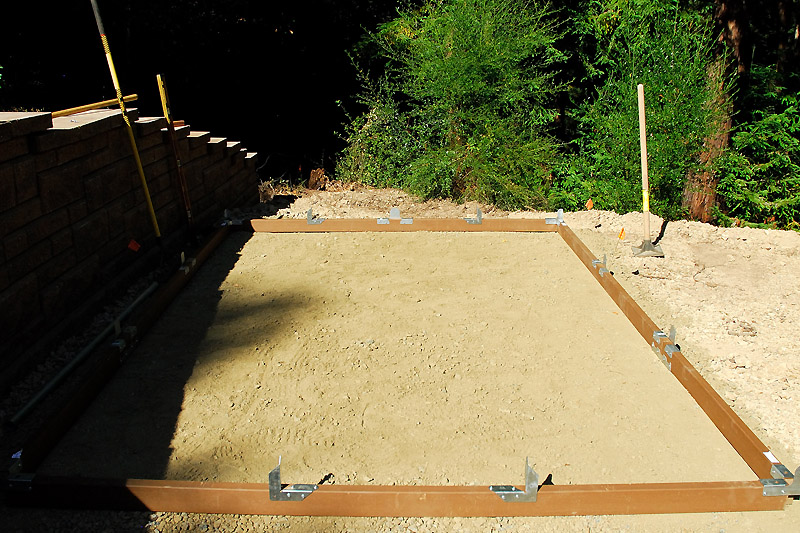
Greenhouse Foundation
The foundation of the greenhouse is made from a recycled plastic to resist rot, and was easily assembled. We then chose to add some 1/4″ drain rock inside the base, as once the walls were up, it would be much more challenging to add the gravel later.
Once the base was prepared the pre assembled end-wall panels were installed.
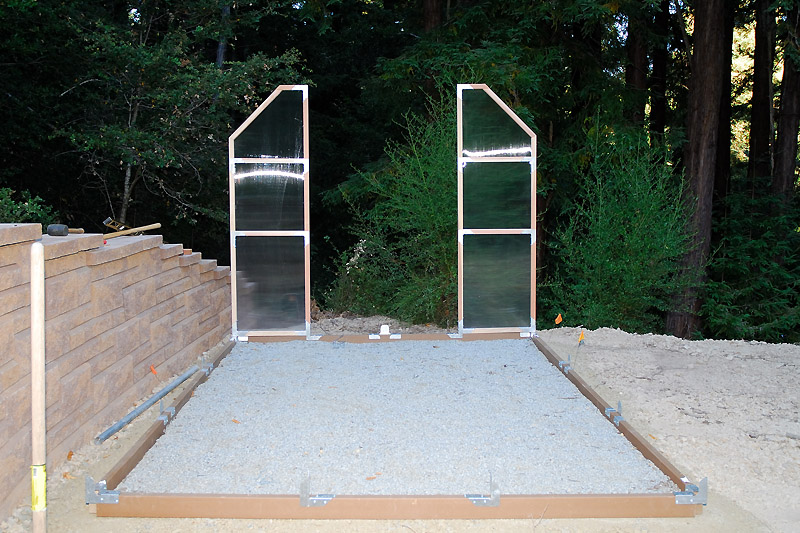
First two back wall corner panels installed
The light was quickly fading as we completed the end-wall installation.
Corner panels, including the pre-hung door, in position
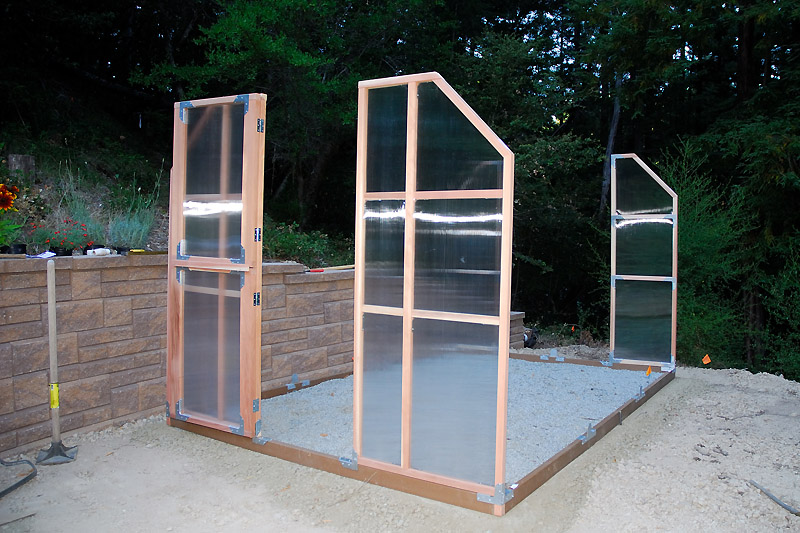
We managed to get the center roof truss together, but as much as we wanted to finish, the rest would have to wait until the morning.
In just a few hours the foundation and end walls were complete, and the center roof truss installed
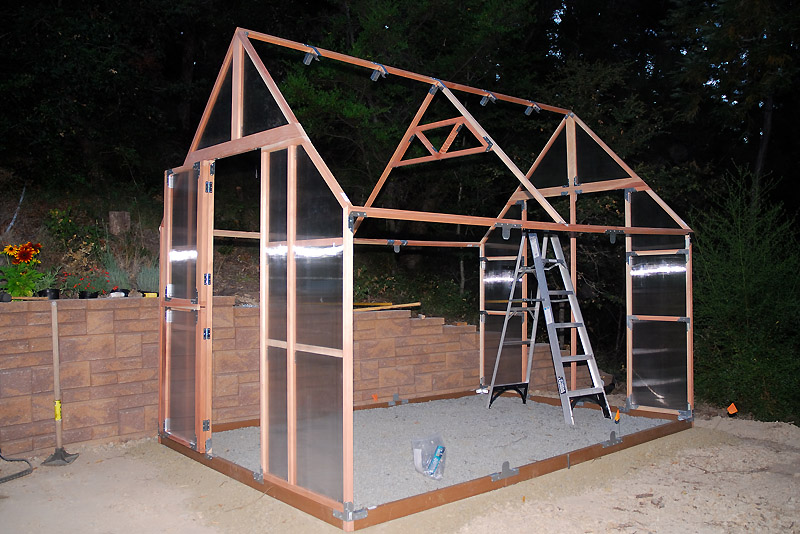
Sunday morning we resumed construction with the completion of the remaining roof trusses.
The remaining roof trusses were installed early the next morning
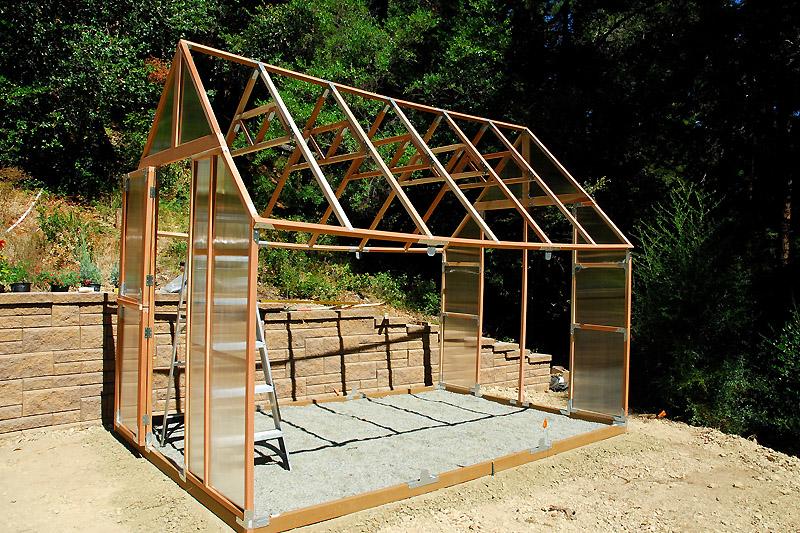
The greenhouse is 10 feet tall at the peak of the roof, providing plenty of head space.
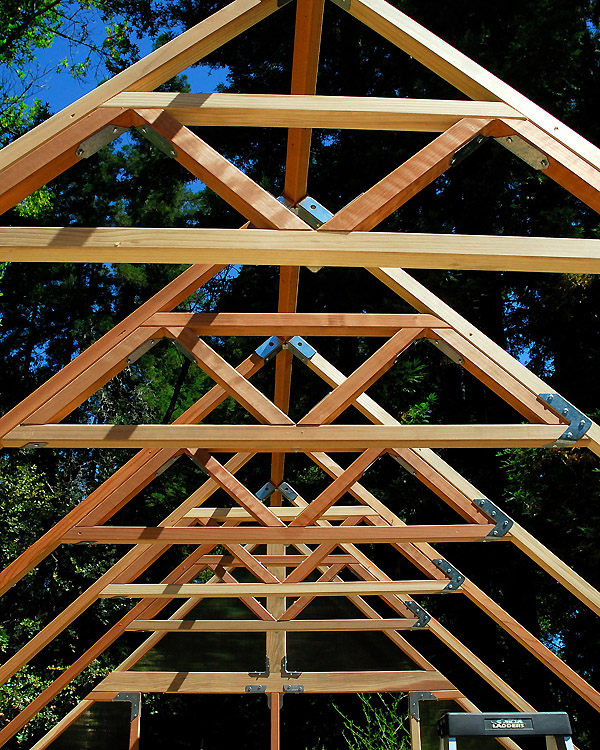
Completed Roof Trusses
Now it was time for the sidewall installation. Each side wall required the installation of 3 pre assembled 4-foot wide panels, which were easily maneuvered into position with two people, and secured to the roof beams.
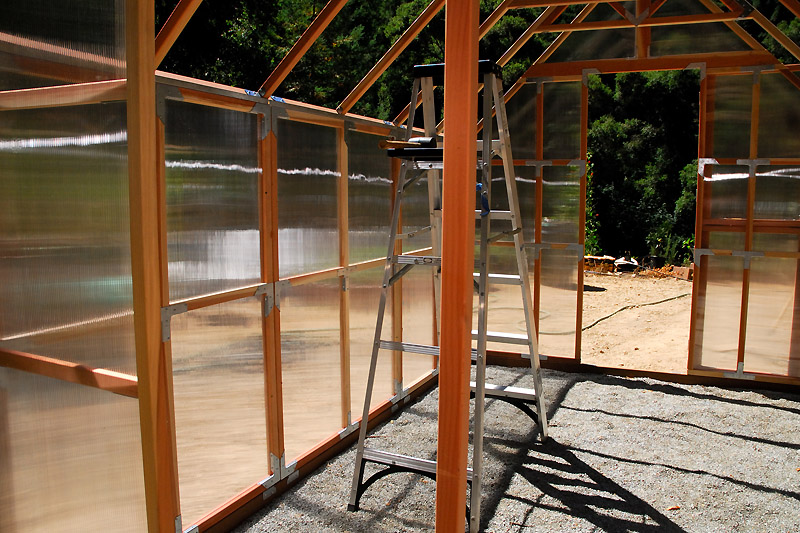
The side wall installation went quickly
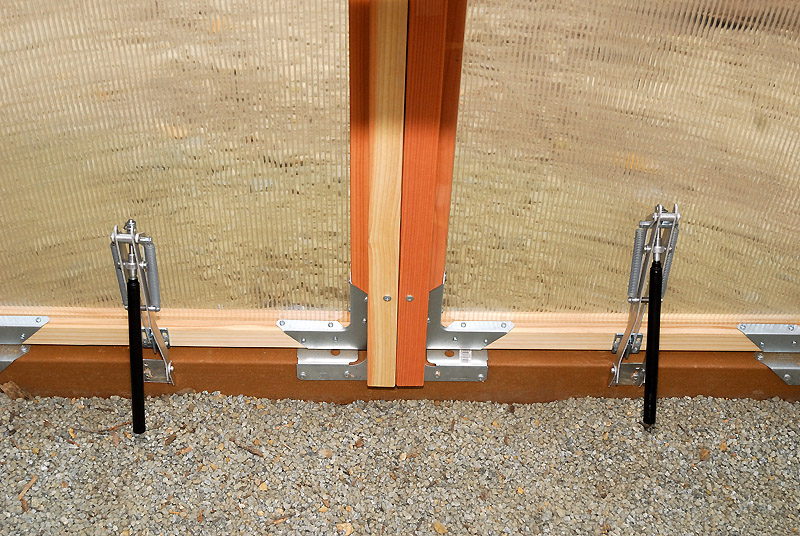
The next task was to install the rear vented panels on the back wall. In my experience, all kits have shortcomings, either in the quality of instructions, or the components. Although we didn’t have an issue with the quality of materials in this kit, we did have an occasional issue with the instructions, or lack thereof. It wasn’t clearly stated either in the instructions, or the instruction video that was included with the kit, that the rear base plate should be installed with the bottom support tie facing inward (those ties face outward on the other three lengths of the foundation plate). We had suspected earlier that something might be amiss, and now we realized we’d installed that plate backwards.
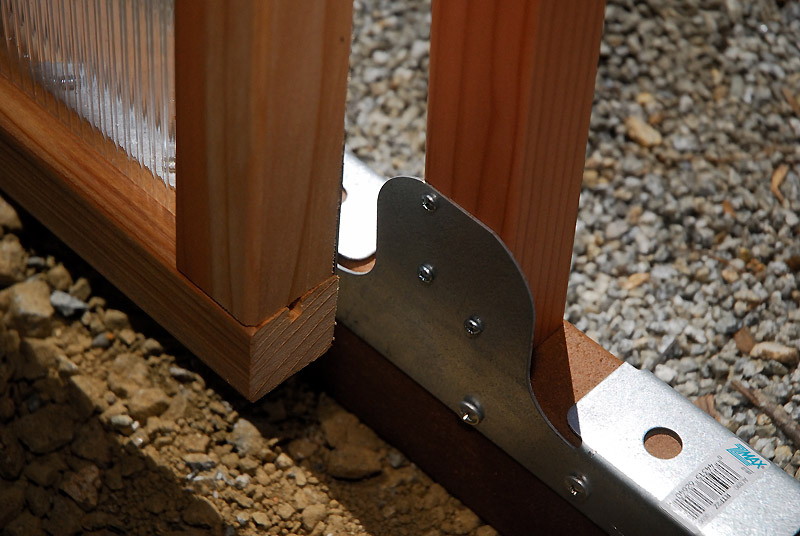
With the post support plate facing outward, the vent can’t close completely
Fortunately it was easy to rectify by simply removing, and reversing the support plate. Except for the lizards watching us from the retaining wall, I don’t think anyone else would have noticed.
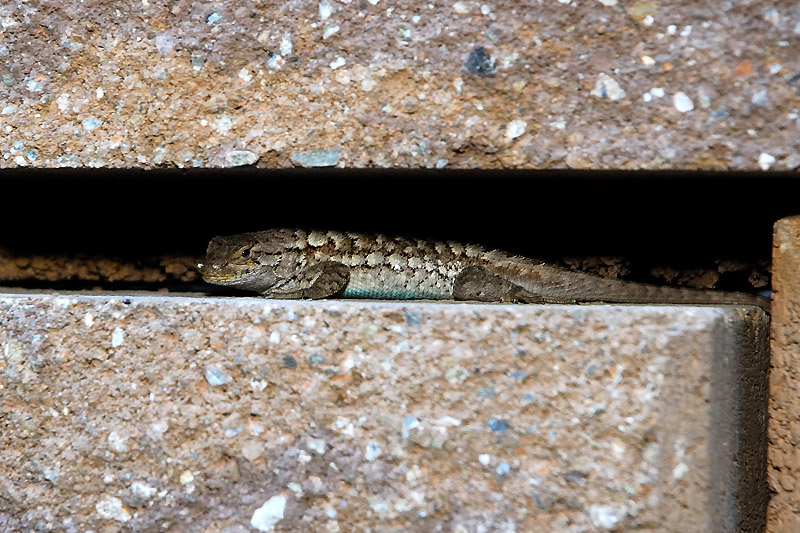
As predicted, the lizards in the garden are finding the retaining wall next to the greenhouse to be a welcome addition to the garden, and like to hide under the cap stones
After that slight adjustment, with the walls complete, it was time for the roof installation. In addition to the two rear wall vent panels, this model also has two independently operated vented roof panels, which can be installed on either side of the roof depending on local prevailing wind conditions.

There are two panels in the roof that open to vent hot air from the peak of the greenhouse
This was the part of the installation that we thought might prove to be too challenging for just two people, and had the greenhouse contained glass panels, it may have been, but the twinwall polycarbonate made the weight of the panels very manageable.
The vented side of the roof was installed first
With the roof installed, the core of the greenhouse was complete. Next we installed automatic solar powered vent openers on each of the two roof, and two rear-wall vented panels.
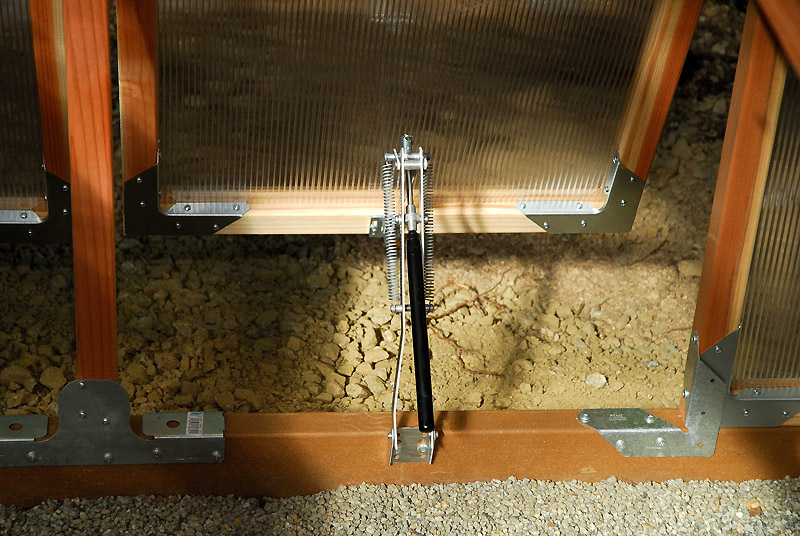
The paraffin in the handle expands in warm weather, causing the vents to open
The black handles contain a paraffin wax that expands in the heat, and contracts in cold. Cooler air is drawn in through the vents close to the floor, as warm air escapes through the roof panels on warm days. If necessary during winter weather, the spring mechanism can be decoupled to prevent opening, and conserve heat.
In cool weather the vents close as the parafin contracts
The greenhouse installation wasn’t quite complete though. As we will be using the greenhouse almost exclusively for seed starting and propagation, we’d need ample bench space for seed trays. We had ordered two optional 12 foot bench kits, and a rear wall bench kit at the time we ordered the greenhouse.
The bench kits were a little awkward to install single-handed, as they’re constructed entirely in place.
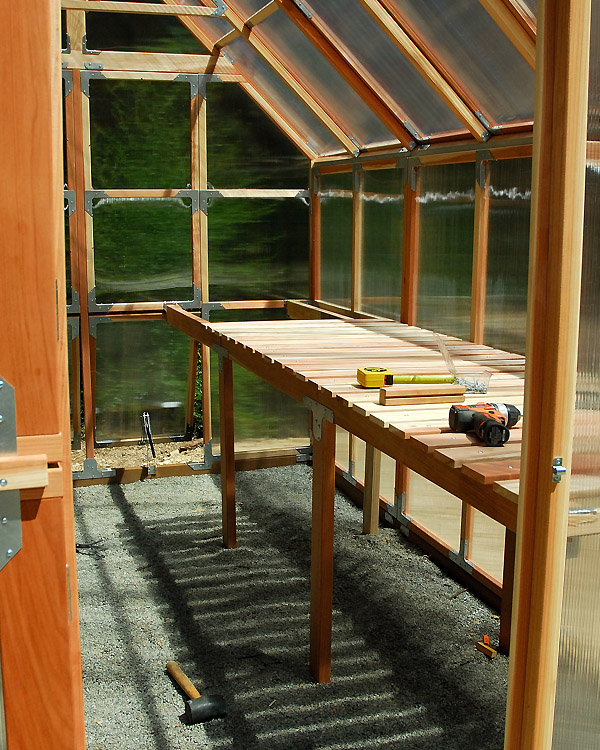
The benches are constructed in place, and it took some time to install each of the redwood bench-top planks
After spending most of yesterday sweltering inside the greenhouse with a drill, a level, and a framer’s square though, they turned out beautifully, and are very strong.
Overall, it took two people a day and a half to construct the greenhouse, and I spent most of a day yesterday getting the benches installed. The end result is a tremendously sturdy, very spacious, and efficient structure, that far exceeded our expectations for a do-it-yourself kit, that we hope will serve us well for many years to come.
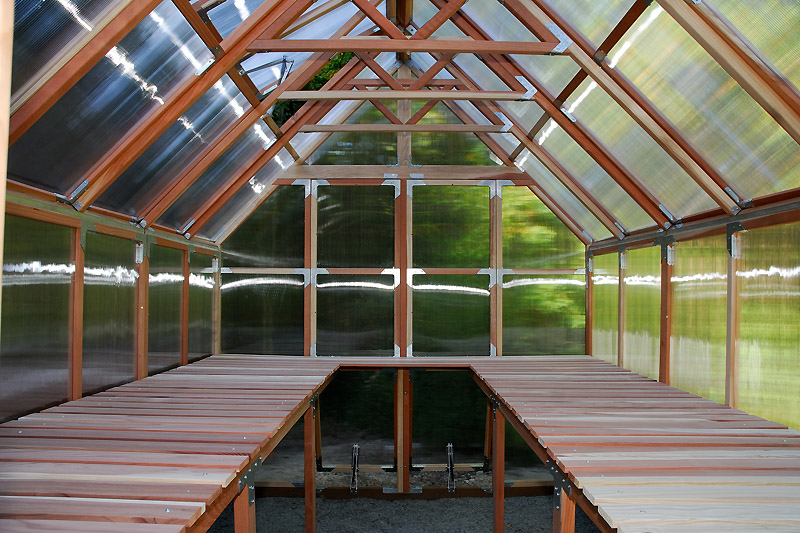
With the benches complete there is ample space for seedlings to grow and thrive
Before the heat mats and grow lights are installed though, we’re going to use a clear sealer on all the wood components. Although redwood is naturally rot-resistant, its life will be improved by occasionally sealing the wood.
We’re so happy to finally have the wall and greenhouse in position in the garden, as now we can finish building the last of the raised garden beds in this area. Not to mention there’ll be no more potting soil in the kitchen! Now we just have to decide which seeds we’re going to sow first…


Let us know how the panels hold up. I have a mini greenhouse with those panels and after a couple of years they yellowed, became brittle and opaque.
Your polycarbonate panels may not have been UV stabilized, as not all polycarbonate is manufactured the same. We were concerned about discoloration too, but the panels used in this greenhouse are specifically warranted against it, and the manufacturer promises to replace them if that happened 🙂
Your green house project is really amazing. You answer all of my questions: how to handle the heat and the cold, glass breakage, and other questions. Here we can have damaging hail, do you have much hail? I am eager to see how you set it up to grow plants.
We do occasionally get some hail, although thankfully it’s usually small, and doesn’t hail for long. Certainly nothing damaging (I hope I didn’t just jinx it). The polycarbonate certainly might scratch from hail, but wouldn’t be cracked, it’s very impact resistant, much more so than glass. The one unknown on set up at the moment is whether or not we’ll need to add an auxiliary exhaust fan to this greenhouse. Our spring weather can be warm, but very damp, so we may add one down the road. In the meantime, I need to investigate some new grow lights! 🙂
This is so great! I’m so happy that you got this done, and I’m sure you’re relieved to have such a big project over with. Now on to the fun part!
You’re happy? I’m THRILLED! It is a relief, it’s been at the top of the to-do list for too long! I’m really glad we have it set up before winter though…I have plans for lots of winter greens 🙂
Lettuce!
Congratulations on another step forward, Claire. I visited a friend who has one and she loves it,…it’s like a play house for her..different color bins for each kind of soil and gravel and hanging plants as well. She has glass shelves as high as she can reach. Fun,…and you really get a sense of accomplishment when you work on a project like this together!
Lots of lettuce…and kale, pac choi, spinach etc. The hardier greens we’ve been able to grow under cover in the garden, but the lettuce doesn’t always survive the coldest weather here, so I’m looking forward to having a steady supply of baby mixed greens this winter.
I’m really glad the benches in this greenhouse are so deep, as I do plan to set up some sort of bin system for soil and soil amendments. It’s just going to be so much fun to finally get better organized on the seed starting front!
Looks like you all have been working hard at Curbstone Farm. I bet you are really going to enjoy the greenhouse and it looks very well made! Do they come in extra, extra large to hold my entire backyard garden. Something needs to control and stabilize our crazy weather. P.S. the wall looks great, too!!
Alas, I think the largest is 8 x 16 foot. You’d have to construct a garden-sized hoop house instead 😉 The greenhouse does seem very well made, and it’s the only kit greenhouse we looked at that didn’t wobble when you leaned on it. You can shove this one with furious intent, and it doesn’t budge!
Clare, beautiful job of construction. I love your greenhouse and you will as well. I still go into our hoop house and simply stand, look around and enjoy the surroundings. Great place to be, wonderful products from it. Wonder what your first seedlings will be? I have some Lacinato kale coming on nicely.
Russian Winter Kale may be top of our list to sow first. I’ve given up expecting much heat for the rest of summer, and have already direct sown some carrots, beets, and radishes in the garden in the last couple of weeks. Regardless, I can’t wait to take the potting benches for a spin. I’m seriously considering stalking the local thrift stores for an old metal bar stool so I can sit in comfort while sowing and transplanting. Who knows, I may spend more time in the greenhouse, than the kitchen from now on! 😉
Clare,
This is sweet, bet you’ll have a lot of fun and yummy produce all winter long. I’ll stick to my hoops as this kind of thing is way out of my budget.
Inspected our bees today, oh my two supesedure cells opened and empty. Got to frame 20 before I found eggs, I was sweating it. My estimate on capped honey 80 pounds!
A greenhouse can be a budget buster. For us it was the most efficient use of a very small space in that corner of the garden, and providing the materials last, it should be a good investment.
That’s not a bad crop of honey, your bees should do well through winter.
Well, I am very impressed – and quite jealous! You did a good job – it looks wonderful! I can imagine all the hours you’ll spend out there playing!
I’ve been dreaming of this for a long time. More of a necessity here than a luxury, and honestly I don’t know how we’ve survived this long without one. Although looking at the window seat in our living room, our former seed starting area, it is a little worse for the wear 😛
Well, let me just say I think you have a great looking greenhouse! 😀 I do recall having an issue with the rear base plate during assembly. I went out to examine ours today to refresh my memory, and I do seem to recall having to undo the foundation to flip that part. I am impressed with your day and a half construction (I must have taken more breaks).
I will be watching in the months to come to see what you have growing in the new space. I’m still tweaking what to grow in there, but I have had a lot of fun experimenting. I would also add that our greenhouse has held up to 3 hail events this year and came through with flying colors. The outside greens were shredded by the worst hail storm, but the greenhouse was unscathed.
It is fabulous isn’t it 😉 Seeing yours installed, and being so well used, convinced us this model was up to the task. I’ve never been a fan of kits, which is why we build most things here from scratch, but with only two of us, we just had too much going on. I’m happy with how it’s turned out, and can’t wait to put it to good use. Glad to hear yours is holding up well through unsavory weather!
Excellent! We hope to someday build a greenhouse, and this gives us hope that there are alternative to glass that perform even better overall.
Glass greenhouses were the norm when I lived in England. I don’t think I recall very many though that weren’t freezing in the winter, or had broken panes of glass. We don’t get terribly cold here in the winter months, so I expect the polycarbonate will be sufficient for heat retention in the winter. We could add a small greenhouse heater though if necessary. We’ll see how the polycarbonate holds up over time, and how our seedlings do on warm sunny days, but I expect we’ll like this better than glass overall.
You guys never fail to make me feel like an underachiever. LOL! That looks like just the ticket for me in my yard. What did the whole kit and kaboodle cost once it was all said and done?
Well, two mammoth projects in one month is exceptional even for us 😉 Cost depends on which model you choose, and accessories, but their base models start around $1,200 and run up to $4,200 for the 8×16 (shipping included – but not including the benches which run a couple of hundred each, but would be easy to build benches with leftover lumber if you have some lying around). There are cheaper kits on the market, but when we looked, greenhouses definitely suffer from ‘you-get-what-you-pay-for’. We looked at a similar sized model, made of the same materials, but had to be installed by the installer on site (not DIY), and those prices started $2k higher than these, and the quality was no better.
Clare I didn’t think you would have it built already so soon after getting the wall built. Those benches look so sturdy and just like the whole kit it looks like money well spent.
Over here polycarbonate greenhouse sheets can suffer in the storms and I’ve seen many a sheet blown out from the frame (though they were metal frames) as the little metal clips didn’t hold them in too well when under such stress.
What type of clip mechanism do you have to hold the panes to the frame?
We vetoed a number of polycarbonate greenhouses with metal frames for just that reason. The panels always seemed loose, and the clips weren’t sturdy at all. I don’t know if you can tell from the photos, but look at the second picture down from the top, with the panels propped against the wall. Each wall panel is constructed from one large sheet of polycarbonate. so the side wall panel would be one large 4 x 6 foot sheet. The wood frame all the way around has a channel cut into it, where the polycarb slots in, and then the ‘mullions’, the two strips of redwood running horizontally, and the one vertical centered strip, all help to hold the polycarb sheet firmly in place. Without those strips in across the sheet, I think the polycarb would have a tendency to bow out, especially in warm weather. I was impressed at how firmly those sheets are seated in the frame. I’m hoping they’ll perform better. A lot of the metal edged panels we looked at were made of individual panes of polycarb in a wall section. I can only imagine how noisy that would be in a windy setting, with them rattling around! Only time will tell how well they hold up. Maybe we’ll have to do annual greenhouse anniversary update posts 😉
What a great project. Your farm looks so exciting. So pleased you are now creating all your own fertilizer. The permaculture concept of recycling carbon back to the soil from where it came is good for both our soil and planet.
Fortunately the chickens and the local stable help a lot with improving our soil fertility. I’m also thinking of adding a worm box. My next challenge will be blending my own seed starting soil mix for the greenhouse! 🙂
As always, I am impressed with your meticulous execution of a great project. You make the construction appear very do-able. I look forward to reading about your adventures in the new greenhouse!
I was surprised that just two people really could install this entire greenhouse. Honestly, many more extra pairs of hands may have actually slowed us down. 😉
That’s a really pretty greenhouse. I hope you post a picture of you enjoying your coffee (or hot drink of choice) in it come your coldest day this winter. Enjoy your new mini-climate!
Mornings are definitely all about coffee here. Although I have visions of potting about in the greenhouse in January with a nice warm mug of hot apple cider! 🙂
ohhhh a greenhouse….so pretty….I so want one but do not have the space that is right for it…what a wonderful next adventure…can’t wait to see more of it in future posts
They do have a mini 6 x 4 foot model! 😉 I know how it is to be short on space. Even though we have acreage here, most of it is wooded, and nothing is flat (unless we made it so). Even leveling the area for the vegetable garden was a huge challenge, and we’re hoping this greenhouse will help us make every square inch count!
<i<no more potting soil in the kitchen!
So that’s what it takes. My wife is about to begin her annual ritual of digging up and covering the kitchen floor with ‘saved’ vegs and herbs.
Well, my kitchen counters are already buried under summer and winter squash. I am looking forward to not dragging potting soil through kitchen though, I can make quite a mess when I’m seed starting! 😛
A greenhouse has been on my mind since we bought our acreage. I can concur about potting soil in the kitchen, the living room, seeds in the fridge, pots on the counters. I find the idea of building or sorting through kits intimidating though. Always nice to read your detailed posts as it helps me to make decisions in my own garden.
I think if I didn’t enjoy cooking so much, I would mind the potting soil in the kitchen, or the seeds in the fridge 😉 I am happy to free up the kitchen now for more edible endeavors.
I must admit this kit was well thought out overall, and the instructions (except for the glitch on the foundation plank) were very clear. The greenhouse arrived in 10 boxes, and thankfully, the instructions would even state which box the next required piece could be found in. It was a little like putting together a giant jigsaw puzzle, but turned out rather well!
Clare, your greenhouse turned out great,and I saw your lizard in the wall. But wait…the snakes love those walls too. My tiny yard with all the masonry gets garter snake families very year. I see the babies every spring and lucky for me the hawks get most of them. Unfortunately, my lawn mower gets some too. Really they are great for slug patrol. Slugs are not a problem here.
I love seeing our gartersnakes here, and we have at least two different species of them here. We’ve also seen California King Snakes, Ring-neck Snakes, Gopher Snakes, and Forest Sharp-tailed Snakes in that part of the garden too. I haven’t seen one on the wall, yet, but I wouldn’t be surprised if I did!
can’t wait to see your first crop from the greenhouse! great plans..
I just need to finish sealing the wood first, and then set up an irrigation system 😉 Hopefully we’ll planting our first crop very soon though!
What a cool greenhouse!! I’d never heard of using anything other than glass, but it makes so much sense. I use our patio table as a potting bench and then just hose it off. I’d rather have your greenhouse. :o) Zuchini fritters for dinner tonight!
Well, not so cool today, we finally made it over 95F 😉 As a traditionalist, I always thought I ‘had’ to have a glass greenhouse, but the more we looked into it, the more this polycarbonate option made sense. We’ll have to see how it does over the next year, but I’m optimistic!