This weekend we needed to inspect all four hives for a variety of reasons, but the two hives with the highest priority were the new hives containing the bees from the packages we installed last week, as it was time to remove the Queen cages.
Package Hives
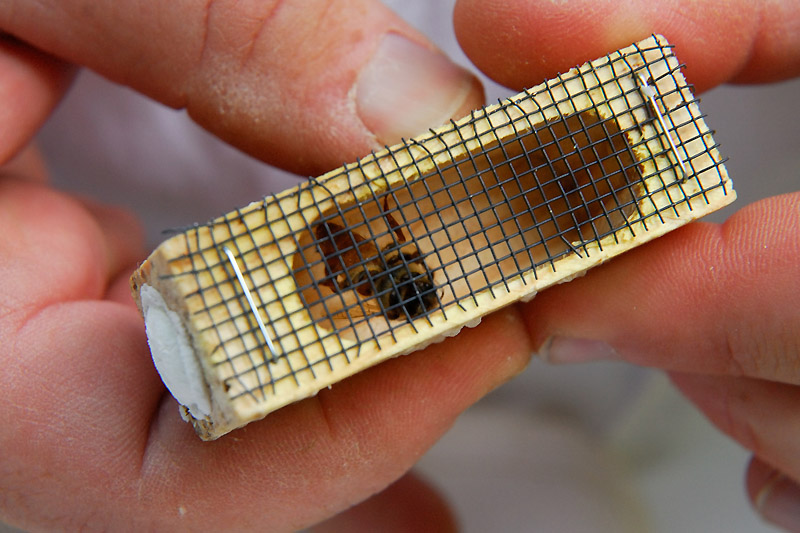
The Rosemary and Chamomile Hives both house Italian bees from our purchased packages. We had installed the bees 6 days previous to this inspection. Our goal was to ensure the Queens had been successfully released, and check to see if there was evidence of egg-laying or hopefully, sight the Queens. Even if the Queen cages had been opened, it doesn’t mean the Queens are present in the hive, as on rare occasions the worker bees may reject and kill them after they’re released. In that case there’s a narrow window of opportunity to re-queen the hive if necessary.
Both package hive inspections were very similar. We found slightly more population in the Rosemary Hive than the Chamomile Hive. This could be either due to one package containing more bees than the other, or a result of drift, where bees orienting to a new hive may become confused, and enter the wrong hive. Severe drifting has been known to occur when installing multiple packages in an apiary at the same time.
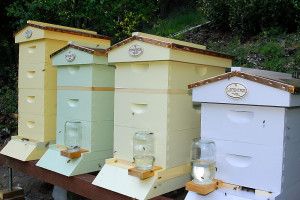
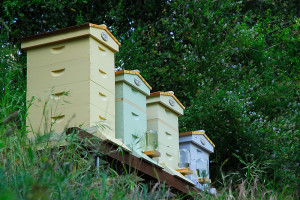
As our hives are clustered close together on the same hive stand, this is why we painted each of our hives a different color.
Studies have shown that drift of workers from one hive to the next can be significantly reduced by making each hive unique in color, or pattern. [1]
Back to the inspection though. Removing the inner cover of the hives we found plenty of activity in the brood boxes. The question was had the bees consumed the marshmallow plugs we installed, and safely released their new Queens?
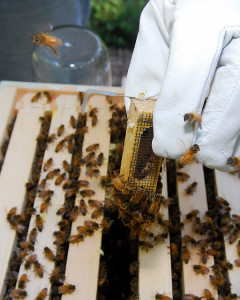
For each of the package hives we removed an outer frame to give us space to work, and then carefully slid out the Queen cages.
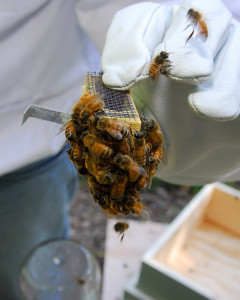
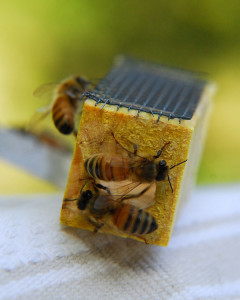
We could see immediately that there were multiple bees clustered at the cage entrance, and a few bees were wandering in and out of the cage, so we knew the plug had been removed.
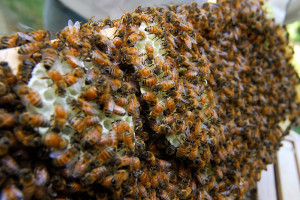
It was obvious that the extra gap created between the frames by the presence of the Queen cages had resulted in the construction of burr comb on those frames, in both hives.
As the comb was fairly new and soft it was easy to slide the hive tool along the top bar to carefully remove the burr comb.
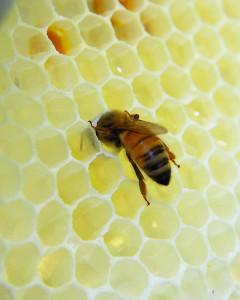
The burr comb was easily removed, although this particular bee, busily slurping nectar, didn't want to leave
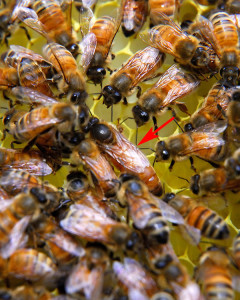
But what about the Queens? We were lucky with this inspection as we sighted not one, but BOTH Italian Queens (both are unmarked, making it slightly more challenging). It helps that we saw them in their Queen cages prior to release, so we knew we were looking for light-colored Queens. The Chamomile Queen was too fast for my lens, but I did manage to catch a photo of the Rosemary Queen…
Except for one frame with burr comb in each hive, the rest of the frames in the hives were being well drawn out. As we’re supplementally feeding both package hives at the moment, there were plenty of nectar stores, but the pollen stores in the comb were low. This is expected as pollen stores tend to increase once brood is present in the hive. We scanned the frames and found no evidence of larva, although we did catch a glimpse of a few eggs. We’ll have a better idea of the laying patterns of the Queens during the next inspection once we can clearly see larva and capped brood.
We wrapped up the package hive inspections by adding a second medium hive body to each hive with new foundation so the Queens will have plenty of space for brood. As the weather has turned dreary we also added half a pollen patty to each of the package hives. It’s probably not necessary, but we had a patty handy, and it will provide them with a pollen source if they can’t forage during this week’s wet weather.
Afterswarm Hive
It had been a couple of weeks since we’d checked on the afterswarm nuc colony that we originally captured in mid-April. Last we saw these bees we had sighted eggs, suggesting our virgin Queen had been successfully mated, and we added a second nuc hive body to give them more room for brood production.
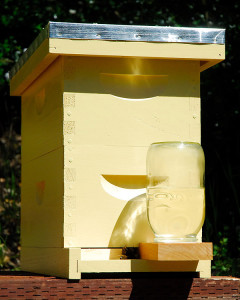
Until now, the afterswarm has been housed in a medium nucleus hive with 5-frames in each of two hive bodies
We estimate that the first pupae will begin to hatch in this hive around the 20th of May. At that point the population will begin to increase significantly, so we felt that now was a good time to transfer this colony to a full sized hive.
We removed the inner cover and found the bees had already drawn out four of the five frames in the upper nuc hive body, and there was capped brood in both boxes.
We could already see drawn and capped comb in the upper hive body as soon as we removed the inner cover
We positioned their new hive on the hive stand, and removed the top box from the nuc and set it aside. This afterswarm colony still has relatively low population. There is continued attrition of field workers, but as no new bees have hatched, the lost population isn’t yet being replaced. As such it’s imperative to maintain the orientation of the brood nest when it’s transferred to the new hive to ensure there are sufficient nurse bees present to care for the brood.
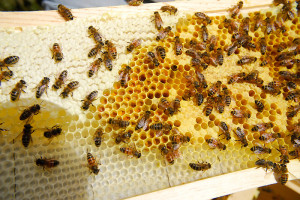
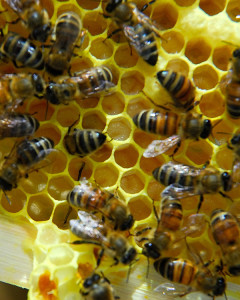
The capped brood is usually toward the center of the frame (right), surrounded by a ring of pollen (center), and an outer layer of capped honey (top left)
Brood nests are typically built in a ball or oval shape across multiple frames. The bees construct the brood nest so that they can efficiently keep the brood warm. Disrupting the shape of the brood nest makes it difficult for the bees to cover the brood and maintain the brood nest temperature between 93-96 F. [2]
The brood nest was moved so that the frames remained in the same position, left to right, top to bottom. The frames in the lower nuc body were transferred to the bottom hive body in the new hive first. Then the upper hive body was added, and the frames transferred from the nuc, being careful to keep the same alignment and orientation as was present in the nuc. As the new hive bodies hold 8 frames, rather than 5, the new empty frames were positioned on the outer the edges of the hive body, keeping the brood nest centered within the hive.
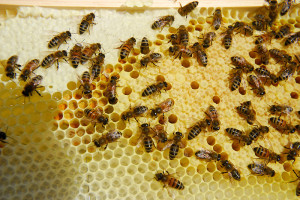
This is our first close look at brood pattern in the afterswarm hive. The brood pattern was excellent, with lots of capped, flat, worker brood, with few holes
As we were transferring the frames though, we had a pleasant surprise. Our first direct sighting of the Queen in this afterswarm colony!
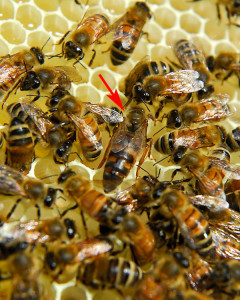
Compare how dark this feral Queen is from the afterswarm, to the pale Queen from the Italian colony shown above
Until now we had no idea what she looked like. Was she light? Was she dark? It turns out she’s very much a brunette, and quite stripey compared to the blond Italian Queens from our packages.
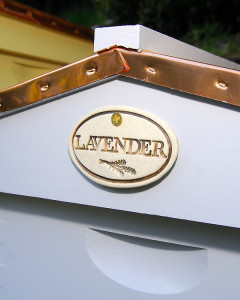
The afterswarm colony is now located in the new Lavender hive, and the nuc hive box was removed from our hive stand.
Lastly, we needed to do a quick check on the original swarm colony in the Salvia Hive. It had been three weeks since we added the third hive body, and it’s obvious even from the hive entrance that this colony is thriving. On warm sunny afternoons between 3:30 – 4:00 PM we consistently see clouds of new worker bees taking their first orientation flights in front of the hive. Someday I’ll strive for video, but here they are just getting started on an afternoon orientation…
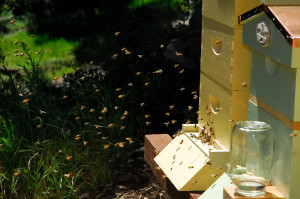
The Salvia Hive was starting an orientation flight while we were transferring the Nuc to the Lavender Hive
We were curious how this hive was doing on space, and whether or not we’d need to add another hive body. The general rule is to err toward slightly too much, rather than too little space, at least while the weather is warm. It’s important when adding new hive bodies, especially if the hive body is destined for brood rearing, to add it to the hive before all of the frames in the existing hive body have capped honey across the top. Conventional wisdom is that the Queen will not cross capped honey to enter a new hive body, so waiting too long can potentially restrict the size of the brood nest!
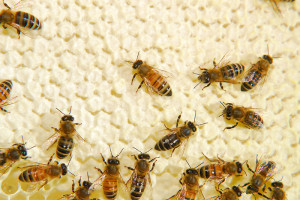
Capped Honey: If all the frames in a hive body contain capped honey, the Queen won't cross it to enter a new hive body placed on top
At this inspection the Saliva Hive consisted of three medium hive bodies, and we were impressed to find both capped and uncapped brood in the upper hive body already. Clearly this Queen is using the extra space we provided last time, and with most of the frames drawn out and occupied, we went ahead and added hive body number FOUR to this hive!
Overall, this inspection was busy, but it yielded the sighting of three of four Queens! The Salvia Hive is getting so large we may never find that Queen, but she’s obviously there, as the hive is thriving. Both of our package Italian Queens were successfully and safely released, so we’ll wait a couple of weeks before checking on them again. We graduated the nuc afterswarm colony to the Lavender Hive, filling up our hive stand…
…and our bustling Salvia Hive now has three hive bodies with brood, so we added a fourth to give them room to grow. The population in this hive has increased considerably in the last few weeks. As we’re running all 8-frame medium hive bodies, the one disadvantage is that the hives can become quite tall as the population builds. Egg production however should begin to slow after the summer solstice, as egg laying is discouraged by decreasing day length, but if the colony gets too large in the meantime, we may have to start thinking about splitting the Salvia Hive into two separate colonies. We’ll have to wait and see…
—————————-
[1] Root, Amos Ives. 2006. The ABC & XYZ of Bee Culture. 41st Ed. p 215-216.
[2] Seeley, Thomas D. 2010. Honeybee Democracy. Princeton University Press. p. 25.






I am very excited to report that a professional beekeeper is going to place three hives at Carolyn’s Shade Gardens. Your posts got me so excited but I knew time for beekeeping was not in my future. Coincidentally a local beekeeper/honey purveyor approached me and asked to have hives here. I am thrilled.
Lucky bees! Congratulations Carolyn! Hosting bee hives is a wonderful way to add bees to the garden without the burden of having to manage and maintain them yourself. I’m sure your plants will benefit from their presence, I know the bees will appreciate the variety of new nectar and pollen sources. I do hope the beekeeper will share a jar or two of ‘Carolyn’s Shade Garden Honey’ in return!
Sounds like everything is moving smoothly in the hives there. Nice to find the queens too.
Our bees are being picked up tomorrow.
We don’t usually fret about finding Queens, as there are usually other ways to tell if the hive is Queen-right from the presence of eggs and larva, as well as general brood pattern. However, as both Queens look like they’d only just started to lay eggs, having visual confirmation that they were both alive and well was comforting. Long live the Queens! I’m sure you’re excited about your bees arriving tomorrow. I’ll be sure to check in!
It looks like it’s going great with the beekeeping! Interesting to learn that the bees learn the color of their hive, I thought they were just painted to make them look nice.
You probably mentioned what the jars of liquid were for on the hives, but I don’t think I saw it. Is it sugar water?
You’re right Catherine, it’s 1 part water mixed with 1 part granulated cane sugar. As our poor bees were having to start from scratch with just foundation, it helps to give them the extra energy they need to efficiently draw new comb. One of the concerns is that after the solstice bees apparently tend to resist drawing new honey comb, so the sooner we can encourage them to do so, the better, so they’ll have plenty of space for brood, and winter food stores. We took the sugar water away from the Swarm (Salvia Hive) after 4 weeks, and I expect it will be about the same for the remaining hives. We make all of our own sugar syrup, and don’t feed high fructose corn syrup like commercial beekeepers do. There are harmful compounds in HFCS that are toxic to bees, and actually have been shown to shorten the lifespan of honeybees by almost a week!
As always I’m fascinated by these posts. It’s amazing how quickly you’ve built up four thriving hives. Had no idea the queen bee was quite so large. She’s almost double the size of the other bees!
She really is quite large, which always make me laugh when we ‘struggle’ to find her! Drones are big too…but in a portly, hefty, big-eyed, and rotund sort of way. Queens however are significantly longer than worker bees, with their wings only coming about half way down their abdomen, and yet still somewhat svelte in their overall appearance. Either our Queen-sighting skills have improved, or we’re just plain dumb-lucky…I’m voting for the latter 😛
Clare, what happens if the queen is killed or dies, both in managed hives and those found in the wild? Is a new one raised immediately?
That’s a great question Donna. If the Queen disappears, for any reason, a hive can only raise a new Queen if there are eggs present in the colony (eggs only exist from day 1 to day 3). These must be fertile eggs (in that eggs from a laying worker, destined to be drones, will not work). Essentially, ‘it takes a Queen to make a Queen’. If she has started to lay and dies for some reason, the colony will feed Royal Jelly to the eggs to raise Queens. The first Queen to hatch will sting any sister Queen eggs that were raised (as insurance) and she will assume the role as head of the hive. If however, there are no fertile eggs, the colony will die. This was our concern with our virgin Queen. If she went out on a mating flight, and didn’t return (she was eaten by a bird perhaps) we’d have no fertile eggs that were able to be transformed to make a new Queen, and thus the colony would be doomed. It’s an interesting mechanism, and providing the Queen is mated has a reasonable fail-safe. If it’s a new unproven queen however, as was the case with our afterwarm, there’s sufficient cause to chew through a few fingernails until we know all is right in the hive!
I feel like I learn so much from your posts. Not that I will remember any of it but you do a great job of explaining what is going on. And I have to say you have the most attractive hives I have ever seen.
Thanks 🙂 Although, the way things are going, I see more painting of hive bodies in the not too distant future!
Thanks for the answer, Clare. I always wondered about this but never researched it. It is really interesting and nature seems to have many circumstances covered. So the laying workers must be like the Digger bees somewhat because each female lays here own eggs in the solitary varieties of diggers. The female also digs the nest and looks for food. Sounds like a human woman. I did not understand that either when I looked up Diggers, how some of them have no queen. The diggers do all this and do not live long enough to see the offspring.
There are a number of solitary bees that don’t have Queens, like our Mason Bees. Because they lack a true hive structure, the Queen isn’t really necessary. All females can lay eggs, and all females can control whether or not the eggs are fertilized. Fertilized eggs are destined to be female bees, unfertilized eggs become male. Insects really are marvelous creatures!
Clare, the hives all lined up with their different colors and labels look so beautiful…I imagine that it’s very satisfying to see them. Lucky bees indeed.
I know there will be a harvesting of honey at some point, but I am enjoying the story, chapter by chapter. This topic series could easily be published as a book for anyone from an older child to potential beekeepers.
Actually, we’re not counting on a honey harvest, at least not this year. Due to the numerous pest and disease challenges facing honey bees these days it’s best to leave the honey for the bees. Our goal this year is to help the bees build sufficient population early such that they can build strong winter stores of natural foods (honey and pollen). We’d much rather the bees have their own honey to sustain them through winter, than feed empty calories in the form of syrup or fondant. We will feed in winter if necessary, but only if they exhaust their own food, which is much more nutritious. I’d love some honey, but I’d rather have healthy bees 🙂
This is absolutely fascinating! You really make the goings-on accessible to someone like me who has never been near a hive and doesn’t know the first thing about bee-keeping. It’s just thrilling seeing your pictures and reading all of this great info – thanks so much for sharing! I will definitely be checking back to see what the “buzz” is over at Curbstone Valley (pun absolutely intended.) =)
Thanks for stopping by Aimee 🙂 Although there’s a lot to learn about bees and beekeeping when venturing into it the first time, it really isn’t rocket science, and we hope that by documenting our experience that someone else might be inspired to give it a try. They’re fabulously fascinating creatures, and I think everyone should have a chance to look in a bee hive…even if it’s only virtually!
Great post! I too keep bees and did a hive inspection today. I’m still learning and I love when people give really nice details on their work with the bees. It helps so much in the learning process. I look forward to reading more of your blog. 🙂
I agree Melissa. I’ve learned more from other bee keepers, either in person, or through their blogs, than I have in most of the books and journals I’ve read. Although I’m a visual learner, and just seeing a photograph is worth a whole chapter of text. Oh, and as for the ‘still learning’ part, I expect the bees will always have something new to teach us 😉
Love the lineup of colorful hives … and to think that that stand was empty not that many weeks ago.
Do you know if the Italian queens were allowed to have their mating flights? or were they artificially inseminated? if the latter, with semen from just one or from several drones? (Just wondering if the genetic diversity in hives with a purchased queen might be less than that of a feral hive.)
I’ve also wondered about the unpainted (or painted a different color) bands that are sometimes between boxes in the hive – currently appearing between the top and second boxes in the Rosemary and Chamomile hives. Is that part of one of the boxes? or an insert of some kind?
(I’ll keep my questions about hive splitting for another day 😉 )
Isn’t it crazy? We thought we were just going for two hives this year! If we’re not careful, we may end up with five!
Our Italian Queens were wild bred, not artificially inseminated. You can purchase specifically bred Queens, which I agree, tend not to be as genetically diverse. Although I do wonder if an Italian Queen being wild bred at a commercial apiary really is any more genetically diverse. Because these Queens were wild bred, this is why our packages were delayed. March was so rainy in northern California that the early spring Queens couldn’t take their mating flights. Thankfully April was much better weather-wise. Although until we can assess brood pattern we won’t know if they’ve been well bred.
The unpainted bands visible on Rosemary and Chamomile at the moment are the edges of the solid inner cover. At the moment each of those hives have two hive bodies filled with frames of foundation, with the solid inner cover on top. Above the inner cover is an empty medium hive body. This allows us to place food (nectar and/or pollen) on top of the inner cover (which isn’t really solid, there’s an oval hole in the middle of it). The bees can reach the food, but it keeps it out of sight of robbers and thieves. In winter we’ll only feed inside the hive, but during this part of spring, when the risk of robber bees is low, we’re front feeding with syrup. This allows us to better see how much feed each hive is consuming, and when to re-feed. It’s imperative though that the feeders aren’t leaking at the entrance, or we’ll have hoards of ants in no time. Maybe in the next post i’ll show how we made the feeders.
Another advantage of the empty medium, at least in the case of swarms, is that some believe it helps to provide the illusion of additional space to the bees when they’re first settling in, to encourage the swarms to stay. Of course, in cold weather, this can make the hive more difficult to heat, but in our mild climate that’s rarely an issue.
I just love the different colored hives. It reminds me of the painted ladies in San Francisco!
Beekeeping is such an art and a science!
Great minds! We had the same thought when we saw them all set up on the hive stand. They reminded us of the ones near Alamo Square in SF all lined up in a row 😛
Clare it is so good to get a virtual view from inside a bee hive and even see the Queen bees. Not only have I enjoyed your post but there’s just as much again in your comment section. Your bee keeping journal will certainly be a great help to others starting out and it’s a fascinating read for me.
Glad you’re enjoying it Rosie. I’m always amazed there’s so much to write about! 😉
Things are looking great!
Although I think I have great pattern-recognition skills, I can never ever spot my own queens.
The speed at which the bees work is truly amazing, isn’t it?
The bees constantly amaze me, and I’m so happy with how things look, especially in the Lavender hive. As she was a virgin Queen, we just had no idea how that was all going to turn out. Seems she had no trouble finding a date though 😉
I did really well spotting a friend’s Queens, but until this inspection I was awful at finding my own. Having some idea what to look for is helping, but darn it, those dark Queens are tough to see! She’s just stripy enough that she blends right in with all the workers. The Italians (to my eye) stand out more as they’re relatively stripe free. I’m guessing the Salvia Queen is dark too…but we’ve never seen her.
Okay, maybe a stupid question here, but how do you stop a hive from growing? I’m thinking at some point you just can’t keep adding hive bodies?? It seems to me this could get outta hand if they start deciding that there isn’t enough hive body to go around and they decide to take up in some tree at the elementary school? (shows you what I know , which is nothing) 🙂
Nope…not a stupid question at all. To give the bees more room, you can simply harvest honey, so the Queen has room to lay more eggs. Unfortunately, if not done correctly you can end up with a large bee population, but then head into winter without enough resources, and the hive can starve.
As beekeepers we all want the Salvia hive…the hive that is doing so well that it’s almost a ‘problem’. Truly robust hives are less common these days, but it’s generally the sign of a healthy colony. The type of colony you’d like to propagate.
If the colony is building up well enough, early enough in the season, the best thing to do is to ‘split’ the hive. You take a couple of frames of eggs and brood, a couple of frames of honey and pollen, and enough nurse/worker bees to tend to the young, and place them in a small nuc hive. Like the hive our afterswarm (Lavender) hive started in. Providing they have eggs/larva at the right stage they’ll make their own ’emergency’ Queen. The downside is she’ll be a virgin Queen at hatch, so it may be a month before she herself is laying eggs. If this is done too late in the season (after the summer solstice) there’s a risk the colony won’t have time to build up population because it takes time for the Queen to lay, and then 20-21 days before the workers hatch. They also many not build up enough honey/pollen stores in time for winter. However, if they do, you end up with two hives instead of one. At the moment, as many beekeepers are losing hives over winter to a number of bee maladies, the more hives you have going into winter, the more likely you are to have some surviving stock by the following spring.
Very interesting reading, including the comments and your responses! I love the way your hives look like upscale condos, and obviously your bees are flourishing in their new digs.
They do seem happy so far. Although, spring is usually a time of successes in beekeeping. Late fall and winter however is when problems tend to crop up. The healthier our bees are now though, hopefully the better they’ll do in the more challenging months of the year.
Always fascinating reading. Is there a particular reason for painting the hives the colours you did?
Not really. I avoided dark colors. The hives face directly South on an elevated slope and I was concerned about the hives gaining too much heat with dark colors in mid-summer.
Other than that, it was mostly personal preference. I leaned toward more naturally occuring colors that worked with the copper roof…and the ‘Lavender’ hive had to be, well, lavender!
Bees actually have very limited color vision in the visible spectrum. They don’t see red at all, they’re red-blind. Of studies I’ve read on drift, which is mostly a concern for beekeepers breeding Queens, differing patterns on the hives are more effective at preventing drift (and Queen loss) than the actual color per se. Painting a mural on a hive would be more effective than a hive a solid color. As I’m artistically challenged though, I’m hoping our bees are smart, and can read 😛