A lot has happened since we last posted about our goat shed construction. We’ve had word that the first of our reserved doelings was born on Sunday night, and we can’t wait to meet her. We’re also crossing our fingers for a doeling from the next doe we have a reservation on, and that doe is on kidding watch now. Needless to say, there’s more excitement in the air here than the night before Christmas!

Last we posted, the siding was going up in between rain showers
Back to the barn’s progress though. We left off last time with a view of the barn partially sided, and tarped due the intermittent rain showers.

A few weeks ago we started with the foundation...
Lucky for us the last couple of weeks the weather has been tremendously cooperative for February. As much as the gardens have been desperate for rain, we’ve been so grateful that the real wet weather held off until today. It finally rained this morning, almost 2 inches since midnight, but most of what’s left to finish on the barn is inside, where it’s warm and dry, so we can wrap that up later this week, rain or shine.
We’ve actually accomplished quite a lot in a few short weeks. After prepping the site and pouring the foundation at the beginning of February, we quickly moved on to framing out the structure.

The shed quickly took shape as the walls were framed
Since then we’ve completed the siding installation, including some rather fiddly pieces along the gable wall ends, and we’ve installed the redwood gable wall vents.

Redwood Gable Vents
I just love how these look, so much more attractive than the metal vents.
It’s always interesting to see how quickly the framing goes up on any structure, but then how slowly the rest of a building such as this seems to come together. What looks relatively simple and straightforward on the surface, actually takes a lot of time to put together.
Part of the roof framing was complete when we last posted, but we also needed to frame out the roof over the deck, which is connected to the main roof.

The rafters appeared to be too short on the front of the shed at first
In this picture we noted that the front rafter tails were truncated to accommodate the deck roof. It looked a bit lopsided, but now you can probably see there actually was a method to our madness.

With the addition of the deck roof, the overhang was extended over the front door
This broken-back style of roof as it traverses over the deck makes the roof line a little more interesting. It also doesn’t block as much sun from entering the face of the barn as a steeper roof pitch might. Aesthetics aside, it’s functional too. By shallowing out the slope of the roof we increase the vertical clearance underneath, and eliminate the risk of a self-inflicted concussion when approaching the barn from up slope.

With the framing complete, the plywood roof sheathing was installed
This last weekend, with some extra help, we finally managed to finish the roof installation. The plywood roof deck went down, leaving notches at the ridge for ventilation under the ridge cap. A layer of tarpaper was laid down over the sheathing, followed by the metal roof panels.

These gaps in the roof deck will sit under the ridge cap, and allow warm moist air to be vented from the barn
With some minor roof framing modifications, we could have installed the metal roofing directly over the roof rafters (we did do that over the deck), but metal roofing can be deafeningly loud during heavy rains, so we opted to install the plywood underneath for a little sound deadening inside the barn.
Also, the type of roofing we chose has a number of ridges and valleys across each sheet, which makes blocking rodents from entering under the roof eave more challenging. The foam strips you can buy to block those gaps are like caviar to rats and mice, and simply don’t last, so although the plywood was an extra installation step, it will be worth it just to keep the woodland creatures at bay.

Cutting the roof panels to length was labor intensive, even with a sheet metal cutter
Of everything we’ve done during the construction of this shed, this task, officially, was my least favorite part of the entire project. Cutting the metal roofing panels. Even with a power sheet-metal cutter, trimming these 8 ft x 3 ft roof panels was a royal pain in the derrière, to say the least. Sheet-metal cutters are designed to cut FLAT sheets of metal, and the peaks and valleys in these Galvalume® panels made trimming these panels to fit more than a little challenging, not to mention the cut ends were lethally sharp!
With perseverance though, the panels for the front side of the barn, and the deck roof, were finally all trimmed to length, with no fingers harmed, and the last of the roof was installed (in the dark, under the glow of headlamps), along with the ridge cap, well in advance of today’s storm. I’m happy to say, the roof IS watertight, as it has been tested with plenty of rain since midnight!

We finished the roof in time for the rains to return
In between roof framing and installation, the fence installers had begun the herculean task of fencing in a secure day yard, on less than ideal terrain. They couldn’t begin this part of the project until the height of the roof over the (as yet unbuilt) deck was established. We couldn’t work on the barn while the installers were building the enclosure.

With the deck roof height established, work on the enclosure could begin
As important as the barn is for keeping the goats safe from predators, it’s only half of the equation. We can’t keep the goats locked up in the barn all the time just to keep them safe. They need fresh air, and sunshine, but in a secure area where curious coyotes, and boisterous bobcats, can’t get to them. At night, we need to ensure that the goats don’t become haute cuisine for the local Mountain Lion population too.

Discussing what was possible on the slope, we roughed out a plan for the covered enclosure
After discussing our fence requirements with the installers, we worked together to design and install an enclosure to help keep the goats safe from all the predators that wander through the farm, day or night.
Our two priorities were that we could walk inside the enclosure without banging our heads on the roof, and that IF a predator should succeed in climbing the fence, and stand on the roof, that it can’t fall through into the enclosure. Mountain Lions have been known to scale 15 foot vertical fences, but we had NO intention of installing a fence that high, so the only logical solution was to cover the entire enclosure. It’s not cheap to build a covered enclosure, but it’s very effective, and for us it’s worth it for the peace of mind.

A chainlink roof may not be particularly attractive, but it's a small price to pay for herd security
In fact, at a recent Mountain Lion informational forum at the University of California, Santa Cruz, conducted by professor Chris Wilmers, it was pointed out that although humans don’t need to be unnecessarily alarmed about the presence of lions, professor Wilmers advised goats owners to consider keeping their goats in a “fully-enclosed mountain lion-proof structure“. This is as much for the well-being of the lions, as the goats. In my personal opinion too many lions are depredated each year as a result of livestock kills that could have been prevented, but I digress.

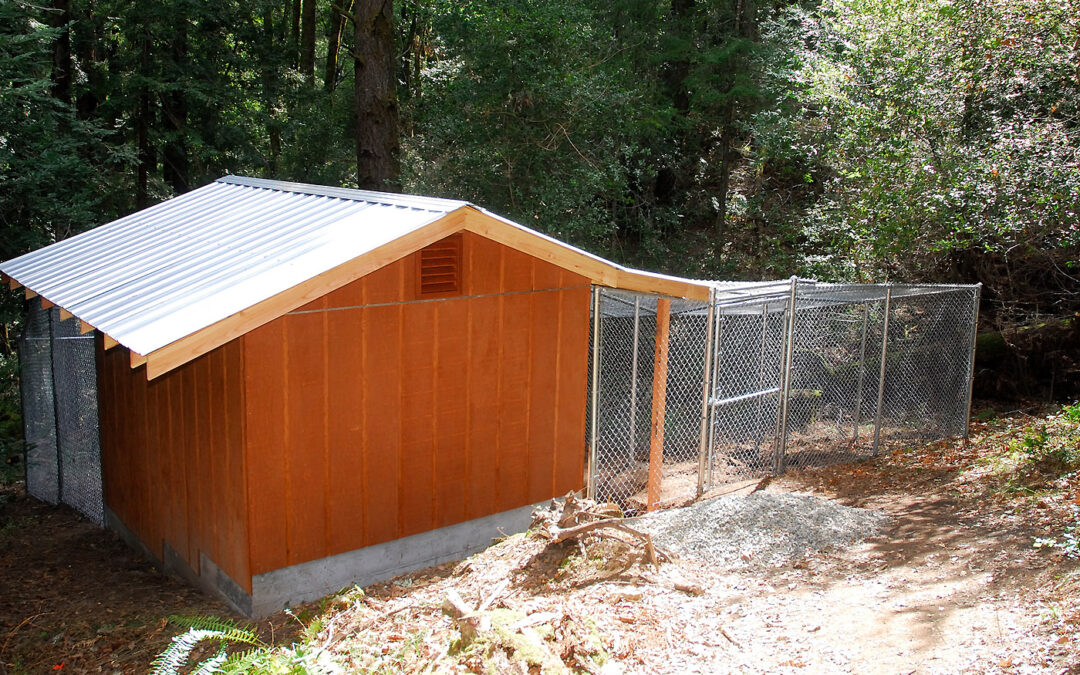
The enclosure consists of a perimeter 7ft fence, with a chain link cover across the entire area
We’re fairly certain that our variable terrain gave the fence folks a few ulcers, but they were very creative, and efficient, and have now finished the enclosure. Most of the enclosure is 7 feet high, providing plenty of clearance for us, although part of the enclosure runs closer to 8 feet in height, but this was because the slope drops off on the far side of the barn, and we needed to keep the barn ‘windows’ INSIDE the covered area.

The three windows in the barn are all situated below the roof of the enclosure
We have a couple of areas left to tweak once the deck is installed, to ensure that predators can’t dig under where there’s a sudden change in grade, but other than that, the enclosure is finished!
Meanwhile, back at the barn, I was busy constructing the shutters for the windows.

During cold weather the shutters will allow us to close up the windows as needed
As we mentioned last time, we’re not using traditional glass windows.

'Windows' along the south wall
Instead we’ve constructed vented openings, and are using shutters to help regulate air flow in the barn.

We used metal screens for the windows, rather than glass
These were quite simple to put together, using expanded metal sheets for the ‘windows’.

The expanded wire sheets were painted to inhibit rust
The sills are trimmed in redwood, as it will be resistant to moisture.

Solid redwood sills will resist moisture and decay
Shaping the edge of the window sills was a perfect excuse to break out the router.

The router made quick work of easing the edge of the window sills
The shutters were installed with a top hinge, and can be propped open as needed.

We'll make some longer supports to hold the shutters open, these were just to keep them open while the stain dried
The barn’s dutch door is also finished, and the hinges will be installed tomorrow once the rain finally moves on.

The dutch door for the barn was built to match the rest of the building
In our ‘spare time’ we also put together one of the goat’s sleeping benches for the barn. I suspect we’ll be making more of these, probably at various heights, as they’re so easy to construct.

The goats will likely sleep on these benches, and jump around on them for fun, but as they're redwood, they should last a long time!
The goats can use them either in the barn for sleeping, or outside as play structures, in addition to the various stumps and rocks we’ll add to the goat yard for them to climb on.

We used the router to soften the edge of the bench too, as we'll likely find ourselves sitting on it from time to time
In addition to building the barn, and getting the yard fenced, we’ve also had to take the time to source, and stock up on, other goat supplies…like these gate panels for inside the barn,

These gates will be used to help partition some of the areas inside the barn
and stall mats.

Stall mats will help to take the chill off the concrete floor
Finding various feeders, like this one for feeding loose minerals,

Feeder for loose minerals
…and hay feeders.

The hay feeder will be fitted with a lid to keep adventurous goat kids from climbing up into it
We’ve also added a stanchion. This compact model was especially designed for dwarf goats, and easily folds flat for taking to shows. Eventually this will be used as our milking stand, but we figure it’s never too soon to acclimate the goats to the concept of a stanchion.

This stanchion is designed for dwarf goats, and although we won't be milking for at least a year, it will be useful at vaccination, and hoof-trimming time
Of course, we also needed to be sure we had at least a few of these around too!

When the babies arrive, they'll be bottle fed...so we've stocked up on bottles too!
This week we’ll need to stock up on bedding straw, and hay, and next time we show you the barn, the inside should be finished, the last of the trim will be stained, and the deck installed.

The new goat barn!
Hopefully we’ll have some baby goats to show you too! We can’t wait…stay tuned!


Oh, my goodness! When can we come visit?? (Fair warning – you may never get us to leave). Absolutely gorgeous work – stunning!
Thanks Nicole, and I promise, soon! We’re thinking of organizing some sort of spring fling/welcome the goaties to the farm shindig soon 🙂
Oh wow! It’s beautiful and you did such a great job. I’m amazed and impressed by all the work and planning you put into this. We used the prefab galvalume on a DIY shed and porch project so I know what a pain it is.
I’m new to your blog but will take some time soon to check out the older posts.
Thanks for stopping by Shirley. The Galvalume was a pain, but on the upside, once it was cut, it installs very quickly, and I quite like the look too. Very barn-ish 🙂
I suspect that you are hiding a few goats around somewhere to surprise us?
I wish I was! I haven’t even seen a photo yet of our little doeling…the suspense is driving me slightly crazy, but I know we’ll get to see her soon. Cross your fingers that the other doe has a girl too! I promise, as soon as the goats arrive at the farm, the whole world will know 😉
Awesome diggs for the goats! Looking forward to seeing their adorable faces!
Me too, we haven’t seen the first doeling yet. The second doeling didn’t work out, as the doe didn’t give birth to enough girls. It happens, but it means we’re now trying figure out who her replacement might be!
I can’t wait to see your new goats! How are your turkeys doing?
The turkeys are doing great, although they probably don’t understand what all this fuss about goats is 😛
What a project! Is it strange that the most exciting part to me was the bench?
I saw some goats recently that had a large tortoise to use as a climb-on-top-of plaything. Considering adding one? 🙂
Well, our bench isn’t quite as fancy as the one in your post 😉 However, it is sturdy, and expect it can handle almost anything our goats will throw at it!
Congratulations, Clare and Mr Curbstone! Those lucky goats…. Are you researching goat’s milk soap recipes? I’ve heard it’s very fun to make. Sue
PS, thanks for your ID on my “pokeweed” I’m hoping you’re right!
I think between beeswax, honey, and goat’s milk, we’ll definitely be working on soaps and lotions in the future. We have an assortment of fragrant herbs in the garden we can use products like that too 🙂
I hope the ‘pokeweed’ turns out to be a chokecherry after all!
The baby goats will come home to a pretty fancy nursery, won’t they? You have really gone to a lot of work to create the perfect home for them. Can’t wait to see them. Little goats are so sweet.
There’s no question they’ll be moving into 5 star accommodations. I just hate rebuilding enclosures any more than necessary, so I’m usually motivated to make them sturdy the first time around 😉
Very fancy, all you are missing is a nice stone entrance way, maybe a nice little archway 😉
Lucky goats
Oh, that sounds lovely, but sadly my masonry and dry stone walling skills are somewhat lacking 😛
This is an amazing addition to your farm. These goats are so lucky to have you as their caretaker, and this structure seems as if it will last a long time. I am looking forward to seeing the goats living in their new shed. The young ones, I bet, are adorable.
The shed and enclosure are definitely durable. Hopefully they’ll prove to be practical too. We have a couple of finishing touches to do, including building the deck, and installing the corner boards on the siding, but it feels good to have it mostly done!
You are SO going to enjoy this building (to say nothing of its inhabitants) – all the effort and finishing touches will give you pleasure – and peace of mind – for years! Will you take the girls out for walkies? When we had our pet boer goat, Wee Davey, I loved having him follow me around when I was working out and about. I can’t wait to see the babies’ arrival!!
The girls will definitely be going for walkies, for some exercise, and browsing on the property. We have plenty of places to take them, we just need to be careful of having them run loose in some areas though. Nigerian Dwarfs run quite low to the ground, and plants like our enormous thorny blackberries have the potential to cause udder injuries, so leash walking will give us more control over the girls roam. Having them accustomed to leash walking will no doubt help for showing them in the ring too 🙂
Oh, my! Mountain lions! I didn’t realize you had such predators to think about! Great planning, and what a lot of work. But it is gorgeous, and those new little ones are sure to be thrilled with their new home!
Mountain lions are definitely a worry for goat owners up here. It seems that every time we go the local feed store we hear about more livestock kills. I don’t have an issue with the lions at all though, this is their home, and their habitat in this area is already fragmented. We just have to be savvy soon-to-be goat owners and plan accordingly.
Awesome! Great job. I am a bit jealous. I am more of a sheep person, but the structure is great.
I like sheep, but this property is much better suited to browsing goats, than grazing sheep. We are a little shy on pasture land here with all these steep slopes! 😉
Oh Clare I adore this shed and all the parts you added…the fence does look like a lot of work but well worth it for peace of mind…those benches look wonderful and I am sure the goats will love them….i want one!!
Haha, well, those benches are super easy to build. A 4×4 post, and a couple of 2x6s, with a smattering of deck screws, and voilà! 😉
You did an amazing job as usual. The goats are going to love it.
I hope so! I think I’m going to love it too 😉
I love the shed especially the chainlink enclosure so the goats will be completely safe. But the anticipation is killing me. I can’t wait to see the goats!!!!
The anticipation is killing YOU? I think I’m going to explode! 😛 The good news is I just replaced the video camera that I drowned last spring during one of our massive storms, so once we get the second doeling picked out, and bring them both home, we should have some video to share!
Sorry the second doeling didn’t work out. I know that you guys are super-resourceful and will come up with a good Plan B.
As for the shed, many humans live in shelters that aren’t as nice as our goat house.
Have you ever considered fiber goats like pygoras?
We have a couple of potentials for our second doeling, but we’re going to wait and see who ‘hatches’ this weekend before finalizing a decision.
I think this goat barn is nicer than our own house, but they deserve it.
If we had more room here (less woodland, less slopes), and didn’t have to build Fort Knox-like enclosures for all our animals, I’d love to have some fiber goats…and maybe a few Merino Sheep too! I love knitting with Merino wool, but it’s just so darned expensive 😯
I just bought my second fleece. You have to be sort of insane and detail-oriented to process your own fiber. And looking in the mirror, I think that’s about right. Since I live on a tiny postage stamp of land, there are no fiber animals in my future.
Illustrates so well the amount of thought and planning needed to house your goats but how do you manage to make every stage of operation seem so smooth, organised and frankly beautiful? The painted wire sheets image would make a wonderful modern print for the goathouse! Am as excited as the kiddies now.
It actually was important to stay organized while building this, or the whole construction of the shed would have taken much longer. I actually started by clearing out and reorganizing the workshop before we did a single thing to the shed 😉 I wonder if our goaties would appreciate modern art? I suspect they’d be too tempted to nibble on it…they’ll have to enjoy the real thing instead 😉
Wow, it’s just amazing how this is coming together. I agree, the windows you’re making are so much better than glass – and won’t get dirty. Will be fun to see the little ones arrive. No turkeys or chicks this year, or are you just to busy writing about other things?
We’ve barely had time to come up for air the last month. Our hens are still laying plenty of eggs, and thanks to Jenny’s ridiculous success last year with the poults, we’re not short on turkeys either! I think in the interest of focusing on raising the goats this year, we’re going to skip chicks this season, and wait until next spring…otherwise the garden won’t see me until June! 😛
Boy, the goats have it made. Great job, Clare. All ready for babies too.
With as much time as I expect to spend in this barn, I thought we should make it nice. The goats are spoiled, and they’re not even here yet! 😉
That enclosure looks great, very secure and well built. Really looking forward to seeing your goats and kiddies.
The fence installers really did a good job, and they got it done on time. I think it may have raised a few eyebrows with the neighbors, but they got used to seeing nothing done around here for 25 years before we showed up 😛
Once again Clare I’m so impressed with how well thought out your building is. I wondered when I saw the chain link going across the top but as soon as you mentioned cougars I realized that of course they would be able to climb up and get inside. Glad you realized this and were able to build the right structure the first time around.
Every study I looked at that was trying to determine the best fence to keep cougars out (most of the studies were for sheep), the end result was the same. You can’t make one tall enough, or electrified enough, to exclude them with any confidence. Putting a lid on the enclosure though should make all the difference, and as these are dwarf goats, I think it’s a more practical approach than trying various combinations of fencing, both electrified, or not.
And I thought your chicken coop design was impressive. This isn’t a goat shed; it’s a goat resort! Really, everyone should be very comfortable there.
Shhh…don’t tell the chickens, they think they have it good now, but if they see the goat shed they might start making demands 😛
Those will be some lucky goats. That structure looks fantastic. Well designed and well built. Congrats. Can’t wait to meet the kids.
We can’t wait to meet the kids either…I’ve heard a rumor it’s going to be very soon 😉
I echo all the compliments above! Your goats are very fortunate to come to attentive and caring owners who have put so much effort into making a good home for them. As always, well done! When I need a garden structure built, I wish could hire you!
I’ll be happy if we’re done building structures for a while. After this project, I don’t mind admitting we’re both pretty worn out! Looking forward to using it for its intended purpose though, and I’m sure as soon as the babies arrive on the farm, we’ll forget about all the Ibuprofen it took to build it 😉
Marvelous!!! Will serve as a model for our pred-proof banty house!!!
If I was constructing something for poultry, the only major difference would be no chain link fence, but the shed structure itself would make for a pretty swank coop!
Clare, I have to say, when you do something you do it right. Your farm is gorgeous and inviting on all levels, from the beautiful beehives to this very smart goat house. You do inspire me, truly!