As much fun as it is for us to now have goats bouncing around the farm, the part we’re most looking forward to is having our own farm-fresh goat’s milk.
However, Lotus and Minnie are only 4 1/2 months old, so it’s going to be a while before these girls are in milk.

“Lotus, I think the farmers expect us to earn our keep!”
In the meantime though, there’s nothing to stop us from venturing into cultured cheese and butter making. We started out by hitting the books over the last few weeks (see resources below).

Goat’s milk Chèvre is simple to make
Chèvre, Fromage Blanc, and Cabécou, are some of the simplest fresh cultured cheeses to make, both in regards to equipment required, and the relative simplicity of the cheese-making process. Although many consider cheese-making to be an art, it is, at its core, very much a science. The more complex the ingredients, or aging process, the more opportunity there is for something to go awry. As much as we’d love to delve head first into crafting an aged cheddar, or Stilton, it makes much more sense to start out with something simple.
So, as a novice cheese-maker, yesterday I decided my first foray into cheese-craft should be a simple Chèvre.
The equipment required was straightforward, and with the exception of the butter muslin, everything else was standard equipment, and already part of our kitchen arsenal.

Butter muslin is more tightly woven than conventional cheesecloth, and used for draining soft cheeses
Sourcing the right milk, however, was not so simple. The most important component of cheese making, obviously, is the milk. Ideally it would be our own fresh milk, from our own goats, but purchased milk will also work. Not all goat’s milk on the grocery store shelf is equal though.
The only goat’s milk available in our local market was ultra-pasteurized.

A lot of mass distributed goat milk is ultra-pasteurized
Ultra-pasteurization extends the shelf life of milk, and as goat’s milk is not as popular with consumers as cow’s milk, at least not at our local market, product turnover is quite low. As such, there’s no incentive for some markets to stock goat’s milk that isn’t ultra-pasteurized. If we only intended to drink the milk, ultra-pasteurization might be fine. However, ultra-pasteurized milk can be very problematic for cheese-making.

Of course, the best milk for cheese-making comes straight from the goat! Right Lotus?
The higher heat ultra-pasteurization process irrevocably alters the structure of the milk proteins, and much of the calcium becomes chelated, affecting coagulation. As there is no cheese without coagulation, it’s important to read the milk carton to help ensure a successful homemade cheese product.
Fortunately, we have an abundance of specialty food markets nearby, and it didn’t take too long to find conventionally pasteurized goat milk. This milk was higher in protein, and butterfat, than the ultra-pasteurized product. More the better!

Conventionally pasteurized goat milk is available, but it may take more effort to source it
As goat milk isn’t cheap (almost $4 a quart locally), ultra-pasteurized or not, it was worth it to take the time to source the right product.
With milk in hand, the next step was to assemble and sanitize the cheese-making equipment, as well as the kitchen counters and sinks. As with any cultured food product it is imperative the only microbes being innoculated into the food are desirable ones. A spotless kitchen is mandatory for cheese-making, as is the use of equipment that can be sanitized.
First, the dogs were banished from the kitchen. Then the counters and sinks were bleached with a 10% solution, and rinsed thoroughly.

A simple 10% bleach solution was used for cleaning counters and sinks
The stainless equipment was first washed in hot soapy water, thoroughly rinsed, and then sanitized in an iodophor solution.

Bleach will pit stainless steel. Iodophor sanitizers are still effective, and much kinder to your kitchenware
Fortunately, we also make beer, so we already had Iodophor on hand, but any brew-supply vendor will carry it.

Soak the stainless tools in the Iodophor solution for a minimum of 10 minutes before using
With everything clean, FINALLY, it was time to move on to the fun part. Making cheese!
Note that although cultured Chèvre doesn’t take much active time to make, the cheese does need to be drained approximately 12 hours after the addition of the starter culture. As such, it’s helpful to start this recipe in the early morning, to avoid the need to drain the curds at 2AM.
Fresh Chevre
Yield: 1 Pound
Active Time: 25-30 Minutes
Inactive Time: 18-24 Hours
Equipment
6 Qt Non-reactive (stainless steel or enameled cast iron) heavy bottom stock pot
Slotted spoon (stainless)
Balloon whisk (stainless)
Butter Muslin
Non-reactive colander and large bowl for draining
Cheese Molds and draining rack (optional)
Thermometer
Ingredients
1 Gallon Goat’s Milk (not ultra-pasteurized)
1/2 tsp of Chèvre C20G Mesophilic Starter Culture
1/2 tsp finely ground sea salt
Directions:
Over low heat, heat the milk for 15-20 minutes, until the temperature of the milk reaches 86F.

Goat milk
Don’t rush heating the milk, or it may scorch.

The thermometer is probably the most important piece of equipment for cheesemaking. The goal is to warm the milk, not cook it.
Once the milk has reached temperature, remove the pan from the heat.
Sprinkle the C20G starter culture over the warm milk, and allow to stand for five minutes. Once the starter culture is thoroughly hydrated, use a balloon whisk to incorporate it in to the milk.

Allow the culture to hydrate before whisking it into the milk
Cover the pan, and allow it to stand, undisturbed at room temperature (72-78F), for approximately 12 hours.

By 6 hours the curds are clearly forming, but the curd mixture is quite loose
As the proteins coagulate, the curds should form a thick mass, floating on the surface, surrounded by clear whey.

By 12 hours the curds have formed a thick mat, floating on the surface of the whey
Line a colander with damp butter muslin, and carefully scoop the curds into the colander using a slotted stainless steel spoon.

By 12 hours the curds break cleanly as they’re scooped from the whey into the muslin
Allow the curds to stand for a few minutes, as the excess whey drains, and then sprinkle 1/2 tsp of fine sea salt over the curds, and gently toss.

It’s beginning to look like Chèvre
To drain, the tails of the muslin can be brought together, and the curds either left in the colander set over a large bowl, or the muslin can be hung up over a sink or bowl, for 6-12 hours, at room temperature.

The curds are covered with the muslin, and allowed to drain for up to 12 hours at room temperature
Alternatively, the curds can be placed into soft cheese molds, and set on a draining rack.

A Chèvre mold can also be used to shape the cheese
Shaped cheeses should be drained longer, as the more the curds are allowed to drain, the more firm the cheese will become.

This molded Chèvre was allowed to drain for 12 hours, and flipped once during draining
Once the Chèvre is of the desired consistency, the cheese can be removed from the muslin or cheese mold, and refrigerated for up to a week (if it lasts that long…I know this batch won’t). The cheese can be eaten as is, or coated in fresh herbs, or chopped dried fruit.

Herbs, like thyme fresh from the garden, pair well with the tangy flavor of fresh Chèvre
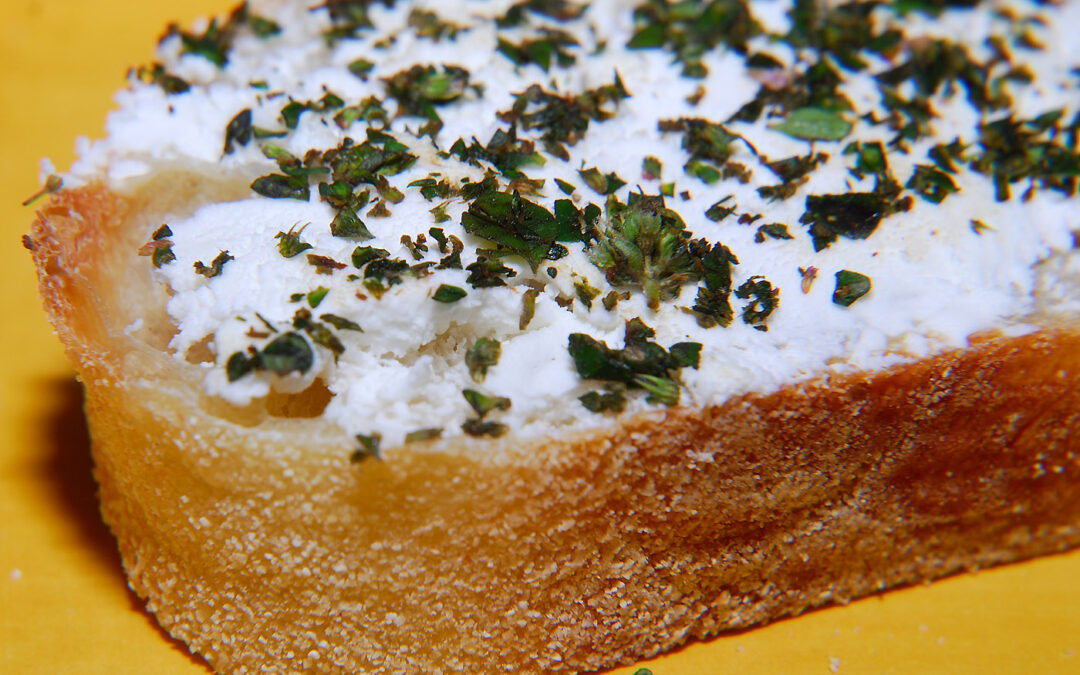
You can simply serve the cheese on crackers, but while I was waiting for the cheese to drain, I made a couple of loaves of sweet French bread, as my cheese vehicle of choice.

Homemade Chèvre + homemade French bread = lunch!
I must admit, there’s something rather gratifying about crafting one’s own cheese, even a cheese as simple as Chèvre. As goat’s milk is relatively expensive, it cost almost $16 to make just one pound of homemade Chèvre, so I doubt we’ll make this too often, although for the flavor, it’s worth it!

“Milking? Really? I thought the stanchion was for sleeping on!”
However, once the girls are in milk, I suspect we’ll be making a LOT of cheese…

Homemade butter was traditionally shaped using butter molds, like this round vintage carved mold
…and maybe even some cultured butters too, so I can finally put this vintage butter mold to good use! First though, there’s some fresh cheese in the fridge with my name on it…
———————–
Cheese-making Books:
Fox, Patrick F., Timothy P. Guinee, Timothy M. Cogan, and Paul L. H. McSweeney. February 2000. Fundamentals of Cheese Science. Aspen Publishers Inc., MD.
Hurst, Janet. March 2011. Homemade Cheese: Recipes for 50 Cheeses from Artisan Cheesemakers. Voyageur Press, MN.
Karlin, Mary. August 2011. Artisan Cheese Making at Home: Techniques & Recipes for Mastering World-Class Cheeses. Ten Speed Press, CA.
Kindsedt, Paul. May 2005. American Farmstead Cheese: The Complete Guide to Making and Selling Artisan Cheeses. Chelsea Green Publishing Company, VT.
Le Jaouen, Jean-Claude. 1987. The Fabrication of Farmstead Goat Cheese. Cheesemaker’s Journal, MA.
Cheese-making Cultures and Supplies:
The Beverage People, Santa Rosa, CA.
New England Cheesemaking Supply, South Deerfield, MA.
Dairy Connection, Inc., Madison, WI.
Glengarry Cheesemaking and Dairy Supply, Ltd. , Ontario, Canada


Fascinating!
(My initial thought when reading the title was “those little goats can’t be producing milk already!”)
No, you’re right, the girls are still too young. I’m just a little impatient, and figured it doesn’t hurt to practice my cheese-making skills now. Then once they’re in milk, I’ll be ready! 😉
So Cool! You make this accessible to people like me. My wife would love this. Where do you source the starter culture?
We actually have a specialty kitchen/homesteading supply store near us that stocks the C20G starter culture. If you don’t have a store locally that stocks cheese-making equipment, there are a number of vendors online. I use The Beverage People, as they’re close to me (link is at the end of the post), but the New England Cheesemaking Supply is probably closer to you. They also sell online too. The culture usually comes in a pack of 5 small envelopes, and you can freeze it until you need it, so it’s nice to keep on hand. Alternatively, they also sell cheese-making kits*, like this one:
http://www.cheesemaking.com/store/p/170-Fresh-French-Goat-Cheese-Kit.html
It comes with the same C20G starter (and a C3 culture) along with four basic cheese molds, rennet, and butter muslin too! Would probably make a great gift for your wife, and you get to sample the results!
*I’m in no way affiliated with any of these companies, I just love cheese 😛
I am really amazed at your continuing search and expansion of your production in the farm. We have some goats too, but we just sell them for meat. You are also very technologically modern!
In a perfect world, we’d have a lot more room, and a lot more goats! 😉
Wow! I doubt I will ever make cheese, but I think it may not be too hard to make this! The end product looks delicious, especially combined with your freshly baked bread!
This was remarkably easy. Heat milk, whisk in culture, wait, drain, and eat! 😛 It’s more difficult to make a chocolate cake, than this cheese. I don’t know I why I didn’t try it sooner!
Wow, that looks so awesomely delicious! I love goat cheese. My mother-in-law makes fresh paneer from cows milk every so often and makes it look so easy that I really should try to make it sometime (it seems slightly easier!)
Paneer (Panir) is easier, in that you don’t need a culture to make it. It falls into the direct-acidification classification of cheeses, like Mascarpone, Ricotta, or Queso Blanco. Those styles of cheese tend to an acid, like lemon juice, or vinegar, for coagulation. As cultured cheese goes though, Chèvre is relatively fool-proof. You just need to plan a day ahead of when you’d need it…and then try not to eat of all it at once 😉
Homemade Chèvre – mmmm that sounds (and looks) good! We’ve got access to some good local goats milk, but I just haven’t found the time to make any yet. I just need another 24 hours in the day to do all I’d like to do!
We’re harvesting honey today though, so I’m pretty happy about that. 🙂
Local fresh goat’s milk? I’d like to suggest that maybe you turn some of it into some lovely fresh Chèvre…maybe for recipe 51?! 😉
What will be even easier when you have your girls in milk is that (during the warmer months), you can bring the milk in, filter it and add it right to the culture without even needing to heat it because it is so warm right out of the goats. At least, that’s what I do since I’m
lazyefficient with my cheese making and because it is so dang hot. You’ll also get a higher yield because of the wonderful casein content of Nigerian Dwarf milk. I turned a gallon of milk into three pounds of chevre last week, and a gallon of milk into two and a half pounds of fromage blanc last night. Oh! Try your chevre with a little bit of honey on top- I use a blandish cracker, but it would probably be better on your fresh bread. So good!I’m encouraged by your yields Sarah, but that’s also why we picked Nigerian Dwarfs for our herd. Protein, and butterfat! I’m so excited to use our own milk in cheese next spring (no pressure Lotus 😉 ) I’m not even sure I quite got a pound of Chevre out of the commercial milk I used for this batch, but I know most ‘dairys’ use breeds that don’t perform as well on the protein/BF as Nigerians. These pint-sized goaties truly rock in the milk pail. However, we did already try the cheese with honey from our own hives, it was awesome! I do wonder if using milk from our own goats will also increase the sweetness of the cheese too. Seriously, if I could find 40 acres and a milk-house, I’d snap it up and build a creamery in a heartbeat! 😛
I’m so glad to see this post. I’ve been wondering about making goat cheese but hadn’t taken the time to do a lot of reading on the subject. This looks like something I could do. Thanks
Even though this Chèvre was made with commercially available milk, it still was more tangy than most Chèvre I’ve bought. It is wildly simply to make. You don’t even need a mold, you can just the muslin (that’s how I shaped the ball of cheese in the first photo that’s in the ramekin). The herbs just ratcheted it up a notch 😛
Wow, great fun! I love goat cheese, and it looks so easy. That will be great next spring, when you have your own milk. Though we’ll miss the entertaining videos.
I’ve been thinking recently about trying to make some cheese. It sounds like Chevre would be a good starting point. Great step by step guide, thanks! (And by the way, I loved the annotated goatie pics – I’m completely convinced that you captured perfectly what they were saying!)
Oh, yum. I love cheese, and that looks so good. When I’m in Gettysburg, I have access to goat cheese from a local goat farm. They make a variety of cheeses, including a gouda-style, parmesan-style, havarti-style and feta. It’s all to die for; and after reading your post, I’m realizing how reasonable their $1 per ounce price is. Enjoy your cheese (and won’t it be wonderful when you have your own goats giving milk!). -Jean