This year has definitely turned into the ‘year of the goat’ on the farm. Even with only a single doe in milk this season, the presence of a milking doe in the barn has been a rather life-altering event.
Twice a day milking had to be factored into our daily chore routine, along with maintaining twice-daily milking records, milk processing, and storage. I’m loving every minute of it.
Lotus has been producing plenty of milk this spring!
Having access to fresh goat’s milk on the farm has also opened up a wonderful window of opportunity for embarking on new adventures.
The obvious thing to do when one has a glut of goat’s milk is to make cheese, and we do, but more recently we’ve also started making cold process goat’s milk soaps!
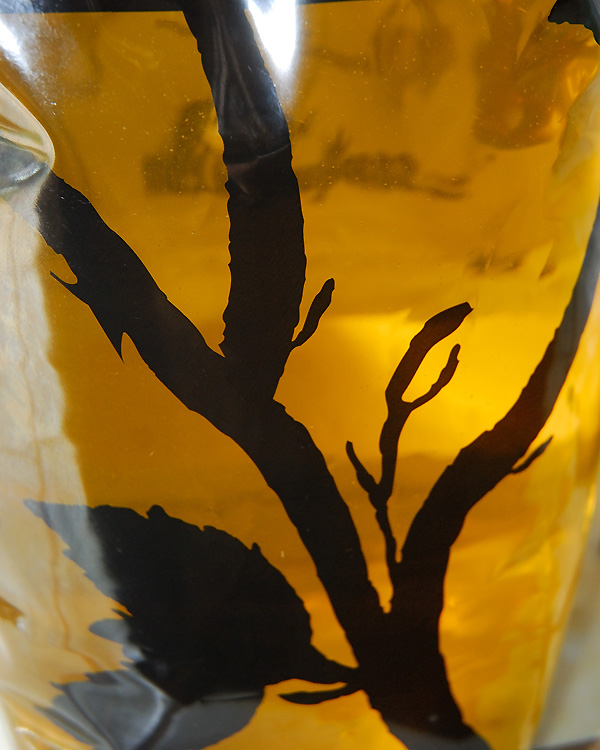
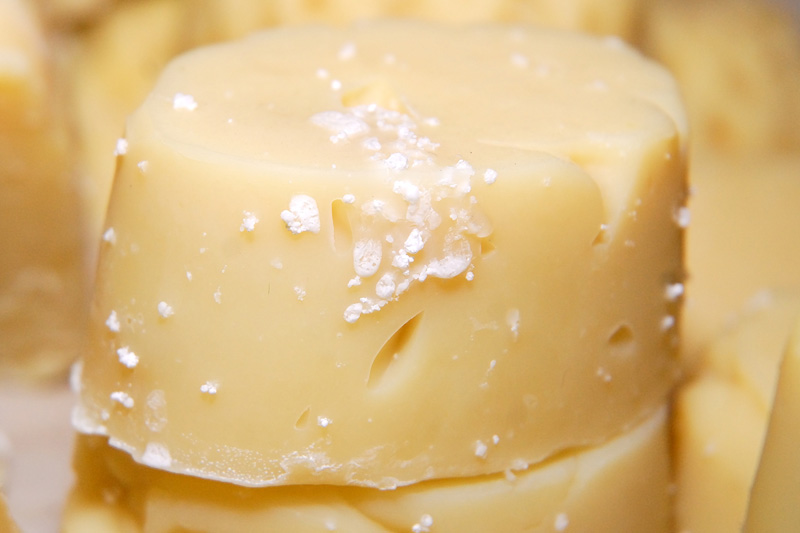
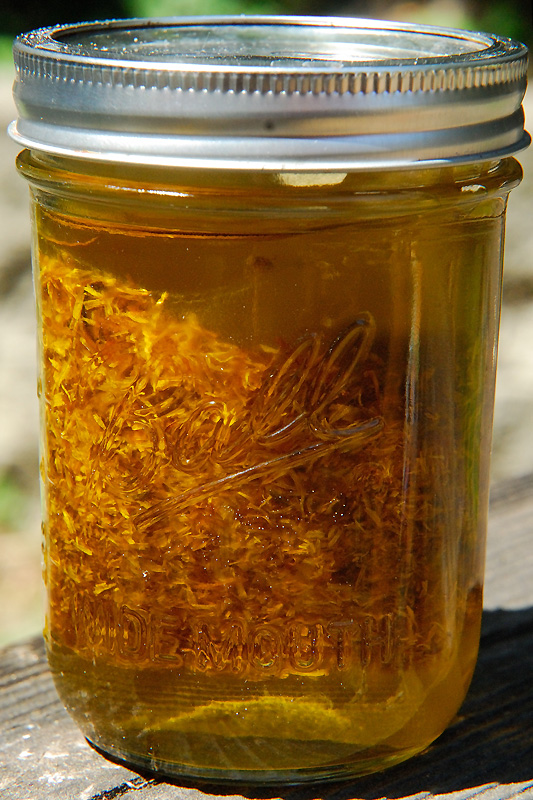
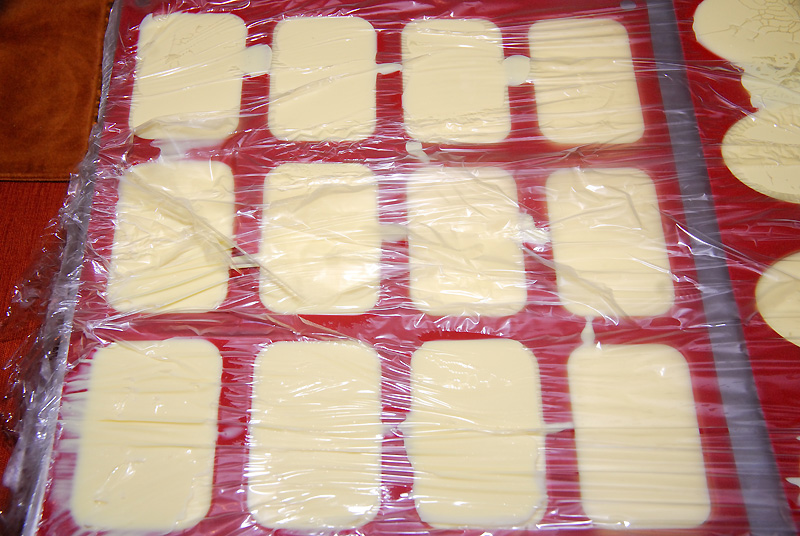
No, it’s not butter! This is orange & calendula goat’s milk soap!
So far we’ve made two batches of 100% goat’s milk soap. Some soapers like to use at least some water in their goat’s milk soaps, and perhaps we’ll try that down the road, but honestly, I’m something of a purist, and wanted to try crafting some all-milk soaps. Besides, I’d been told that 100% milk soaps can be highly temperamental, and I love a good challenge!
The first batch I made was a Lavender and Calendula soap. As there were particular ingredients I wanted to use, I formulated the recipe myself, using some helpful tools online [1, 2]. I’ll get more into how to formulate soap recipes in a future post though. This post is just a general overview of our goat’s milk soap making endeavors thus far.
Once I had formulated a recipe, the next step of course was sourcing the additional ingredients we’d need to make our soap, including various carrier oils, butters, and essential oils. My hands take a beating on the farm, and my skin, even on a good day, tends to be desert-dry, so I wanted to make a soap that would be both gentle, and moisturizing.
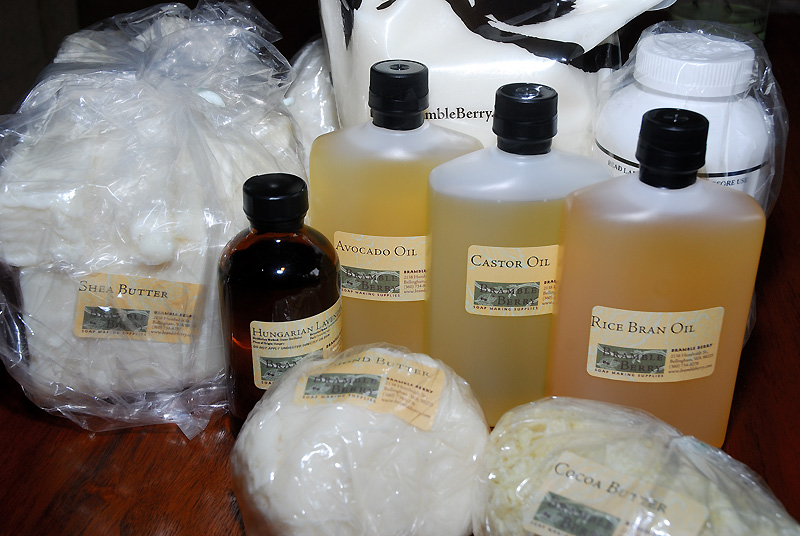
Just a few soap making supplies
I planned to use a lavender essential oil in the soap, but while I was waiting for the bulk of my soaping ingredients to arrive, I also infused some organic olive oil with dried Provence lavender flowers.
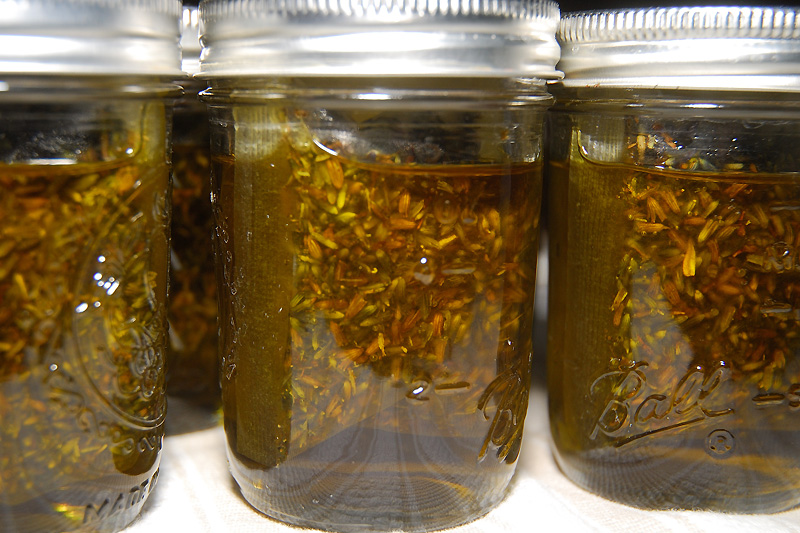
One of the base oils, olive oil, infusing with dried lavender
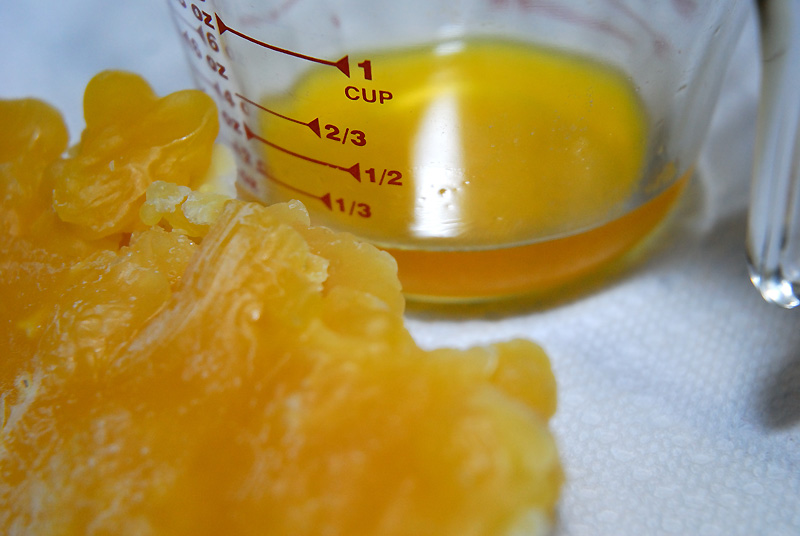
I then measured, and froze the amount of milk I would need for the recipe in advance.
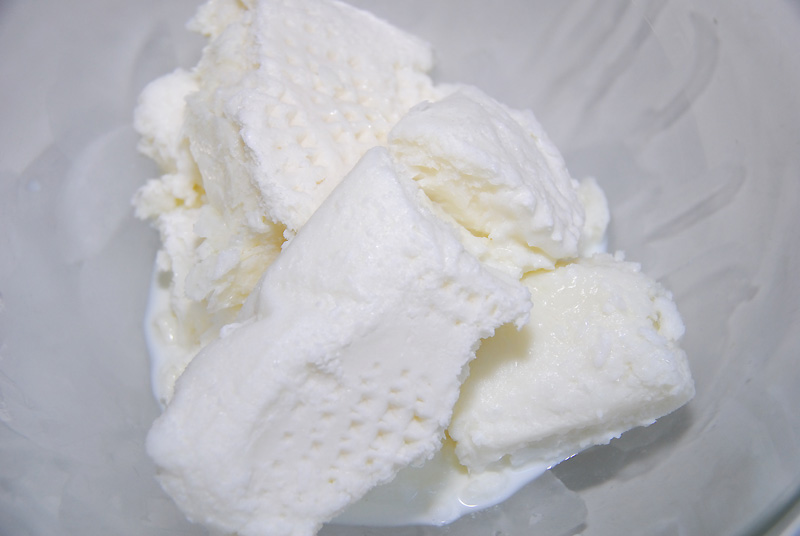
Frozen Goat’s Milk
Why freeze the milk? Milk soaps are notorious for turning various shades of beige, brown, or orange, primarily due to the reaction of the milk sugars when combined with sodium hydroxide. Adding lye to milk, or water for that matter, causes an exothermic reaction, where significant heat may be liberated. If this heat is not controlled, the milk can scorch, and that causes the milk to change color. To slow down this reaction, and control how much heat is produced during this reaction, most milk soapers prefer to work with their milk in a frozen, or semi-frozen state.
So, with the milk frozen, and ready to go, and the rest of the ingredients to hand, it was finally time to make our first goat’s milk soap!
Soap Making is a Science, Not Just an Art!
If you’re new to soap making, I cannot emphasize enough the importance of having a quality, dependable scale to weigh your ingredients! If I learned nothing else after taking four years of college chemistry courses, it’s that accuracy in measurement is critical to the success of any experiment, especially if you want to be able to repeat your results! Although minor inaccuracies in soap making likely won’t cause too much excitement in the kitchen, they can affect the quality of the final product. It’s also helpful to keep good notes for each soap batch, to help with duplicating successes, or to avoid repeating mistakes.
I originally formulated my recipes in ounces, but when I ran the recipe through a lye calculator, I converted the entire recipe to grams. My scale weighs in 1 gram increments. Many digital scales only weigh in 2 or 5 gram increments, so consider that when shopping for a scale for soap making.
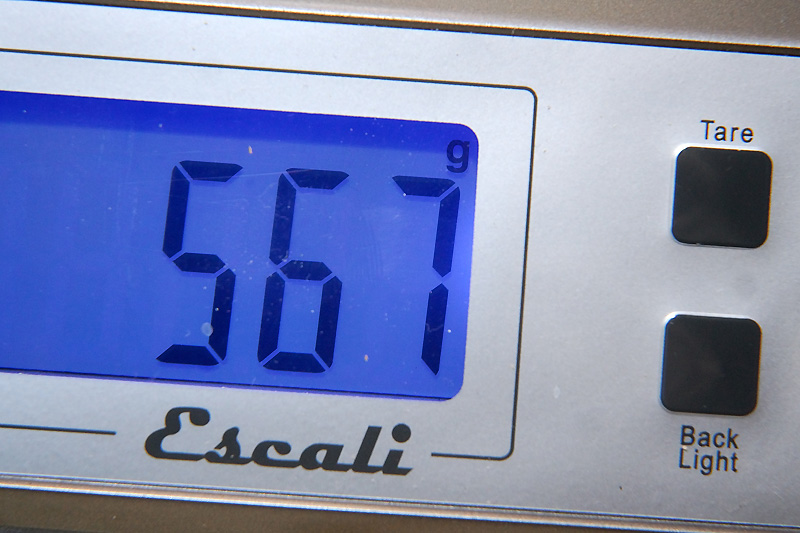
Look for a scale that weighs in one gram increments
Making Soap
There are two primary steps to making milk soap. The first step is to weigh out all of the oils and butters into a stainless steel pan, and then set those over a low heat on the stove to melt, stirring occasionally.

The liquid oils, and solid butters, are set on the stove over low heat
The first recipe I made was Lavender and Calendula, and used olive oil, coconut oil, palm oil*, palm kernel oil flake*, rice bran oil, avocado oil, castor oil, sweet almond oil, shea butter, cocoa butter, and beeswax.
I started by thoroughly melting the coconut, and palm oils separately. Palm and coconut oils are solid at room temperature, and it’s especially important that the palm oil is completely melted, and well mixed, before incorporating it into a recipe. Otherwise you may find excess steric acids in the palm oil that will precipitate out in the soap. Not necessarily a problem, chemically speaking, but it can result in ugly soap.
When palm is completely melted, it should be clear
With those oils melted, and measured, it was time to weigh out the remaining oils and butters.
My recipes use beeswax, as we have some that we melted down last year with our solar beeswax melter. The beeswax improves the hardness of the bar, and durability, however, there is a downside to incorporating beeswax into your recipes. Beeswax has a very high melting temperature relative to most other oils or butters used in soap making.
Beeswax has a high melting point
As such, if using beeswax in soap, any soap, I highly recommend melting the beeswax separately, either in a double boiler, or the microwave, and then pouring the liquid beeswax into the pot with the rest of the melted oils once they are up to temperature.
Working With Milk and Lye – It’s Not as Scary as You Think
Just don’t forget the goggles, and gloves!

Not exactly the height of fashion, but goggles, and chemical resistant gloves, are required soap making attire!
If you’re new to soap making, your biggest fear may be working with sodium hydroxide (lye), and it certainly deserves respect. I once had a job where I had to work with 12N hydrochloric acid almost every day. That’s nasty stuff! Sodium hydroxide, although at the opposite end of the pH spectrum, is also pretty nasty stuff. However, in all the time I was working with the 12N HCL, I never once splashed myself with it. Yes, sodium hydroxide can be dangerous, just use common sense. Keep your work-space organized, wear closed toed shoes, goggles, chemical resistant gloves, and long sleeves. Keep all pets, and children, out of the soap making zone, and just go slow. Don’t rush when working with lye, soap making should be fun, not a chore.
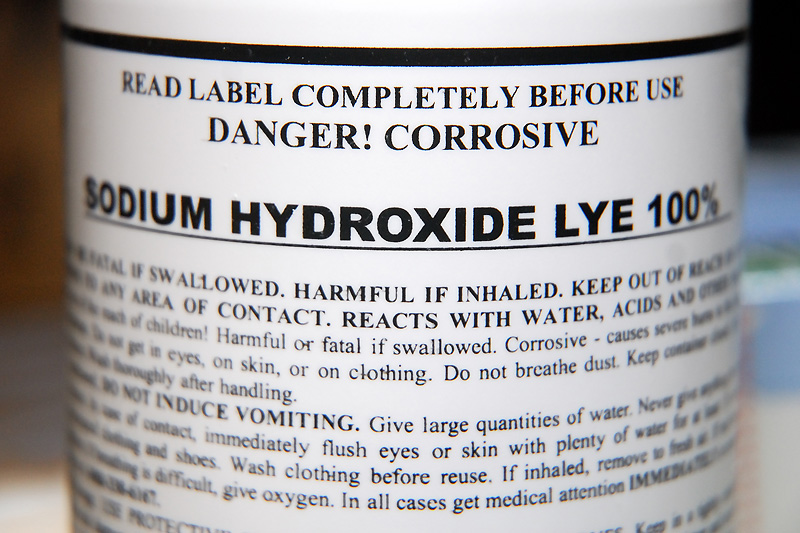
Lye safety is imperative. Wear goggles and gloves, long sleeves, and keep children and pets away!
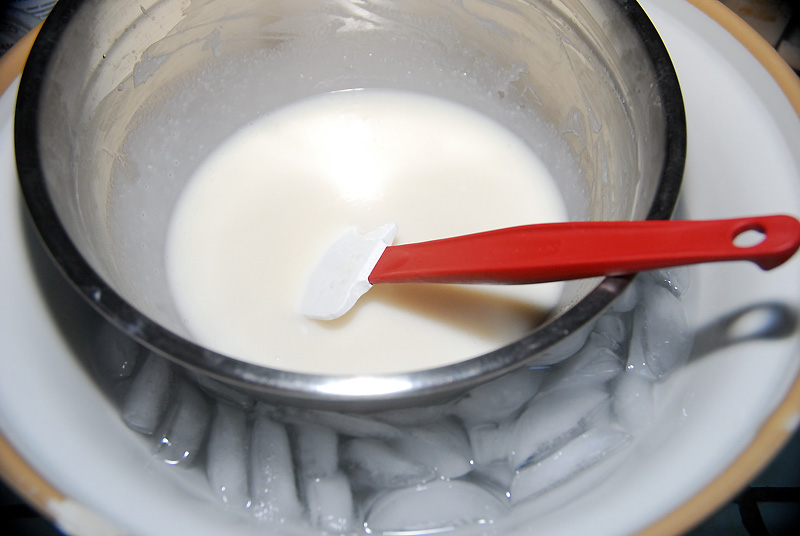
While the oils are melting, the second step is to carefully weigh out the lye, and then very VERY very slowly add the lye to the frozen milk. Personally, I prefer working with flaked lye, rather than beads, as it has less tendency to scatter across the work surface.

Flaked Lye
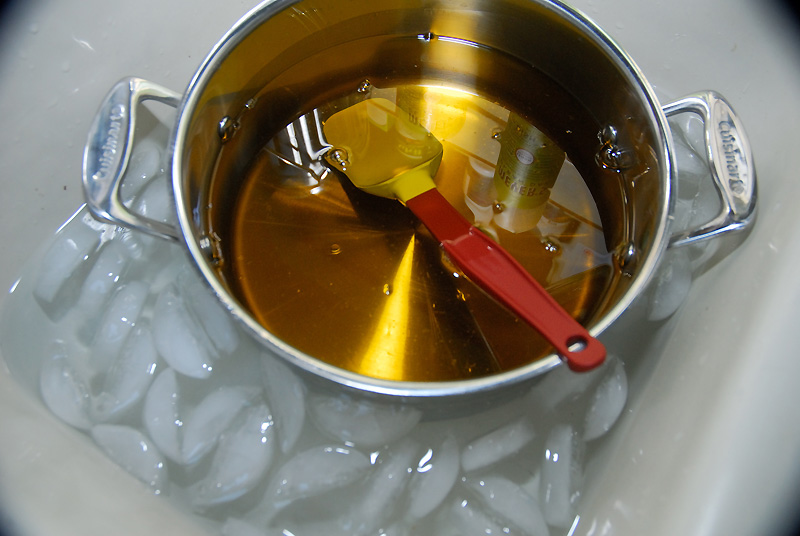
I then place the frozen milk in a stainless steel bowl, and set the bowl in an ice bath. I recommend keeping an extra container of ice nearby, as you may need to add more to the ice bath as the lye solution heats up.

I keep an instant read thermometer handy, and keep a very close eye on the milk temperature as the lye is slowly incorporated. I start by adding just one to two tablespoons of lye to the milk at a time, and mix it thoroughly before adding more.
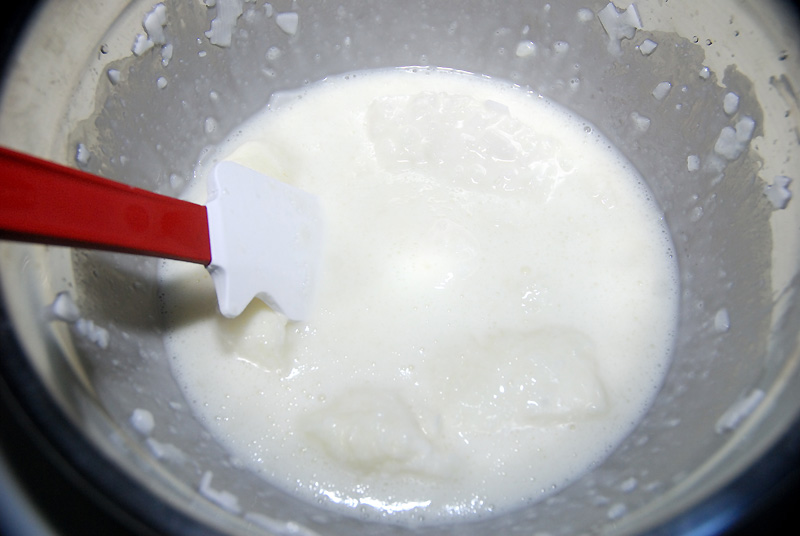
The milk will quickly begin to melt as the lye is added, but the ice bath will help to keep temperatures under control
See the flakes of lye on the sides of the bowl in the picture above? Be sure to scrape all that lye back into the milk, and mix it thoroughly.
There is a fine line between keeping the milk and lye solution cool enough to maintain a pale colored milk soap bar, but allowing the mixture to heat up enough that the lye fully dissolves. Some of this is up to the judgement of the soap maker, and how dark you want your soap.
If the mixture starts to heat too quickly, make sure you still have ice in your ice bath!
However, generally speaking you want your oils, and your lye/milk solution, to be no more than 10-15 degrees (F) apart in temperature when they’re combined, otherwise the soap solution may seize, or not trace as expected.
The Results
I promised on Facebook last week that I’d “come clean” about our milk soap making thus far. It’s fair to say that no soap maker makes perfect soap every time. If they say they do, they’re probably lye-ing (pun intended). So, as part of coming clean, here I’m going to show you what happens if you keep the goat’s milk and lye mixture too cool.
As the soap cures these crystals have become more powdery, but this is undissolved lye
It’s clear the lye did not completely dissolve. It wasn’t obvious in the milk and lye solution while it was being mixed, in part because the milk and lye solution is opaque. However, the granules were visible near the surface of some of the bars within 48 hours of unmolding the soap. Clearly I either didn’t stir enough, or allow the mixture to get warm enough, or both. This thick crust on the surface of the soap is definitely lye crystal, not just a light dusting of soda ash.

A must have in every cheese making, or soap making kitchen, pH paper
A little pH paper showed the crystals were very basic.
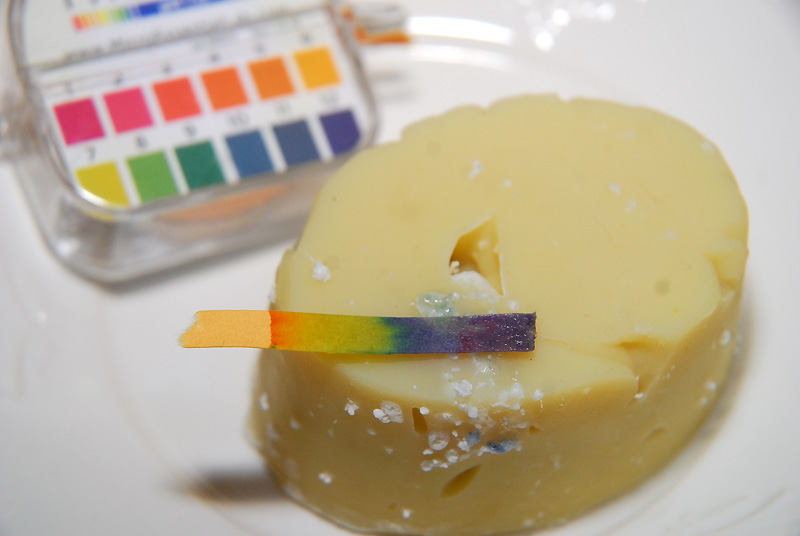
The pH of the lather is around 9, but wetting just the crystals, the purple color shows the pH is over 12!
These crystals are still caustic, and trust me, you don’t really want this in, or on, your soap.
Also, notice how deformed part of this bar is? As soon as I added the Lavender essential oil to the soap solution in this batch, it started to seize. I was able to pour the mixture into the first few molds, but by the time I got to the last molds, I was spooning a mixture the consistency of a thick banana pudding. As a result, a lot of air was trapped in the mix. Not a problem, chemically speaking, but aesthetically really ugly.
Despite the lye crust issue with the first batch, after a few weeks of curing I did test the soap for lather, and this soap lathered very well. I was happy with the recipe overall, I just needed to work on my lye-mixing technique.
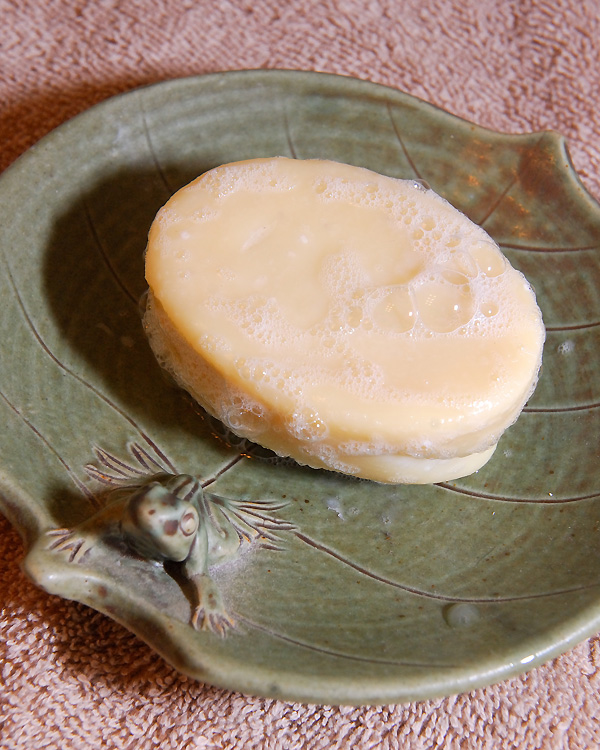
Despite the crust problem, the Lavender and Calendula soap otherwise turned out well. The bars are firm, and lather very well
I may try rebatching part of this botched batch[4], just to see how well this milk soap rebatches.
That’s alright though, that’s what experimentation is for. After a few adjustments, the second batch, I’m happy to say, is turning out MUCH better.
Making More Soap – With a Few Adjustments
When I made our most recent Orange and Calendula soap last week, I started out by mixing the lye with the frozen milk, in the ice bath, as before. Even in the ice bath, the mixture reached 65 degrees Fahrenheit. Once the lye was mixed with the milk though, I removed the mixture from the ice bath, and continued to stir, as I allowed the mixture come up closer to 80 degrees. This time the lye appeared to dissolve more completely, so lesson learned. Keep the lye and milk cool, but not TOO cold.
For this batch I infused the olive oil with calendula
I also added the essential oils to the cooled oil mixture immediately before adding the milk and lye solution. This allowed me to better control how much the soap traced before pouring it into the mold. There can be some cost, in the form of loss of fragrance, when essential or fragrance oils are added early, so I added a little more orange essential oil to this batch to compensate for that.
With the oils and butters melted, and the milk and lye solution prepared, it was time to combine the mixtures to make soap!
Before mixing, I rechecked the temperature of both solutions. If the oils are too warm, the pan can be set in an ice bath (I use the sink), to help cool them down more quickly.
These oils were a little too warm, so I briefly chilled them in an ice bath
Just be careful not to splash water into the pot of oils, and stir occasionally to prevent components, like beeswax, from precipitating out on the chilled edges of the pan.
I do like to keep my soap making cool, so the oils and lye solution were approximately 80 degrees when they were combined.
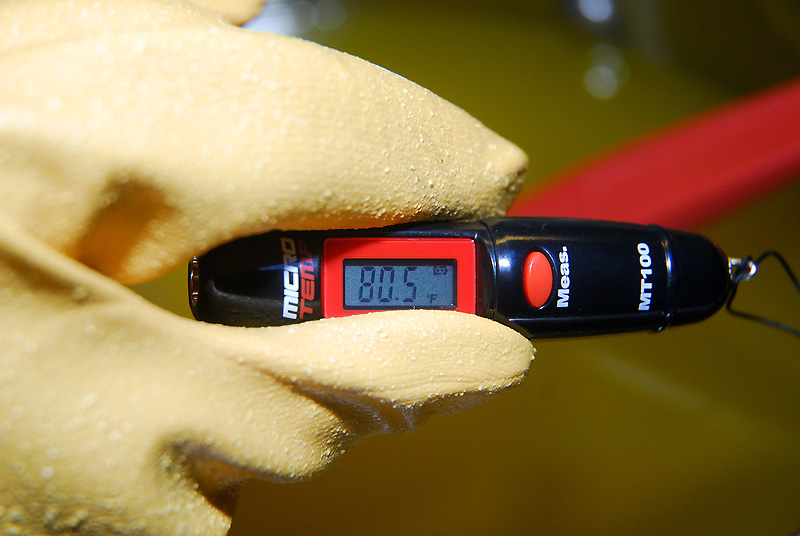
A small instant read thermometer is very helpful. If you use one with a metal probe, make sure it’s stainless steel!
The second soap batch combined beautifully. Like most modern soap makers I use a stick blender to mix the solution, being careful to tilt the stick blender in the solution before turning it on to release any air trapped underneath it. This prevents unwanted bubbles in the finished soap.
Once I barely reached a medium trace, I poured half of the mixture into the first silicone molds.
Just poured! The orange and calendula batch was much easier to work with
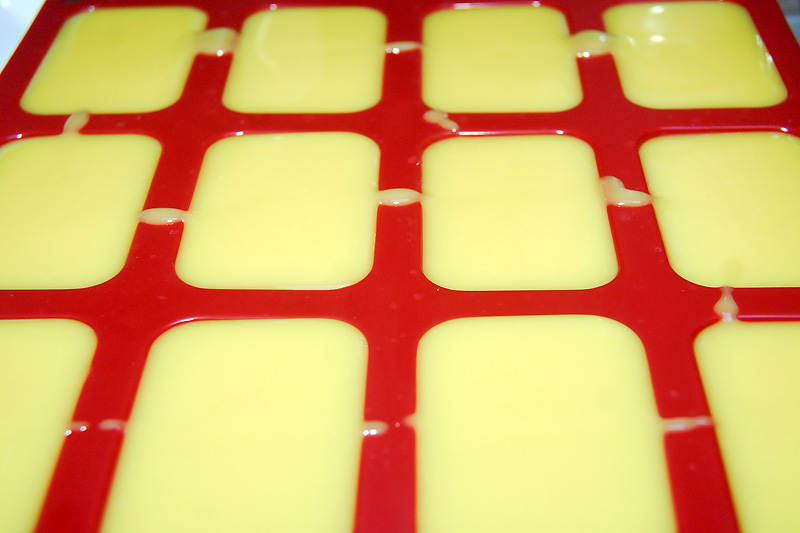
To the remaining half of the soap mixture I added some dried calendula petals, just for their decorative effect, before pouring that mixture into the molds.
Is It Soap Yet?
Not quite. By the time the soap is in the mold, some of the fats have saponified, but it’s not quite soap. With these first two batches of soap I chose not to allow the soap to gel.
When a soap goes through gel phase, the soap in the molds continues to produce heat, sometimes quite a lot of it! For these soaps I was more interested to see how pale I could keep this milk soap in color. As the milk in the soap will darken in the presence of more heat, one way to maintain a lighter color in milk soap is to use small light-weight molds, not heavy, insulated wooden molds. Another method is to freeze the soap immediately after it’s poured. You don’t have to, it’s a personal choice. Freezing slows the saponification process, but also prevents the milk proteins and sugars from scorching and turning dark in color.
I know that some soapers swear by freezing their milk soaps, others would never consider freezing them. I intend, for my own comparison purposes, to allow half of the next batch I make to go through gel phase though. I’ll be interested to see the difference in the color and texture of the soap, using the same recipe.
For these batches, as soon as the soap was poured into the silicone molds, the molds were covered in plastic wrap, and immediately placed in the freezer.
I unmolded the first batch (Lavender and Calendula) after just 24 hours.

This is the lavender soap, immediately after unmolding. These bars were frozen for 24 hours
The molds are small, but if I was using a larger mold, I’d leave it in the freezer longer (large molds may require up to a week before they can be unmolded).
The second batch, the Orange and Calendula, I left in the freezer for a full 48 hours. As the mixture wasn’t as thick when I poured this batch, I decided to wait a little longer before unmolding it.
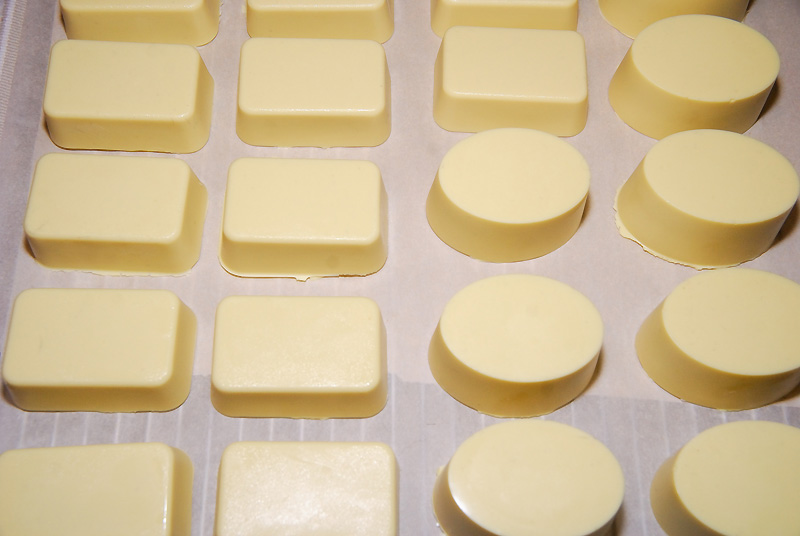
Note the color got a little lighter once the soap was frozen
What I love about these silicone molds is they are so easy to work with. The soap, especially when frozen, just pops right out, perfectly, every time!

The molds are easy to turn inside out, and the soap comes out beautifully
Of course, even now, it’s still not soap!!! Well it is, but it still needs to cure for a few weeks before using it.
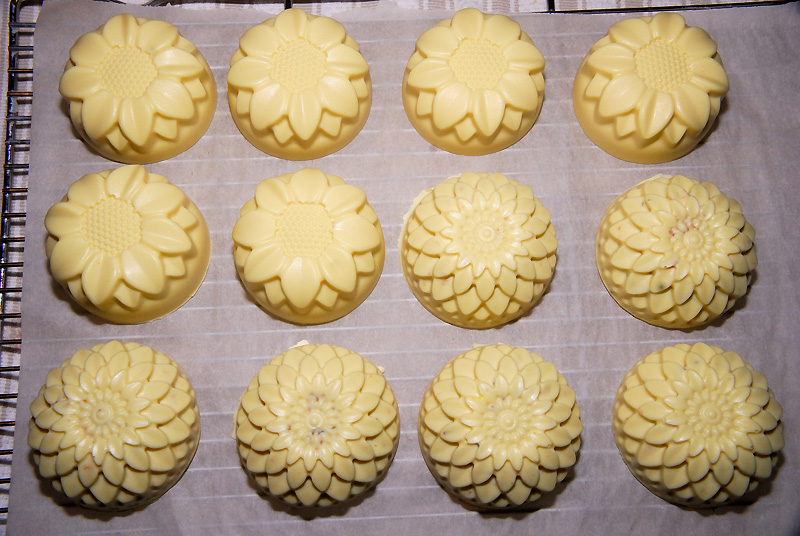
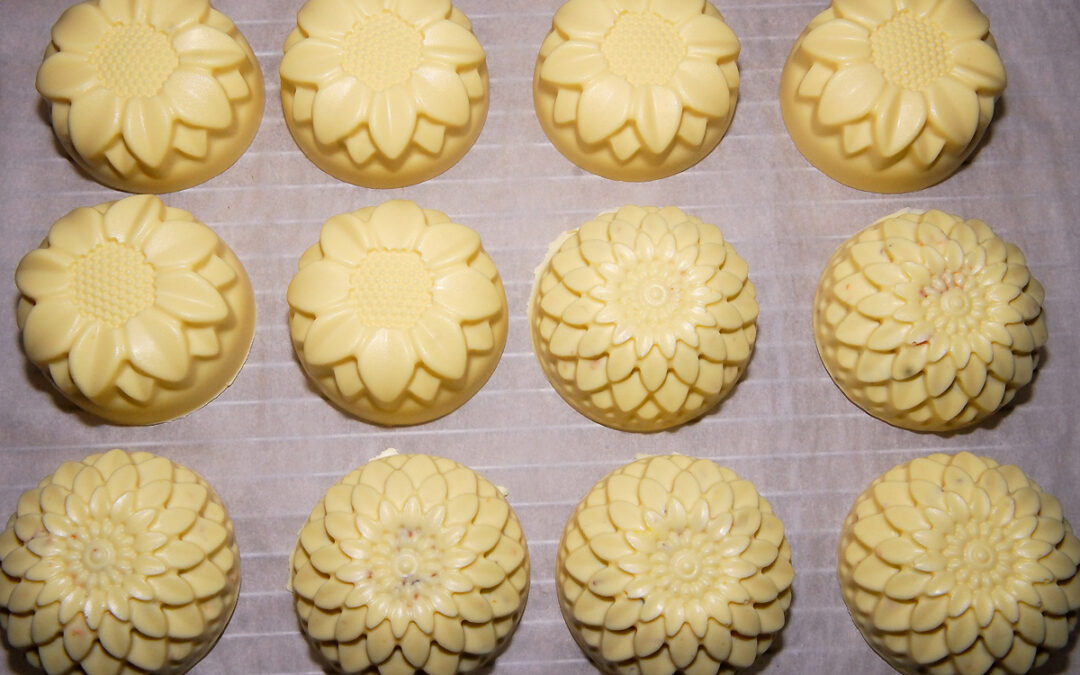
Batch #2 – Orange and Calendula
In the meantime, I’m loving how the second batch has turned out so far. The calendula-infused olive oil I used, and the orange essential oil, made these bars a gorgeous pale buttery yellow color. It really does look like butter, it just won’ t taste very good on toast!
If I like how the bars cure out in a few weeks, I promise I’ll post a recipe!

I added some dried calendula petals to these round soaps
So now that I’ve ironed out a few minor wrinkles in my milk-soap making method, I’m already planning to make our next batch this weekend. This time I’m thinking of trying a white tea and ginger fragrance oil.
Do you make milk soaps? If so, do you make 100% milk soap, or do you use water in your recipe as well? Do you freeze your soap, or do you allow it to gel? Does the color of the bar matter to you, or just the quality of ingredients used? Have you ever rebatched a milk soap? Did it work? Perhaps the most important question, how long before you ran out of space to cure your soap?!
————————
[1] Soaping Oil/Butter Properties – Nature’s Garden. A very handy reference chart on the general qualities of oils and butters commonly used in soap making.
[2] SoapCalc – Any recipe, whether found in a book, or online, should be run through a lye calculator. This one is quite comprehensive, and will allow you convert your recipes into grams.
[3] Sustainable Palm Oil: Rainforest Savior or Fig Leaf? An article outlining some of the issues surrounding the cultivation and use of palm oil, even RSPO certified sustainable palm oil. There is a lot of controversy about using palm oil in cosmetics making (or food products for that matter). Even though palm oil is an excellent base oil for soap, and has some wonderful properties, its production, even ‘sustainably harvested’ palm oil production, can be detrimental to the environment, and to sensitive wildlife habitats. As such, once our existing supply of palm oil, and palm kernel oil flake, is exhausted, our soaps will be palm free.
[4] Clean The World Soap makers, don’t throw away your botched batches of soap! If you don’t want to rebatch the soap yourself, consider donating it. Clean the World can rebatch, and redistribute the soap to those in need.
Check out our Soap Making board on Pinterest!


Clare I love both molds and can’t wait to see what you’ll come up with for labels. The Orange and Calendula is in a lovely creamy looking bar…. So glad you’re enjoying it all. Would you wash goats with goat soap? ;-P
I’ve been playing around labels, and soap packaging. Too many choices! 😉
Never really thought about washing the goats with goat milk soap. I don’t think they’d mind. Maybe I should make a shampoo bar…
I have a niece that has very sensitive skin. VERY sensitive. I have been looking for natural products that would work for her. I am thinking you may have it.
My skin is quite sensitive too, and dry. It’s part of why I was inspired to try making my own. I find most commercial soaps to be either too drying, irritating, or overly fragranced. I love having complete control over what goes into this soap! 🙂
Which is more fun for you, making cheese, or making soap? This seems quite complex. Why so many different types of oils?
I sure wonder how you find time for all of this!
Actually, I can’t choose! They’re both a lot of fun. Soap making, like cheese making, has endless possibilities. So many different recipes to try. You’d need never make the same thing twice (unless you want to of course).
Each of the oils brings something different to the soap. Some contribute more to the moisturizing properties of the soap, or the hardness of the soap bar, others may enhance the creamy lather, or bubbles. You can certainly make soap with fewer oils though, and I will try some more simplified recipes down the road.
Thank you for the mention! If you would ever like for us to provide you with some supplies to make the soap you mention in your blog, let me know. It would be my pleasure!
You’re welcome, Deborah, and thanks! I love your soaping oil chart, and have a copy of it sitting here on my desk 🙂
You managed to put a lot of good info in that post! And kudos for talking about problems too. We have not had the problem with the lye not dissolving. We do freeze our goat’s milk, and use 100% milk with no water added. But our mix tends to stay more in the 80-90°F range adding the lye. We don’t try to get our batches to gel, but if they do it’s ok. Mostly they don’t. We don’t care about color either, as long as the milk isn’t scorched (it’s usually some shade of light tan). We’ve had great results with our goat’s milk batches, and I do love the finished product. The milk does make for a lovely lathering experience.
We haven’t done much rebatching either, and none of goat’s milk soaps. So far we haven’t run out of curing space, or storage space, but I can see how it could happen! 😀
As for the seizing up, it’s happened to us a few times, though not with lavender EO. It has led us to skip the silicone molds and pour in wooden ones pretty much exclusively. Since we’re not selling our soap, we often opt for easy, and pouring in the wooden mold is definitely quicker if you have a batch that is fast becoming solid on you!
I realized once I saw the lye crystals forming that I’d been a little overzealous keeping the lye and milk solution cool. It definitely made a difference letting it warm up a little more, but didn’t seem to have any effect on the color of the soap.
Even that crusty lye coated soap left my hands feeling better than most commercial soaps do, so I’m very much looking forward to trying the second batch after it cures a little more.
I wasn’t expecting the lavender EO to make the soap sieze. Generally I tend to think of lavender as being one of the easy essential oils to work with. Perhaps the lye issue affected it, or maybe I traced the soap too much before adding the EO. As you can see I chickened out the second time by adding the EO to the oils, but I’m not that experienced using them. As I get more comfortable working with them, and knowing which oils misbehave, I’ll feel more confident adding them after I add the milk.
I can see how pouring into the wood mold, if you’re in a rush to get the soap in the mold, would be much easier. I actually have a new wood mold on order. Not the typical log-type loaf mold, but a shallow, single bar deep mold (I think it makes 18 bars with the dividers). I’m hestitant to use a loaf mold, as I would expect it holds a lot of heat. Maybe I should try it though, as I have a 5 lb loaf mold sitting here. I just need to embrace my sense of scientific adventure 😛
Wow! This is fascinating! Your soap looks wonderful. Because of my work with tiny infants, I have to constantly bathe my hands in an alcohol based product to prevent spread of infection. That, along with gardening activities, is very tough on my hands. Goats milk soap just sounds good. If you ever decide to sell these over the internet, I will be your first customer!
Goat’s milk soap is wonderfully conditioning for the skin. It sounds like your hands take very similar abuse to mine. I feel as if I either always have my hands in water, or soil! 😉
This was a wonderfully informative post. It seems like a really rewarding endeavor as well. The soaps turned out beautifully and I can see why you want to create more end more varieties. So much fun and now you can create the beautiful wrappings. I love that you use so many products made on the farm.
I enjoy being able to produce so much from scratch here, using ingredients we grow or raise. Having fresh goat’s milk to hand this year though has been fabulous. It really has me questioning why we didn’t add dairy goats to the farm sooner!
What a wonderful article. I havent made lye soaps since my now 23 yo twins were 14. I still have some. We made goats milk soaps as well, but never heard of freezing the milk. Great idea. We made large batches, and used a mixing bit on a drill in a deep stainless steel pot.When we made them those silicone molds were available. i love them. We had to make wooden molds and then slice the bars. I love the gentleness of homemade soaps. Nothing better.
I did a LOT of reading before I ventured into making milk soap, and looking to see what had worked for other milk-soapers in regards to retaining lighter colors in the soap. Freezing the milk, with or without an ice bath, and then freezing the soap immediately after pouring seemed to produce the best results. I’ve been very happy with it so far. I have a couple of wooden molds here that haven’t tried using yet with the milk soaps, in part because I’m concerned the soap will generate too much heat, but I do want to see how they work out, soon! I agree, these soaps are so much better than your standard commercial bars! 🙂
I never realised that there was so much work involved in making soap Clare. It certainly is a challenging science and seeing those beautifully moulded soaps afterwards must be so satisfying.
There is a certain degree of organization that’s required for soap-making, and an understanding of the ingredients being used. It is a lot of fun though, especially when you’ve formulated a recipe yourself, to see the end results. Unmolding the first soaps reminded me of my old Beatrix Potter plaster-of-paris molds I had as a child. I remember back then peeling back the rubber molds and finding Jeremy Fisher’s fishing rod didn’t turn out, or Mrs. Tiggiewinkle was missing her nose. 😉
My uncle used to make soap and it was the only soap we used in the house. I miss it. This post amazed me as to what goes into making soap. Clare your skills just keep coming. I would love to sample your soap if you decide to sell it.
I’d love for you try it! The last two batches I’ve had a little more soap than would fit in my silicone molds. I just ordered a few more, and now have a mold that I can use with each batch for making some smaller sample-sized soaps too. Then if we sell some of the soaps, people will have an option to try a smaller size before committing to a larger bar 🙂
I wish we were closer to your farm then I’d come and steal me a bar of that calendula/lavendar soap! *g*
You have quite a bunch of soap there– what do you plan doing with them? Sell them or?
I’m really liking the orange and calendula. I rebatched the lavender soap, and added some Litsea essential oil, and so far I’m loving that too! I have plans to make few more different varieties, maybe a honey and oatmeal, and a plain unscented. I just made one batch with a fragrance oil, ginger-lime, with some sea clay which is good for slightly oily or combination skin. I love the aroma, but the fragrance was a little more challenging to work with. I think the plan for now will be to sell some of the soaps, locally at least, this year. Maybe next year, once we have more goats in milk, we’ll look into selling online. You need to come out for a visit so we can send you home with some samples! 😉