The ability of bees to obtain and store food is a function of weather, resource availability, and colony size. The question is, if feral colonies can store enough food without a beekeeper ever feeding them, why do beekeepers feed bees? Well, part of the answer is that not all feral colonies survive winter. However, as beekeepers, we’d like to do what we can to ensure the survival of bees in our care.

Occasionally through the year it may be necessary to feed colonies in your apiary
Why We Feed The Bees
In an ideal situation the colony will build up sufficient population over the spring and summer months to devote enough foragers to the task of collecting, and storing food reserves.
Many factors can influence the stores in the hive, and there are many reasons to feed bees. Bad weather can impact nectar flows, as happened here this spring. Extended rainy or cold periods can prevent foraging flights. Varroa mite burdens can increase the rate of feed consumption. Autumn robbing of hives by other colonies, or yellow jackets, can deplete stores. Greedy beekeepers that take too much honey late in the season can jeopardize the survival of a colony. Forage availability can also be affected by location of the hive. Bees in urban areas generally have access to more forage, from blooming garden plants, than do rural bees who are more dependent on native forage.

Ideally, honey bees can forage for, and store, all the feed they will need during the spring, summer, and early fall
The level of available pollen, nectar and honey is constantly in a state of flux within each colony’s hive. Stored food is used throughout the year to feed both the adult colony, and young developing bees within the hive.
Any imbalance in food consumption, versus storage, during the year can result in the bees being caught short. This puts the colony at risk of starvation when the demand for food exceeds the resource availability.
In the spring wildflowers are plentiful enough that food availability isn’t much of an issue in this area. When resource availability was high, our Queens raised more workers, and began to produce drones.

Spring wildflowers provide an abundant, natural, source of nectar and pollen for the bees
Many of the plants the bees forage on here in the spring, however, are dormant by mid to late summer. By mid-August our hive populations were at their highest, but food availability ebbed to its seasonal low. This is when the colonies strived to conserve stored resources by ceasing drone production, and ousting drones from the hive.
Because this region is prone to protracted nectar dearths in the late summer months, when the native forage is predominantly dormant, we expected we may need to feed our colonies by late summer, and indeed, we noticed a pronounced nectar dearth setting in by late August, as our colonies rapidly began to consume the stores they’d accumulated over the preceding months.

This frame was emptied during the fall nectar dearth, a time when colonies may rapidly exhaust their honey stores
We didn’t harvest any honey from our colonies this year. This was the first season for our hives, and it was more important that the bees used their honey to produce wax, which is energetically expensive, and to feed their growing colonies. As much as we’d like honey, it was far better to leave it for the bees.
Within a couple of weeks after drone production ceased we noticed the hives were getting very light on stores. It was becoming questionable whether or not our bees had stored sufficient honey for winter. Bees die of starvation during the winter months, far more often than they die of cold. For the Chamomile colony their food reserves were critically low by mid-September. We knew that it was imperative for the colonies to have sufficient reserves within the hive BEFORE the cold weather set in and the hives closed down for the season. Clearly it was time to feed.
How We Feed The Bees
To feed the bees, first we had to decided HOW to feed the bees. In the spring months, being new to beekeeping, we elected to temporarily use entrance, or Boardman feeders. Many beekeepers don’t like using Boardman feeders. They can leak, dumping syrup in the hive (or on the ground if using screened bottom boards), potentially drowning bees, and at the very least attracting ants.

Boardman feeders sit at the entrance, and are convenient for short time feeding in the spring, especially when housing new swarms
In the fall months however, as forage dwindles, Boardman feeders are too attractive to robbers, and can invite robbers directly to the hive entrance.
There are numerous other commercially available feeders, each with their own pros and cons.

There are advantages and disadvantages to any method of feeding bees (click image to enlarge)
After much research, it became clear that over the hundreds of years that humans have been keeping bees, the truly ideal feeder has yet to be invented.
Much of which feeder to use comes down to beekeeper preference, the frequency or duration of feeding, and what type of feed is being offered to the bees.
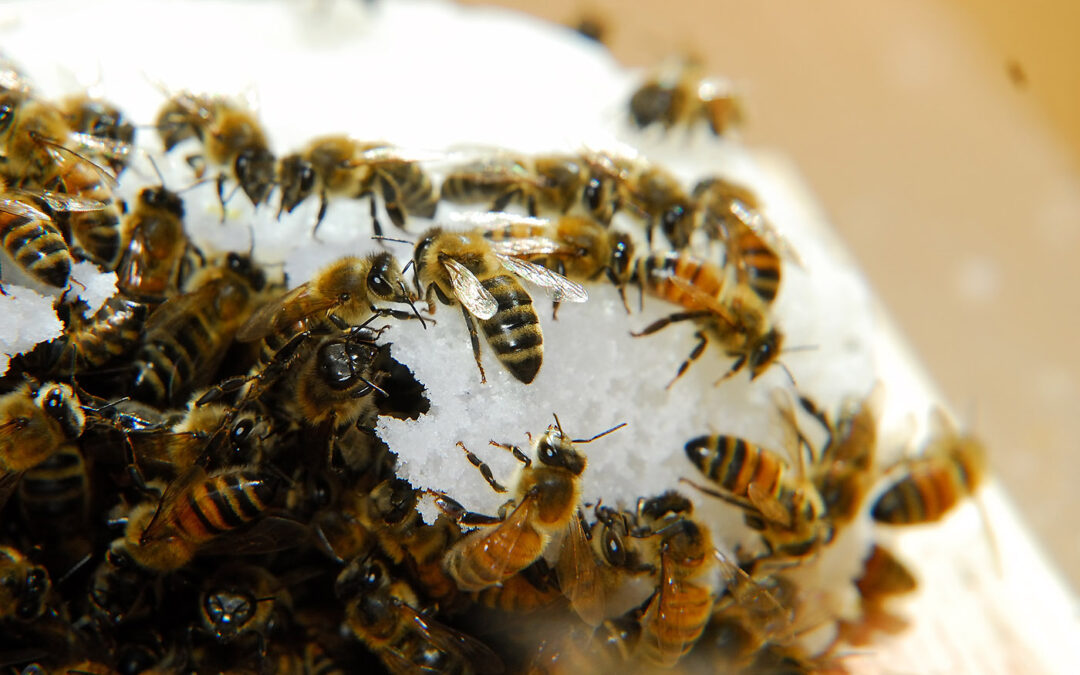
In the fall months beekeepers typically feed a thick, concentrated, 2:1 sugar syrup (two parts sugar, to one part water), but during the fall and winter months it may also be necessary to offer a solid feed, such as fondant, or dry sugar, for emergency feeding during periods of bad weather. As we have multiple hives, ideally we were looking for a feeder that was versatile, and could facilitate offering either liquid or solid feed, depending on the season.
The Miller style top feeder came close to meeting our needs.

Miller style feeders sit on top of the hive, and hold syrup in the side chambers (Image Source: Public Domain)
This style of feeder has been around for more than a century, but modern versions of this feeder now typically have floats in each of the side wells that help to minimize the drowning of bees in the syrup. The floats can usually be removed if dry emergency winter feed is offered instead of liquid feed. However, after talking to a few beekeepers about their experiences with these feeders, most felt they lost an excessive number of bees using this feeder type with syrup, so we decided to keep looking.
At a recent bee guild meeting we were introduced to Vivaldi boards. What, you might ask, is a Vivaldi board? In essence, it’s a hybrid between a solid inner cover, and a shim, with the bonus of also providing a top vent for the hive.

The Vivaldi board has a central hole, like a solid inner cover, tall sides that act as a built-in shim, and screened vents
Top vents help the hive to control condensation in the cool winter months. Excess moisture that accumulates at the top of a hive can cause water to condense, and drip through the center of the cluster, chilling and potentially killing bees.

To enhance air flow there are screened vents on the front and back side of the Vivaldi board
Venting the top of the hive can help to decrease moisture accumulation, and some beekeepers will pack the tops of their hives with burlap, straw, or dried lavender stems, to help absorb moisture if it becomes a problem.
The solid bottom of the Vivaldi board provides a platform to place dry moisture absorbing material to prevent it from falling down into the hive.
As a feeder though, the Vivaldi board is quite versatile, a true ‘four season’ feeding option. At the time we ordered the Vivaldi boards, we also ordered a syrup feeder that sits in the central hole in the board. This feeder is called a Swienty feeder.

Swienty feeder installed within a Vivaldi board
Having used Boardman feeders, and attempting to use inverted jar feeders inside the hive (which didn’t fit without a shim as we use all medium hive equipment), the Swienty feeder seemed like a promising alternative.
The feeder itself holds a little more than 2 quarts of syrup. As it sits in the center hole, the bees climb up through the center of the feeder to obtain the syrup.
Bees gain access to the center of the Swienty feeder (this one is empty) by climbing through the center hole of the Vivaldi board
However, as the center of the feeder is capped, even with the top cover removed, the bees can’t exit the top of the hive while the feeder is being refilled.

Here the feeder has been filled with syrup. Note there are no bees flying around and landing in the syrup
This makes replenishing the feeder, and replacing the hive cover very fast, and prevents accidentally drowning bees during refills.

The syrup seeps under the central cap, allowing the bees to reach the feed from inside the feeder
It’s also helpful if feeding particularly aggressive colonies because the bees can’t come pouring out of the top of the hive as soon as you lift the cover!
The slight problem with the feeder design is that large numbers of bees in the center of the feeder can actually displace the light-weight clear inner plastic cover. However, a small washer, or similar weight is sufficient to hold that cap in place.

We used some clips of brad nails, but any thin weight, such as a bolt washer, is enough to ensure the central cap stays put
Bee access to the syrup didn’t seem to be an issue, and we’ve had the bees completely empty this feeder, all 2+ quarts, in less than 24 hours!
As the bees have to climb down to reach the meniscus of the syrup, the syrup can’t leak into the hive, and the feeding space is relatively narrow, preventing the bees from accessing too much syrup at once, and drowning. I have yet to find a drowned bee in this feeder. Not one. Can you tell I was a little paranoid about drowning bees?
The only caveat is that this feeder is still attractive to ants, and if ants enter through the vented screens in the Vivaldi boards, with the Swienty feeder in place, the bees can’t reach the ants to discourage them. We had a small colony of ants try to move in under the edge of the feeder after the last rain, so preventing ants from climbing on the hive stand at all has been the most important.

The Vivaldi board sits on the upper hive body, just below the hive roof. We also use a screened inner cover on top of the Vivaldi board to make feed checks easier without releasing bees.
Overall though, we’ve found the Swienty feeder to be an excellent, and very manageable alternative to using inverted jar feeders which don’t fit our medium hives very well. It’s easy to install, easy to reach, and easy to refill.
Sugar syrup alone though only addresses the bee’s need for calories, it doesn’t supplement protein in the diet. For that, we feed compressed pollen substitute patties, especially in the fall if natural pollen resources are low. If the Swienty feeder is in place in the Vivaldi board, pollen patties need to be placed on the top of the frames, under the Vivaldi board, ideally with a shim, for the bees to reach it.

We've also used the Vivaldi board to feed syrup in baggies. With the central hole uncovered, pollen substitute can also be fed on the board in this configuration
This season we only received a partial order for our Swienty feeders, so for the remaining hives we had to be more creative. For those hives we placed baggie feeders on the floor of the Vivaldi board. We half fill each bag (this minimizes any leakage) with 2:1 syrup, and cut 3 separate inch-and-a-half slits in the top of each bag. The Vivaldi board improves bee access to the baggie feeders, as it functions as a built in shim.

The bees access the syrup through slits cut into the bags with a box knife
The central hole in the Vivaldi board is now open, so the bees have full access, and can also reach any pollen substitute, or dry feed left on the board.

Pollen substitute, or drivert (inverted dry sugar) can also be offered directly on the Vivaldi board
In some respects, we’re actually preferring feeding without the Swienty in place, at least at this time of year, as it permits us to also easily leave blocks of fondant in the hive as well, where it’s easily accessible. Fondant ensures there always a source of feed in the hive. If it rains for multiple days in a row, it prohibits us from reopening the hive to replenish the baggie feeders, but it takes much longer for the bees to consume all of the fondant.

The tall sides on the Vivaldi board makes feeding fondant easy, without the use of a supplemental shim
The fondant helps to hold the bees over until the weather improves, which this year has already proved valuable when we received half a week of very wet weather unexpectedly in early October, which dumped 3 inches of rain!
Overall, we’ve been very happy with our choice of the Vivaldi board, and Swienty feeder. The Swienty itself may be more useful in the spring, especially for helping to build up swarm colonies. The combination of the Vivaldi board and Swienty feeder provides us with lots of options for feeding throughout the season, without the need to purchase multiple feeder types for each hive. It also has the added bonus of incorporating additional ventilation at the top of the hive. All around, it seems to provide a lot of bang for the buck, and was economical to purchase too.
We’ve been feeding fairly heavily with 2:1 syrup over the past few weeks, as it’s critical for the bees to store all their feed so it’s accessible to them, close to the cluster, before the cold weather sets in. Over the winter months we’ll primarily leave fondant in the hives as emergency feed, that they can access on warmer days, and use the Vivaldi boards to help manage hive moisture. Both fondant, and dry sugar, have the advantage of also helping to absorb excess hive moisture, so it will be interesting to see how this works for us over the coming months.
I’ll admit, before we had bees, I had no idea that bees could eat so much! We’re already up to a 150 lbs of sugar consumed by the colonies this year!

It's amazing how much sugar bees can consume, especially in a robust colony such as Salvia
During this morning’s feeding we checked the upper honey supers to assess stored feed levels now. A few weeks ago most of the honey in all of the colonies was almost gone. Today, once again, each colony is back up to at least 12 medium frames of nectar and honey. A significant improvement over the frightfully low 2-3 frames the colonies were down to when we started feeding. Hopefully the bees are now in much better shape to survive the winter months than they were before.
All except our one remaining Italian colony, Rosemary, that is. Today we found that this colony in the last two weeks has experienced a dramatic drop in population. They do have plenty of stored feed, but like Chamomile in the weeks before the demise of that colony, the population in Rosemary has suddenly dropped, precipitously. Far more so than either of our two ferally sourced colonies.

The Rosemary colony has stored nectar and honey, but their population has declined dramatically
Rosemary’s cluster has moved down the hive, as expected for winter, but the population seems alarmingly low. We only found one hive body that contained any brood, on just a few frames, and the adult bee population seems barely large enough. We did see a little capped and uncapped larva, but this weekend we may need to investigate a little further. Needless to say, we’re concerned. Both feral colonies, Lavender and Salvia, by contrast, seem to be doing very well.
In the meantime, a few beekeepers have asked us how we make fondant for feeding bees, and I promised to post the recipe with instructions, but got sidetracked during the last post with the Chamomile hive collapse. So now, without further ado…fondant.
Fondant will not make up for extreme deficits in stores in the hive. Feeding syrup in early fall, and on warm days, is much more effective and efficient, and more readily utilized by the bees, but fondant may make the difference between life and death when overwintering some weaker colonies, or late swarms.
Bee Fondant Recipe
10 lbs granulated white table sugar*
2 pints water
2 teaspoons of White Vinegar
pinch of salt
Equipment:
Heavy bottom 7-8 Qt stock pot
Wooden spoon
Heat-proof containers for molds
Candy Thermometer**
Before starting, prepare the molds you will use to form the fondant blocks. Any heat-proof container will work, just be sure to use molds that aren’t too tall for the shim, or feeder type you are using.

We mostly use shallow heat-proof dishes as molds, any shape is fine
We line our molds with foil. This serves two purposes. It helps to lift the fondant free from the container, otherwise you may find you need to chisel it out. Trust me, the fondant sets really hard. Once lifted from the container, the foil can can be wrapped around the blocks for storage.

Line each mold with foil
We store the excess fondant in airtight containers, and wrapping them in foil prevents the blocks from sticking together in storage. Especially important if you live in a humid environment like we do.
Once the molds are prepared, you can begin to cook the fondant. First, add a pinch of salt to the water. Place the sugar in the pan, and then pour the water over the sugar, and stir.

Stir the sugar and water together
Heat this sugar and water mixture over medium-high heat to 238 degrees (which you’ll know is ‘soft ball stage’ if you’re a candy maker). Stir the mixture constantly to prevent overheating, or burning, the sugar at the bottom of the pan. Remember, stir stir stir, burnt or caramelized sugar is bad for bees!
Once the mixture reaches 230 degrees Fahrenheit, stir in the vinegar. The acid in the vinegar helps to invert some of the sugars, making them more easily digested by the bees.
Continue stirring until the mixture reaches 238 F.

It takes a little while, but the syrup will reach 238F. Remember, if it doesn't get hot enough, it won't set!
Note that during cooking the syrup will foam at the surface, just be careful not to let it foam too much and boil over.
One you’ve reached the target temperature, remove the mixture from the heat, and cool to 200 F. Once cooled, whip the fondant with an electric beater until the mixture is opaque, and white in color. I recommend using a hand mixer, as transferring searingly hot molten sugar to a stand mixer at this stage can be very dangerous. Mix at slow speed at first to avoid splashing, and gradually increase the mixer speed as you go.

Let the fondant cool to 200F, then whip with an electric mixer until the fondant turns white
Once whipped, immediately ladle the fondant into foil-lined molds. You’ll need to work fairly quickly as the fondant will begin to set.

Leave the fondant in the molds until cooled to room temperature, and set
If feeding fondant in warmer weather areas, you can heat the mixture to 250 F for a denser brick of fondant that will resist melting better.
You can still feed 2:1 syrup on warmer days too, but the fondant will take longer to consume, and hold them over on the days the hives can’t be opened due to bad weather. You can also place the fondant directly on the top bars if there’s concern the bees won’t move up to the feeder in cold weather, but you’ll need a shim.

It's a little work to make fondant, but the bees will usually take fondant much more readily than they will take dry sugar
*Brown sugar, and raw sugar, contain caramelized ingredients that are harmful to bees. Confectioner’s sugar contains corn starch that is indigestible. Only use granulated white sugar!
** Don’t ‘eye-ball’ the fondant. Occasionally we hear beekeepers complain that their fondant didn’t set. In every single case, when asked, they admit to NOT using a thermometer to test the temperature of the syrup. Making fondant is more science than art, you can’t tell just by looking at it if it’s done. If you use a thermometer, I promise your fondant will set every time!
Now for the obligatory legal bit…
WARNING! WARNING! WARNING!
Sugar is flammable. Don’t allow the sugar mixture to boil over, or you’ll have more excitement on the stove top than you bargained for!
Molten sugar can cause SEVERE BURNS. Seriously. Don’t make fondant while naked (that’s my common sense voice, not the voice of experience). Banish small children, AND PETS, from the kitchen while preparing fondant for your bees. Protect your eyes, and avoid splashing while stirring. Be very careful when transferring the fondant to the molds. Leave it undisturbed until it’s cool.
Congratulations…you’ve finally made it all the way to the end of a very long, but hopefully helpful, bee post!


Clare,
I’ll have to make some fondant. Your bees are hungry no question. What is the recommended amount of stores there for winter? Ours is 40 pounds of honey. I have not feed for weeks, last check one deep box was full of honey. We are just now getting cold rainy weather and I’ll feed them once it clears up.
40 lbs is the recommended average here too. Although we don’t get very cold, we can be prone to some very extended periods of rainy weather. Although some winters we do get runs of remarkably warm weather. Last January was in the low 70s for much of the month…but then it rained until June! I’m glad your bees have done so well this season, our Italians seem to be struggling this year. I do wonder about the Queen quality from the apiary we acquired those packages from, especially as our spring weather was so bad. I’m afraid Rosemary won’t last much longer.
Hi Clare,
Great post… I’m beginning to think I’m an expert in Bee keeping now! 😀
And as for naked fondont making… Awwwww, that’s a shame as I really do love cooking whilst naked 😛
I think naked fondant making should be left to the professionals 😛
Glad you enjoyed the post, I wasn’t sure how interesting it would be to non-beekeepers. Although I’m often asked by people who don’t keep bees why on earth we need to feed them.
We’ve been fortunate this year. I inspected our hive two weeks ago and the bees have plenty of stores. We did have a nice fall bloom of goldenrod and other wild flowers, plus the bees have access to cultivated flowers in the area. I fed them like crazy though early on.
It is a long road to that first jar of honey though. And I’m glad it’s a hobby for me and I don’t have to cost justify it!
I think with our early October rain we’ve had a mini nectar flow in the last couple of weeks. Nothing substantial, but I am seeing a few extra blooms about.
I’m glad your bees managed to build up enough reserves. I know we have extra competition in the neighborhood, with some others who started keeping bees this season. I think with the way our native flower nectar flows work here though, we’re always going to have to scrutinize our bee’s stores in late summer, just to be sure they have enough. Some years years apparently though are very good. I’m looking forward to one of those 😉
Although it is now obvious to me after reading your post I had not appreciated that wild flowers would not be available evenly over the growing season. Surrounded by garden flowers I tend to forget nature works differently.
Your posts are making me realise that bee keeping is more complex than I supposed. There was me thinking the bees just got on with it and you got honey at the end 🙂
I wish beekeeping was so simple. I too once thought that honey just ‘happens’. I’d never really appreciated how much work the bees, and the beekeeper do!
Clare I love reading about the beekeeping even though I don’t officially keep bees, my gardens feed them though…fascinating…
You may not be a beekeeper, but you are a bee-hoster through all the blooms they get to enjoy in your garden! 🙂
I too am starting to feel like I am learning beekeeping. It really is fascinating all that goes into it. Now I learned to make bee food. I like your warnings at the end. Cute humor.
I never appreciated how much of a sweet tooth bees have! I did not expect to spend hours in the kitchen each year making bee candy. But, considering it is Halloween, it seems appropriate 😉