It’s December. Almost the end of the year, and we’re reflecting back on what we’ve accomplished thus far. Overall it’s fair to say we are a little frustrated, and anxious to get planting, but sometimes gardening is a lot like painting a house. You can skip the prep and just slap paint on the walls, but the end result will suffer for it, and you’ll spend countless wasted hours in extra maintenance for cutting corners. Gardening isn’t much different. Since spring we’ve known that our primary goal was to get the orchard and vegetable gardens fully deer fenced. How long could that project POSSIBLY take? We’re not trying to fence in the entire 7.5 acres after all. We could have just thrown some posts in the ground, and tied the fence to the posts and called it done. However, our little deer fence project has turned out to be much more involved than that. Let’s back up a little.

The Problem...Deer
First, there was the poison oak (Toxicodendron diversilobum). I’m not talking a few wisps of foot-long ground hugging vine. I’m talking multi-trunked 30 foot vines strangling the tops of dead oaks. The first year we were here we had some rather spectacular red fall color…turned out our oak trees had nothing to do with it. It was all poison oak.

A mature poison oak vine hugs the trunk of an oak tree
A quote from botanist John Howell sums it up rather well “…in autumn its colors flame more brilliantly than in any other native, but one great fault, its poisonous juice, nullifies its every other virtue and renders this beautiful shrub the most disparaged of all within our region” [1]. Although we recognize its virtues, we’re almost convinced this vine is sentient, and regardless as to how much you endeavor to avoid it, it still reaches out and grabs you when you least expect it.

Poison oak vines hanging from every tree and shrub were impossible to avoid
One of us, thankfully, seems to be immune to it, however, the other breaks out in a vibrant red rash, that seems to worsen with each encounter, resulting in multiple Doctor’s office visits, and questions along the lines of “you do know what poison oak looks like, don’t you?”…to wit the response usually goes, “YES! Now can I pleeeeeaase have some ointment before I scratch ALL the skin off my arms!?!” The one wielding the chainsaw above unfortunately is the one that gets the rash. By mid-summer though, after going about 10 rounds, we did finally win the battle against the poison oak in the orchard…though not the war, as small sprouts of it still keep popping up here and there.
Moving on though, the next task was to assess the existing trees in our future orchard. We have two distinct micro climates here, courtesy of the steep slopes that orient northeast-southwest. The east-facing canyon slopes receive dappled morning sun, and plenty of afternoon shade, and are primarily comprised of coast redwood (Sequoia sempervirens) and Douglas fir (Pseudotsuga menziesii). The south and west facing slopes see lots of afternoon sun, which can be quite intense in summer. The sunny slopes are more chaparral-like, with a mix of bay (Umbellularia californica), oak (Quercus agrifolia and Lithocarpus densiflorus), and Pacific madrone (Arbutus menziesii). Of the trees on the property when we arrived, our redwoods were by far the happiest and healthiest, so when assessing the trees in the orchard area, the first rule was if you’re a redwood, you stay, no question. This was easy, because so few redwoods are found on our sun-drenched slopes.

There was no question of leaving these trees alone
Of the remaining Live oaks, tanbark oaks, and bay trees, some were healthy, but many were not. Little had been done in regards to management of this property for years before we acquired it. As such, the living trees were overcrowded, spindly, and leaning to try to grab any light they could. Bad limb breaks that had not been cared for resulted in either death, rot, or serious disease for a handful of Oaks, and the most dangerous trees were removed first.

Dead tanbark oak - just one of many
Rule 2, if you’re incurably sick, or dead, and you’re in the orchard area, you’re gone…after nesting season is over of course, which delayed tree cutting until mid-summer, and carried us to into early October.

Fungus growing from a dead oak - even in decay, there is beauty
With the slope tidied up, the next task was to develop an irrigation plan, and assess how we get water and power to the future orchard. It’s easier to rough these items in before the fence is up and becomes an encumbrance. We also needed to develop an erosion control plan for the now relatively denuded orchard slope.

Removing the poison oak, and sick trees, uncovered an old guest house foundation
With all that figured out, it was time to walk the perimeter of where we intended to install the fence, and mark out the number of posts we’d need, how many linear feet of fence, and determine where the obstacles were, and how to address them. Safety was also a big concern, as the vegetable garden will sit atop a large plateau, that despite relatively gentle slopes on three sides, has a sheer 30-40′ drop-off toward the driveway on one side. I’m envisioning spending some lovely sunny days in the gardens next spring with the dogs, but do not want to have one of our enthusiastic Labradors launching themselves off a 40′ cliff by mistake. Double fence on the cliff edge, and barrier plantings in spring forward of the fence, hopefully should take care of that problem.

Our adorable garden helpers
See, this post is long already, and we haven’t driven in the first fence stake or planted anything yet! That rather sums up this year overall. We’ve spent months just on the prep for the gardens and orchard (don’t forget we do have day jobs, and a few distractions diverted our attention from time to time)…BUT at last, the end of the deer fence project is in sight! Really!!! Really? Oh I hope so…some days I’d rather spackle holes in walls, prime and mask off windows and trim…and I DESPISE the prep required for painting a room. But, I’m also a believer in if a job is worth doing, it’s worth doing right. I know someday we’ll look back and realize all this effort was worth it.

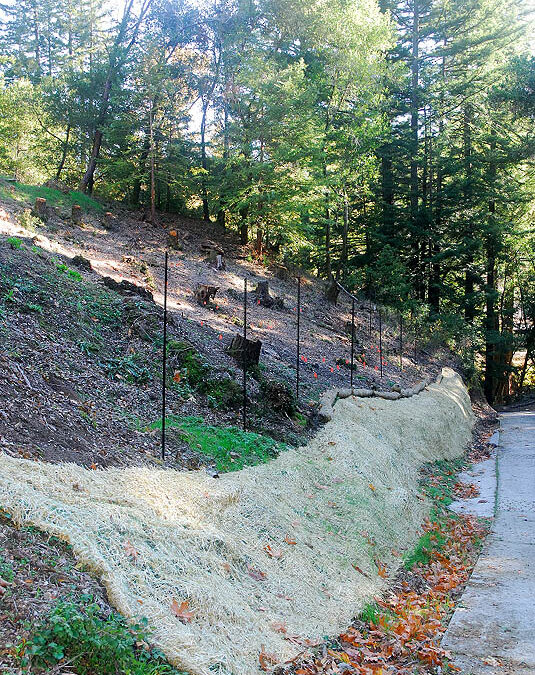
Deer fence posts in place, with an erosion control blanket at the foot of the slope
So, here we are, beginning of December, and phase one of the deer fence is actually complete! ALL the fence stakes are now in the ground. We’ve also installed the 8 gauge mono-filament line that runs around the entire perimeter of the area, 7ft off the ground. This will support the top of the fence, and prevent it from sagging over time. However, here is where we encountered another minor delay with fence installation.
Leading up toward the vegetable garden, along the top of the ridge of the orchard, is a 10 foot wide dirt road. This road was partially cut in when we moved here, but we’ve since improved it so that we can get our very small tractor up to the garden area for hauling mulches, compost, and timbers for constructing the raised beds (our next task).

A felled oak laid out across the road leading to the vegetable garden
The slight snag is that the fenced in perimeter crosses this roadway, and unless we build a gate across the road, the deer-fence will be completely useless. Fortunately our solution seems fairly straightforward…although many of the tasks around here seem straight forward…at first.
Last year our neighbors had acquired a large, heavy-duty, custom built arbor from a friend that no longer needed it. However, the arbor was entirely too large in scale for their own landscaping. They offered the arbor to us, as the alternative was that it would likely end up on the burn pile. Not quite yet knowing what we’d do with it, we agreed to take it, if for no other reason that it was in decent shape, and seemed like a lot of lumber to just torch it. The arbor is 10.5 feet wide x 8.5 feet tall, spans the entire width of the road, and the tractor fits underneath it perfectly! Last weekend, after some priming, painting, and minor rot repairs near the base, we finally put the arbor together, and with some creative tractor maneuvering, and some rope, the two of us managed to install it across our roadway.

Newly installed arbor. The deer fence will terminate on each side of the arbor...next we need to build a gate...
It still needs some corner braces, and we do need to build a double gate underneath it, but otherwise, it fits perfectly! The arbor is also the last piece of the fence puzzle that needed to be installed before we could unroll the deer fence, as the fence ends will need to terminate on each side of it. Now the arbor is up, we can attach the ends of the mono-filament, and finally put up the mesh deer fence.
Although we haven’t quite secured the orchard and gardens yet, we’re very close. Weather permitting, this weekend our plan is to FINALLY finish the deer fence. After all this preparation, building the raised boxes for the vegetable gardens this winter should be FUN. More to follow as soon as the fence is complete…
[1] Howell, John Thomas; Frank Almeda, Wilma Follette, Catherine Best (2007). Marin Flora. California Academy of Sciences; California Native Plant Society. pp. 264.


Oh deer! That sounds like an epic undertaking, but I’m sure it will be worth it in the end.
Oh very interesting, and not too long for me – a fun read! We are considering fencing off just one area of the property, leaving good passages for deer and other critters to cross. One day I might like to grow veggies and other things deer and bunnies etc eat. Interesting about the monofilament. What will you use for the fence itself?
Wow this is quite the project. I loved reading about all the prep work. It doesn’t seem like any projects that we’ve done (small in comparison to yours) are ever as simple as they seem like they should be. I love the arbor as the gate entrance.