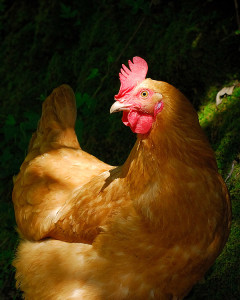
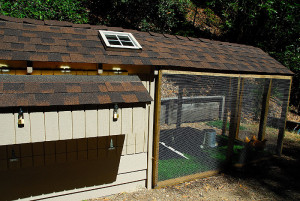
When we acquired this property, one of the first tasks we undertook was building our chicken coop. We’re increasing the size of our flock at the end of March, but before we do, I thought I’d give you a tour of our existing coop that we built for our first Buff Orpington hens.
Our coop was a rather involved project as we’d never built a chicken coop before. We began by looking at commercially available coops, and it seemed most fell into the category of beautiful but absurdly overpriced, or cheap and it really showed. Not averse to a little do-it-yourself construction, we decided to design and build our own. At least with a coop, there’s no sheet-rock to install or tile to set!
Our construction plan for the coop came from poring over numerous other designs that we found in books or online, and adapting features from various coops into what we hoped would prove to be a unified functional design for our purposes here.
I’ll Huff and I’ll Puff
…and I’ll blow your house down…although I’d dare you to try! First and foremost, our coop had to be sturdy. As such, we built the coop with 2×4’s, exterior grade siding including Hardie Plank siding down at ground level to resist moisture/termite damage, and a 30-year asphalt shingle roof. We’ve joked a few times that if we plumbed in a bathroom and a kitchen sink, we could probably rent it out!
Easy Maintenance
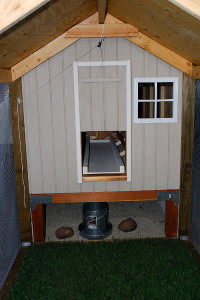
Second, the coop had to be easy to clean. Good husbandry practices dictate that all surfaces of the coop are easy to reach. Really, why make that job any more difficult than necessary? The interior of the coop is fitted with a center gangway that slides out, and on that rests the two removable roosting racks.
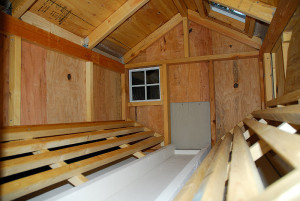
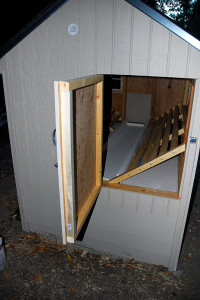
The center walkway and roosting racks are removable. Note the roost poles were rounded over before the hens moved in.
This permits us to completely disassemble the interior of the coop as necessary to scrub the gangway, floors and racks. Of course, to do that, the rear door of the coop had to be made large enough to facilitate removing those structures.
The reality is that chickens are messy. Even a few hens can generate a significant amount of waste while roosting at night. To make routine cleaning easy, without having to completely tear apart the coop, we also installed slide-out poop-boards under the roost poles, with access door panels on the outside of the coop to facilitate removing the ‘night-soil’ which is then composted for the gardens.
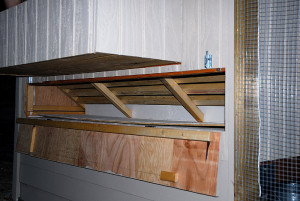
Soil from under the roosts can be removed without entering the coop via the access doors (one on each side of the coop)
A Place for Eggs
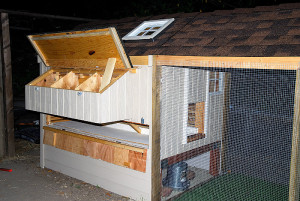
As the whole point of the project was so we could enjoy our own farm-fresh eggs, we needed accessible nest boxes. Not just accessible to the hens. We didn’t want to have to enter the interior of the coop to retrieve the eggs. We constructed the nest boxes to be accessed from outside the coop, and the eggs are collected by lifting the nest box roof.
Each nest box is also fitted with a night shutter between the coop interior and the entrance to the nest box. These shutters are closed before dusk to prevent the hens from roosting in, and soiling the boxes, which in turn reduces maintenance, and keeps the eggs clean.
A Secure Roof
We felt it was important to put a roof not only on the coop itself, but also across the attached run. The hens spend time in the run during the day when we can’t observe them directly while free-ranging.
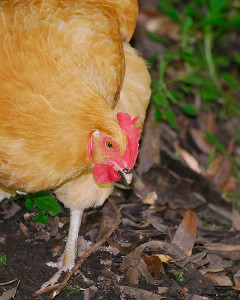
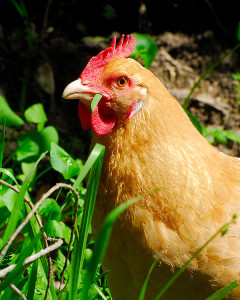
Our hens love to range, hunting bugs, and eating weeds, but if we aren't available to keep a watchful eye on them, they have a secure run
We simply have too many predators here to turn the hens loose unattended during the day. The run roof helps to keep feeders and waterers clear of debris, but also helps to provide shelter from the pounding rains in spring, or the scorching summer sun.
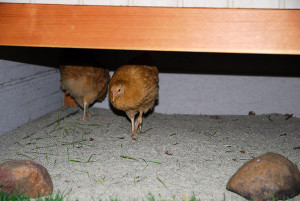
The main part of the coop is raised up off the ground, both to protect the structure from wet soils, but also to provide the hens with a secure hiding place out of sight of our wandering wily coyotes (Canis latrans) that often pass through during the day.
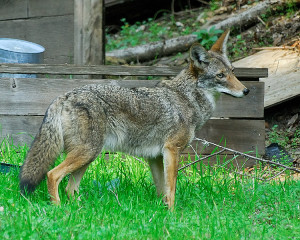
A regular sight here, it's comforting to know our hens are secure from coyotes looking for an easy meal
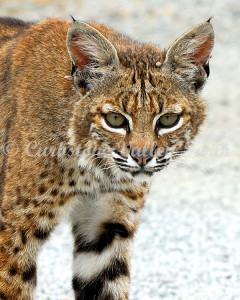
…or even the occasional Bobcat (Lynx rufus)…
To make the space under the coop more useful, we added some deep fine sand underneath and most days, if you can’t find the hens in the run, they’re usually having a jolly good dust bath in the sand pit.
A Secure Run
Lastly, and perhaps most importantly NO POULTRY WIRE! Happy hens are happiest when not being bothered by rodents. Hens are messy, it’s a fact of life, they will spill food. Spilled food attracts mice and their ilk. Poultry wire is too large to prevent rodents or small birds from entering the run, it’s not very strong, and degrades/rusts quickly. Instead of poultry wire, the entire run is wrapped in 1/2 inch hardware cloth. It’s sturdy, and the holes are just small enough to keep rodents and small birds out. We did goof and use poultry wire under the coop to keep moles and gophers from tunneling in, but it has since degraded, and is now being replaced with hardware cloth.
Coming Soon…More Chicks!!!
We’ve had our small flock now for almost three years, and it’s been so much more fun than we anticipated, so we’ve decided to expand! That’s right, our flock is growing this spring!
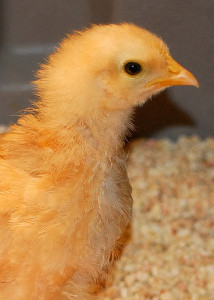
At the end of March we’re adding some more Buff Orpingtons to the farm, but also branching out and adding some beautiful Partridge Plymouth Rocks, Black Australorps, and the more rare Delawares, and Golden Laced Wyandottes to the mix. We’ll post pictures, and maybe even a little video, just as soon as our adorable chicks arrive!





Wow – those are some lucky hens. I do have to say that I thought our wild squirrels were a bit pesty…your wildlife photos are something else entirely. Thanks for visiting my site – I using this snowy day to shop for arbor options. Kelly
As usual you guys put more thought into your project then I think I put into our house addition…I was just contemplating that I would have built the thing and then gone…”hmmmm how do I clean it and oh crap, how do I get to the eggs.” It is however nice to put myself, if only temporarily, at your farm looking at something other then the 20+ inches of snow and blizzard like conditions we are having here in PA….
Looks like you paid a lot of attention to details for your well-designed coop. Lynda has told me “no chickens” so I guess I can live vicariously reading about other folks flocks. Thanks for sharing!
This was such a great post! I love how you broke each part of the coop down and explained why you chose to do different things.
I hope you’ll show us your new babies when they arrive!
Wow that’s a fancy chicken coop, I’ve lived in worse back in college, lucky chickens. Ye got some pretty impresive cats over there too.
Enjoyed this post, such cool details and design. KUDOs! I had Buff Orpingtons years ago when I lived in the mtns they are good layers!
They’re very lucky…we haven’t even started remodeling our house yet!
Tom, I’m sorry…20 inches of snow! Ugh! You’re welcome here any time!
Villager, talk to Lynda…once the coop is up, chickens are the easiest farm critters to care for. Honestly, I forgot that eggs actually have FLAVOR! Our first omelette with our eggs shocked me…it had such a beautifully strong flavor!
Sunny, yes, our wild cats are impressive…I just found Mountain Lion tracks on the ridge this afternoon……hasn’t been a sighting here in almost 5 years! Guess we’ll figure out just how predator-proof our chicken run REALLY is!
They live in a palace. Looks like the kind of coop in the warner brothers foghorn leghorn cartoons, with the wolf or coyote waiting to pounce. Okay, it’s late I am not sure where my imagination is now. Your place is very impressive.
I could never have chickens. All I’d have to do is mention the words “slide-out poop-boards” and he’d put the kibosh on it.
The idea would never fly.
I’m so punny this evening 😉
Oh Kyna, really, don’t even mention the poop-boards. We can sway him with adorable cute videos of little fluffy peeps. Just check back in at the end of the March, and we’ll make his heart melt…promise!!!
Fabulous chicken coop. And I love the new breeds of chickens that you’re getting. I have one Black Australorp and two Black Sexlinked hens. I’d love to get a Silver Lace Wyandott someday. I think they’re the most beautiful breed ever. And I agree that the flavor of homegrown eggs is amazing.
Those ladies are sitting pretty! I love how all the doors of their mansion remind me of a Delorean. But then again, I am a child of the 80s. That bobcat is a stunner!
Beautiful Coop! Love it! How many birds will it hold? We are at the weather proofing stage of our coop… As we stain the outer walls we are wondering about the inside. Did you use any paint or stain that would be easy to clean off? Our friend that is building the coop thinks we should use some enamel like paint for easy cleaning. Any words of wisdom?
This coop will hold about a dozen hens very comfortably, although we are considering adding an extra bank of nest boxes on the opposite side of the coop as we now have more chicks on the way, but there’s no rush, they won’t be laying eggs until September. We are going to add an extension to the run though so they’ll have a little more elbow room outside.
On the inside I did prime and paint the floor of the coop just to help extend the life of the wood. I just used a latex based exterior grade paint, and it’s holding up very well. I didn’t paint the walls, in part because chickens like to obsess on things, and I didn’t want them peeling and eating the paint. Everything else is just raw wood, mostly fir. We used rot-resistant redwood anywhere the wood could come into ground contact, and of course primed and painted all the exterior surfaces. I put a little straw on the poop-boards to make it easier to clean them too. Stops the soil from adhering to the wood too much.
Dear Curbstone Valley, I am so IMPRESSED and I was riveted to your account of designing and building the coop. It is splendid and incredibly practical.
Obviously in a small London garden it would not be possible to keep hens, but my friend B in the country has three Black Rocks which are very handsome birds. Sadly, they do not live in quite the luxury of yours but they are, I assure you, very much loved and well looked after.
I have SO enjoyed this posting.
Great looking coop and beautiful hen! We have discussed adding a coop but with the expanded vegetable garden (and aging bodies.. lol) we have placed that on the back burner for now.
What beautiful hens – can’t wait to see the new arrivals!
Thanks for providing great info on the choices you made in putting together the coop. If I ever get as far as keeping chickens, it will have to be an ‘off the shelf’ coop, as we are not very handy! But you’ve given me lots of great ideas of what to look for in a design.
It must be one heck of a secure run, those predators don’t look like they’d be easily detered!
I love those hens! I even showed their portrait off to my sister, who was in the room. 😉 Can’t wait to see the new varieties this spring. Sounds like you are doing your part to preserve our diverse domesticated animal heritage!
What a great post. I enjoyed reading it very much and am forwarding it to Chicken Farmer (my sister).
Wow! That is quite the coop! My sister Noelle sent me the link to this post and I’m so glad she did. I’ll be sure to bookmark it for inspiration and ideas if we ever decide on a larger flock and a larger coop. I bet you have some happy hens. Good luck with your newest chicks.
Love your blog have just discovered this via Blotanical – I know where I’ll be heading if we manage to get some hens here 🙂 Miranda
wow you have really worked on the chicken coop, looking terrific.
That is quite the coop. I’m really impressed. Seems like you’ve thought of everything. I hope it’s as easy to use as it looks.
Thanks for visiting my blog. I just love Buff Orpingtons, and may go for a full flock of them (although the blue-green eggs of Americaunias are pretty tempting).
Your coop is a thing of beauty. We’re going to have to redo our coop eventually, and address some design issues. . .
Delighted to discover your work on the farm and your record of it here. Thank you so much for chronicling your experience, and especially for including such detail on your chicken coop and pen.
wow, i am impressed! Your chicks live an upper class hen’s life for sure! I really like the pull out poop board. All that good fertilizer so easy to obtain. You have really done an excellent job of planning and building your coop.
What a wonderful post! I do not know how I missed it! Your coup is quite the palace… you have thought of everything! Safety, convenience, comfort… If I were a chick I would ask to be put on a waiting list for your place!! Great shots of the wildlife!
this was so timely. i, actually my husband needs to build a chicken coop next weekend and yours is the alpha chicken coop of chicken coops.
i presently have 5 chickens. at the time we impulsively acquired the first 3 we had an empty rabbit hutch which my husband made chicken safe, dry and secure. the chickens were then locked in the rabbit hutch each night. during the day they are able to roam free in a very large, fenced area surrounded by redwoods. this past father’s day we acquired 2 rhode island reds as very new chicks from the mountain feed store in ben lomond.
i have always felt that the lights used to keep newborn chicks warm were harsh and could not be effective enough to warrant 24 hours of blaring light. they were babies after all. so, i decided to change the normal routine this time.
first i scrubbed a large metal wash basin and wiped it with diluted clorox. i then dug out the heating pad intending to just lay it on the bottom of the basin and on the way back to the tub i passed a draw from an antique side table that i had been moving hither and yon which was about 8x6x6 inches. removing the bottom and one end i place this in the middle of the basin with the back of the draw abutting the side of the basin. this left the front with the removed end open. i might leave the bottom on and just reduce one end of the draw next time.
i set the heating pad on the outside of the draw covering it with an old, soft tea towel nested. the pad was set on very low and it stayed on all day. in the middle of the draw i put their chick starter mounding it up high on the back end where i sank a small ramekin filled with water. they scratched for their food from the beginning and the water rarely tipped. i kept them in the living room where i could keep an eye on them and keep their living space cleared of droppings. the first week or so every few hours i would turn off all the lights in the room and they would go and snuggle together in their warm, tea towel nest. they were active except for the times they ‘took their naps’ or just chose to rest, snuggled into the warm tea towel. these chicks grew into the healthiest chickens i have ever had and i think their beginning weeks made a difference. i could easily put the set up together again if you would like me to send you a picture. i also put clean shavings on the outside of the draw to keep the chicks separated from the cold metal floor. they never seemed to eat the shavings even when the edges of the shavings and the organic chick starter blended a bit.
as they got older they would perch on the edge of the draw and ultimately on the edge of the basin at which time they were taken from the living room and to a guest cottage which has a deck that abuts the area where the older chickens live. i moved them from the wash basin into a wired dog cage that was faffing about from past pets. this worked well because it allowed us to put them out on the deck on warm days exposing them to the older chickens but keeping them safe from aggression. they were able to observe the way the flock behaved and it gave them a ‘birds eye view’ of the pecking order and the acceptable manners of the existing flock. i hoped this exposure would shorten their learning curve when they became part of the flock causing less disruption. at night they would be locked back in the cottage in the wire cage. they spent the evening perched on the edge of the original draw which we just place in the middle of the cage.
as they out grew being in the dog cage 24/7 we were able to stretch a portable wire fence, again faffing about from past pets, across the deck between the the fence and the studio wall. this allowed them to be with the other chickens and yet safely separated. at night they went back to the cage in the studio. ultimately they made the decision when to fly over the stretch of fence and join the other hens but also retained the ability to fly back when they felt threatened. the older hens were no longer flying by this time. they are now part of the flock, healthy and shiny.
the newest two, rockin’ robin and beadie eyed beth, got their own rabbit hutch which makes the area look like an evolving housing track and that has brought me to want the safer conditions of a chicken coop and yours is exactly what i envisioned. thank you. ls
your farm must be just amazing! I will need to wander further into your blog to check out your gardens 🙂
Hey Curbstone,
Thanks for you comment on my backyard farm blog. I will definitely check out the sourdough recipe you mentioned.
Lovely site, by the way, love the photos.
Lisa