Of everything we grow in the vegetable garden the only item used in the kitchen with greater frequency than fresh garlic, is onion. From salad dressings to soups, to breads, and baked dishes, there are a myriad of uses for garlic in the Curbstone Valley kitchen. We simply couldn’t be without it.

'California Early White' Garlic (click any image to enlarge)
Although we’d usually purchase garlic from local area Farmer’s Markets, last October we planted our own, with the hope of having more than enough to get us through the year.
The greatest downside to growing garlic is the loss of valuable vegetable garden real estate.

Garlic in early March 2011
Garlic takes 8-10 months to mature in the garden, taking up space that could potentially house a number of alternate crops in the same period of time. As such, when planting your own garlic it’s important to plan ahead to ensure the garlic isn’t planted in a bed that’s needed in early spring.
As this was the first crop of garlic grown at Curbstone Valley, we planted two varieties of softneck garlic this season, ‘California Early White’, and ‘California Late White’. Neither are particularly special or unique varieties, but both are known to grow well here, and store well.

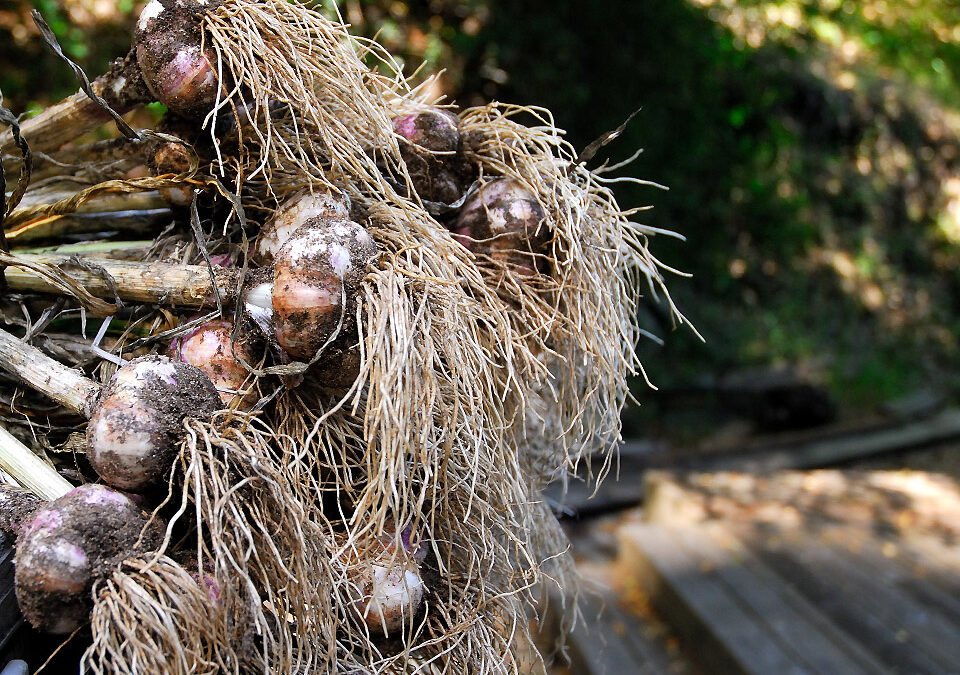
Yesterday we harvested the Early White garlic we planted in October
Depsite an excessively wet spring, our first garlic harvest at Curbstone Valley is looking great so far.

By early May the garlic was taking over the planting bed
We’re growing garlic in raised beds, in richly amended, fertile, loose and free-draining soils. What we don’t have control over though, is the weather. This last weekend we were assaulted with almost three inches of rain, practically unheard of in this area in June. That much rain, so close to the garlic harvest, can create a number of problems, especially if the soils are less than ideal.

After the last rain we noticed some minor rust on some of the leaves
We were lucky however. Despite a minor outbreak of rust (Puccinia allii) on a few of the leaves due to our strange spring weather, the garlic otherwise seems unscathed. The rain however did push up our garlic harvest, as we were concerned about leaving the bulbs in damp soil this close to harvest, and wanted to remove the affected plants to prevent the rust from spreading to our other garlic crop.
As such, yesterday afternoon, in between being bombarded by a few grumpy bees, I managed to bring in the first of our ‘California Early White’ this season.

Our first garlic bulb of the season
There’s no hard and fast rule for when to harvest garlic, but there is a fine line between harvesting too early (where the bulbs haven’t matured), and harvesting too late (where the bulbs are too large and don’t store well). An average guide is to harvest when 40% of the leaves have browned, but it’s also important to remember that water stress, and disease, can result in browning leaves. I prefer to pull the soil away from a few bulbs and assess the size of the bulb, and the tautness of the outer skin before committing to harvesting.

Pulling back the soil at the crown you can assess bulb size and outer skin tension. If the skin is too loose around the outer cloves, you've waited too long
When in doubt, it’s usually best to harvest early rather than late, as garlic that is harvested too late won’t store as well.
I prefer to harvest the garlic by hand to avoid bruising, or slicing, the bulbs. Pulling the soil away from the crown, I work my hands under the roots, and then lift the bulb up out of the soil from the base. It’s important not to pull the plants by the leaves, as these need to remain attached during the drying and curing process. They both help to return energy to the bulb, but also prevent bacteria from entering the top of the bulb while drying.

'California Early White' Garlic
The majority of these ‘Early White’ bulbs were beautiful, and of a good size, and a few were veritable monsters. Despite the small amount of rust, the behemoths will likely be saved as planting stock for the fall. Controlled studies have shown that cloves from infected plants did not result in rust developing in the subsequent crop [1]. However, crop rotation, and disposal of affected leaf litter will be important to prevent overwintering, and reinfection.
A few puny heads of garlic were in the bunch too, but those we’ll simply use first, maybe roasted, and their tiny cloves squeezed onto fresh slices of hot crusty French bread, with a little butter and chive…oh, sorry…the harvest.

The smaller bulbs, like this one, will be used first. The largest of the harvest will be saved for replanting in the fall.
Harvesting the garlic is only half of the process. To store garlic, it first must be dried and cured. The loose soil is brushed from the cloves, and the garlic is hung to dry. As I opted for a greenhouse rather than a shed in the garden, finding space to dry the garlic was a slight challenge. It’s not advisable to ‘sun dry’ garlic. This tends to alter the flavor of garlic, and can actually sunburn the outer cloves, imparting an excessive bitterness to the cloves. A cool, dry, shaded area, either inside, or outside if the weather is dry (and secure from browsing wildlife), is all that’s needed.
Our cobbled together garlic drying racks are re-purposed seed tray holders, the ones with the larger format holes, just large enough to pass the garlic leaves through, but small enough to support the bulb heads.

These open weave seed tray holders make excellent garlic bulb holders for drying
We have them in assorted sizes and shapes here, but using these we can ensure that the heads are exposed to plenty of air circulation all the way around, and as a result there should be minimal risk of mold or rotting cloves as they dry.

We turn the trays upside down, and slide the leaves through the holes so the heads are supported at the top
So now we wait for 3-4 weeks for the garlic to thoroughly dry. During drying and storage we’ll routinely check the bulbs for evidence of mold or bacterial rot, and discard any showing signs of disease.
Once cured and dry, if I’m feeling brave and creative, perhaps I’ll try my hand at crafting my first garlic braid.

The leaves hang below while the garlic dries and cures
If you plan to plant garlic this fall, most vendors have seed garlic for sale beginning in September, but many vendors sell out quickly, especially of the more popular varieties. If you need seed garlic for fall planting, I’d recommend pre ordering stock in late summer to ensure you have the variety you need for fall planting.

Stored garlic should be checked for mold and disease, and discarded
Be sure to order certified disease free stock to avoid introducing pathogens into the garden, and always rotate garlic crops in the garden with non-allium crops for at least three years to reduce the build up of soil-borne pests.
In about a month, with favorable weather, we should be harvesting our ‘California Late White’ garlic too!
———————–
[1] Koike ST, Smith RF, Davis, et al. 2001. Characterization and Control of Garlic Rust in California. Plant Dis 85:585-91.


This was a really informative post! I’m determined to do a fall planting of garlic this year (my first), and I’ll remember all that you taught me here. Thank you!
Good luck with your first planting Alan! My biggest issue has usually been remembering to plant it in time, as the garden is usually winding down in October-November. I’d recommend starting with a proven hardy variety for your region the first time you grow it. Lots of compost, and a little sand if necessary to help improve drainage, and, weather permitting, you should have a great summer harvest!
Claire, your post on garlic could not have come at a better time, as my hubby is losing sleep and proliferating gray hairs over his lack of success in the garlic growing department. He bought some bulbs at one of the big box stores last year and planted them in one of our veggie beds. Growth looks stunted (too much water from both our weirdish winter weather and daily irrigation?) and he can’t figure out the optimal timing for harvesting. Your tips are really helpful!
Stunting can be number of things. Irregular water, or lack of nutrients, disease, or poor quality seed stock. When I plant garlic I only plant the largest cloves from the bulbs. The small ones I just save for the kitchen. Also, in spring, as soon as the soil is really workable, and there’s plenty of spring growth, a good shot of organic fertilizer, or top dressing of compost, helps to give the bulbs a boost while they’re starting to form. We had so much rain this year that by spring our soils were probably leached of a number of nutrients, so a spring feed was essential. Harvesting is a little tricky, but if you have well formed bulbs, and the skin is still a little taut over the outside of the bulbs, harvest a few to start. You can always come back for more.
Clare,
I mentioned to Meg tonight about harvesting our garlic. We set bulbs not seeds in October. Ours looks like a good crop although likely not as big as yours. Meg has been braiding garlic for maybe 30 years. I believe it needs to be soft neck garlic to braid. Not sure but braiding them to dry is better than waiting til they dry and then braiding it.
Both our garlic varieties are softneck this year. The downside is, no yummy scapes in spring, but the upside is they’re good for braiding. At least braided they’ll be easier to store. I’d be concerned about braided them while too green because of mold or fungus on the leaves, but I’m sure if they’re too dry the leaves would just break. We’ll have to see how my first attempt goes 😉
Clare,
BTW Home depot has the good kink free hoses 75 ft for $35. We have some 5 year old ones still in great shape.
Our HD didn’t have the kink-free hoses. They used to carry them, but our local one at least doesn’t. I’m going to have to shop around…seems most garden hoses are so cheaply made these days.
Well, your garlic is certainly ahead of ours by a few weeks! I’m seeing some browning of lower leaves here, but it’s hard to tell if it’s weather related. I’ll do like you do and dig a couple of plants to see what they look like. That was a great informative post!
It won’t be long though I’m sure! We’ll have to see how many garlic recipes we can come up with between us 😉 I’m determined to pickle a little this year. The little bit that pickled along with our dill pickles last year tasted fabulous!
Agree with Alan.Really informative post. Beautifully presented and photographed.
mand
http://www.parsleysage.co
Thanks Amanda, and thank you for stopping by!
great information. I planted my first garlic harvest here last fall and am eagerly waiting for a winter’s worth of garlic to appear. You’re right, it takes SO long!
It does seem to take forever, but so worth it! I do already have plans for that garden bed though **taps foot impatiently** 😛
I’d also like to try this, so I appreciate the tips and very clever to use the trays for drying. I was surprised to find a friend grows hers from regular garlic from the store.
The trays were so helpful. It made it much easier to carry the garlic, and it’s and efficient way to bundle them while they dry. Of course, there are a myriad of other ways to dry garlic too, but we already have the trays, and they work great!
You can grow garlic from the store, but here I’m not willing to risk it. I simply don’t know where the garlic was grown, or whether there are pathogens and disease lurking that I’d rather not introduce to the garden. I do read of a number of people successfully doing it, I’m just a coward 😉
Wow, our garlic is still green green green.
What I’m wondering about is the shallots.
Our ‘Late White’ is still very green green green. But I’d expect that, it’s still early for that variety. I didn’t grow shallots this year. I love them, they taste great, but I really need a pair of those onion goggles when I dice them…they’re worse than the strongest onions for making me cry 😉
Makes me think of “beer goggles.”
Mmmm. Sounds like you’d better get to it if you want to make some of those green garlic waffles (simple to do, just add some sliced green garlic to some waffle batter and make the waffles). Enjoy!
I think we’re too far along for much green garlic this season. I wasn’t willing to sacrifice any bulbs this year, but I’ll have to remember your waffles for next spring!
Hi CV,
Great post, very informative… 🙂
Thanks Liz! I don’t think I ever remember anyone planting garlic in England, although it sounds like this year you’ve plenty of warm weather for it!
I am of the “there’s no such thing as too much garlic” school of cookery. Recently, I have been forced to buy garlic in the market (probably imported from California) because I finally used up all the garlic bulbs I stocked up on at the farmer’s market last fall. It will be a while yet before local garlic is available, but soon my CSA share will include those yummy and versatile garlic scapes.
That was the one downside of our softneck garlic this year, NO SCAPES! We might have to try adding a hardneck variety next season so we have some 😉
Clare,
I talked to Meg, dry the garlic first and then braid it. She says if you braid it fresh the stems shrunk and become loose. So you are on the right track anyway. Her farm was one of the first to grow and sell garlic around here many years ago..
That makes more sense, thanks Randy, I’ll let you know how they turn out if I don’t tie my fingers into the braids 😛
Your garlic is beautiful! How long will it keep after it is dried? I never liked garlic when I was young, but in the past few years I have come to appreciate it for its health benefits as well as its powerful flavor.
Once the early white is dried, I’d expect it to store for at least 6 months. It reportedly doesn’t store quite as long as the ‘late white’ variety, which usually stores for 8 months. Of course, it’s always a little variable based on heat and humidity.
What a clever use of old start trays! I will remember that, this July when I’m about to cobble together some rickety mess of a garlic-drying-contraption.
I do like that the tray keeps the garlic loosely bundled together in one place, but not so much so that mold or fungus is an issue. I also like that I can reuse the tray to carry seedlings again when I’m done! 😉
I just had to comment on how much I like your new blog design. It looks wonderful!! Very nice.
thx for these timely tips…mine is ready soon and I just cut off the scapes..plan to eat this wonderful green garlic this week
I planted my second crop of garlic last year. The first crop was small, only 6 plants with small bulbs. I am hoping for a bigger yield this year. It is too early to harvest the garlic here in Ontario and it is usually done in July sometime. Your post gave some valuable tips. Thanks.