We’ve been planning a retaining wall project in the garden for some time. Last week, after numerous distractions, we finally managed to focus all of our attention and energy on constructing this 37 foot long wall to control erosion in the garden just below our apiary.

The New Garden Wall
Although hardly any great feat of engineering or construction compared to say the Pyramids, or the actual Great Wall, it was a key project that needed to be completed before we can finish installing the rest of the vegetable garden.
Forward of the wall is where the new greenhouse will be installed. The greenhouse arrived some time ago, but because the wall wasn’t done, we couldn’t install it.
Due to the slight slope behind where the greenhouse will be, and the nature of our friable soils, we knew it would be critical to contain the erosion from the slope, or face problems in the future with soil building up behind the greenhouse wall later.

Without a wall, the soils on this bank cut would slowly erode downward, and accumulate at the base
We’d seen how our soils behave when the previous owners of the property had installed a 6ftx10ft plastic kit shed in front of a similar slope, and by the time we tore that shed down this spring, more than 18 inches of soil had walled up against the exterior wall, and had caused the shed wall to fail where it met the floor.
We knew the wall wouldn’t need to be very high, 3 feet would suffice, but first we had to decide what sort of material to construct it out of. As we planned to do the work ourselves, the lighter the material the better, but it would also need to be sturdy enough to get the job done. A number of walls in this area are simply constructed from large format pressure treated timbers or redwood, often with steel posts. However, we didn’t want to use pressure treated lumber, and even rot resistant timbers do eventually rot, especially when in direct soil contact. We didn’t want to build the wall, and then have to replace it in 10 or 15 years. There’s enough to do around here, so we wanted to build it, and forget about it.
After walking around some local supply yards it seemed that our best, homeowner-friendly retaining wall system option, was using some sort of interlocking, mortarless block. There are a number of manufacturers of such products, but we eventually chose a wall system where the blocks were readily obtainable, locally, and easy to install.

We selected an interlocking retaining block system
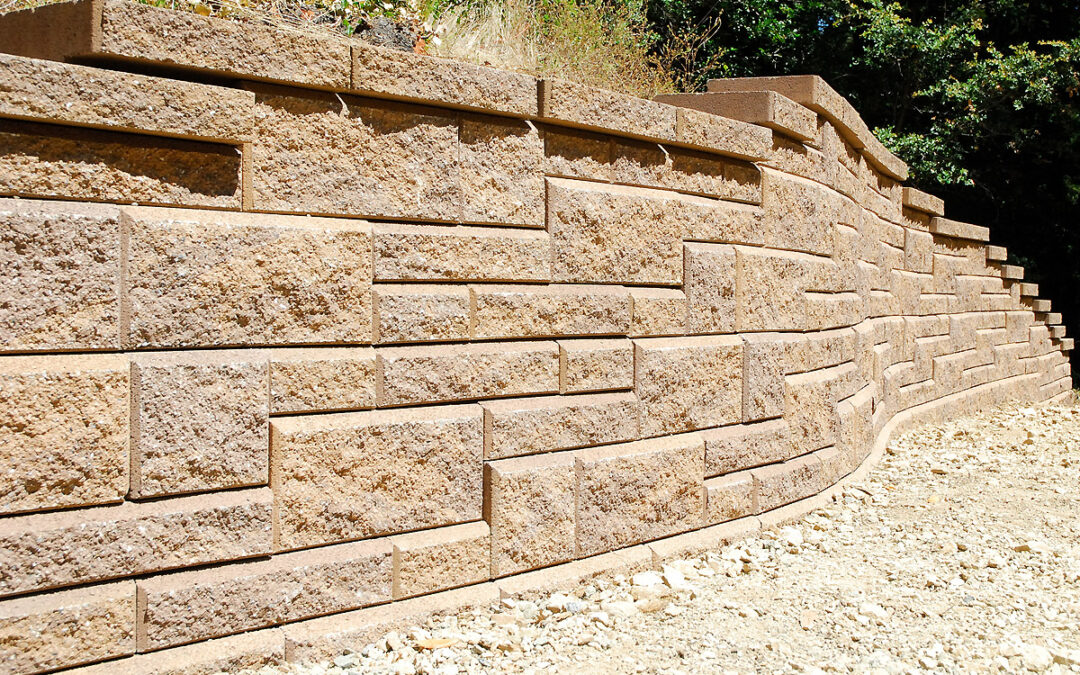
Rather than stare at a perfectly aligned run of parallel running bond blocks, we preferred the less rigid pattern using assorted block sizes, to help add some visual interest to an otherwise potentially boring stretch of wall. We also chose a block color that was as close to the color of our native soils as possible, in the hopes the wall would blend into the landscape, rather than detract from it.
The manufacturer provided clear instructions for determining the number of blocks needed for the project, based on the pattern used when constructing the wall. After double checking our math, we ordered the various blocks, the base rock, 3/4 inch drain rock, drain pipe, and filter fabric, and while waiting for the delivery, set to work on the foundation.

It's important to use the right tool for the job -- the backhoe made foundation prep much easier!
I will be the first to admit that with our terrain here, the tractor was completely indispensable, both for moving materials around the job site due to our elevation changes here, and for prepping the wall base. Our soils are comprised mostly of Santa Margarita Sandstone, and Santa Cruz Mudstone in this part of the garden. Although these soils, once exposed, weather to sand, the surface soil in some areas can be almost as hard as concrete.

Native mudstone is challenging to work in
As you can see, it’s not really soil at all, which is why we plant in raised beds in this part of the garden. The backhoe made excavating the foundation trench a snap though. However, if we’d been blessed with loamy soils, a shovel would have worked just fine. Mudstone isn’t all bad though, as it does help to provide a solid base, providing it’s not disturbed too much.

Mudstone Mountain - Just to get the grade level at the base of the slope, we had to move a LOT of soil!
By the time the trench was dug, four pallets of concrete blocks had been delivered along with the other materials we needed for the project. With the trench excavated and level, the next step was to add a few inches of base rock (usually a 3/4 inch gravel mixed with fines so it compacts).

The foundation trench was dug, and then filled with a few inches of base rock (including fines)
The base rock is tamped and compacted to provide a solid base, and then using string level lines as a guide the first foundation row of large blocks was set into place.

It's critical the foundation row of block is level!
That may sound easy, but this part of the project took a day and a half to complete. We’re sticklers for getting any project’s prep done right, so we didn’t rush this step.

Perfect!
We knew if the foundation wasn’t perfect, any leveling errors would easily be compounded up the wall as it was built.

Once the foundation was completed, we were ready to build the rest of the wall
It’s easier to build a straight wall, but our hillsides aren’t straight. Rather than disturb the fragile soils at the toe of the slope too much, we chose instead to curve the wall around the terrain. We especially liked that this hollow-block system has ‘tabs’ at the rear of the block, so when building outside (convex) curves, the tabs can simply be snapped off with a quick hammer blow to allow for a tighter inside radius.

A standard hammer is all that's needed to remove the rear tabs to incorporate curves in the wall
It saved a tremendous amount of time not having to use a masonry saw to make these adjustments.
Once the foundation blocks were in position, the insides of the blocks were filled with clean 3/4 inch drain rock. This helps to prevent the blocks from shifting, and helps to lock the wall together.

Filling with the blocks with drain rock as the wall is built improves the stability of the wall
Of course, it’s always important during these projects to have some expert on-site supervision.

"Excuse me Mr. Lizard, I need to install the block you're sunbathing on"
This Coast Range Fence Lizard oversaw part of our project on Tuesday morning, and seemed to approve of the wall’s location. I hadn’t really thought about the fact that this wall will probably provide some much welcome lizard habitat as they love to bask on rocks and logs in the garden, so why not a 37 foot long concrete wall?
Before installing more courses of block, we needed to install a toe drain behind the wall. Our soils drain very well, but it can also rain very hard here during the winter months. To prevent future wall failure, it’s important to install the toe drain so that any excess water that accumulates behind the wall, especially once our soils are saturated in late winter, is carried away, at a steady pitch down slope.

Triple wall drain pipe was recommended over the flexible perforated black corrugated pipe, as it's less prone to collapsing
We used a triple wall perforated drain pipe, being careful to install the pipe with the holes facing DOWNWARD.

The two rows of drain holes must face downward. This prevents clogging, and ensures water is carried away from the base of the wall
A retaining wall constructed by the previous owners had the pipe installed incorrectly, and that wall has now failed as the drain pipe has clogged. Now water pools at the top of the wall during periods of heavy rain.
The drain pipe was wrapped in a filter fabric to prevent clogging, and installed with a downward grade out toward a gravel dry well. The pipe behind the wall was laid on a bed of drain rock, and then subsequently covered in the same 3/4 inch drain rock.

The drain pipe was wrapped in a layer of special drain filter fabric before being covered with gravel
Some wall manufacturers recommend lining immediately behind the wall with a weed-blocking fabric, before filling the space behind the wall with gravel. This is supposed to prevent fine soil particles from marring the face of the wall during winter weather. However, this system specifically recommended against using such fabric, especially in areas with fine soils, because if the weed fabric becomes clogged, it can lead to increased hydrostatic pressure behind the wall, and lead to early wall failure. We omitted the fabric, and simply filled the space behind the wall with more 3/4 inch drain rock.
With the foundation in place, the drain pipe installed and secured, it was time for the fun to begin. Although it took a day and a half to complete the preparation of the foundation and base row of block, we managed to install 75% of the entire rest of the wall, with just two of us, in less than 8 hours (my biceps are much stronger now!).

Suddenly we seemed to be making a lot of progress!
Working from the suggested pattern from the manufacturer, it was just a matter of putting together a rather large, and very heavy, jigsaw puzzle (the larger stones in this pattern weigh 75lbs each — even the capstones weigh 55lbs). As a row of blocks was installed, we continued to fill the blocks with the drain rock, all the way up the wall to secure it.
As the rows of blocks are installed, the offset on the face of the blocks causes the wall to naturally step back with a 6 degree slope.

To the right of this picture you can see the wall slopes backward slightly as it increases in height
This makes the wall stronger, as it’s less prone to being pushed forward over time by the pressure of the soil behind it. As our wall was only being built to 3 feet in height, and the slope immediately behind it is relatively shallow, we didn’t need to install geotextile fabric to anchor this wall. We do have another wall to build on site that will be taller, with a much more severe slope behind it, so that wall’s installation will require multiple rows of geo-grid to anchor the wall into the hillside, but that’s another project!

The ends of the wall are stepped down so the cap stone provides a more finished look at the wall ends
Once the last course was complete, and we’d finished filling in behind the wall with gravel, we could add the capstones to finish off the wall. As you can see above, we tapered the ends of the walls. We did this for two reasons. Most importantly, as this wall has curves in it, it minimized the cutting of capstones. The capstones are solid, and rectangular, so not inherently suited to following a curve.

To cut these solid concrete capstones we'd need to use a diamond saw, and it would have slowed down construction significantly
Tapering the ends also meant we needed less block, but it also makes the wall more visually interesting, and for its location, less formal in appearance with the staggered ends.

Without variation in wall height, the shallow curve in the wall would have required cutting most of the rectangular capstones to ensure a tight fit
By dropping the height of the wall at the ends, the capstones help to conceal the side of the blocks and yield a more finished appearance. However, at the end of the wall that is most visible as you enter the garden, we used special end blocks that were finished on two sides.

For visible wall ends, special end blocks, with two finished faces, can be used
It feels great to finally strike this project off our list of things to do. In all it only took four days for the two of us to construct, much faster than either of us anticipated, and by doing it ourselves, we saved a lot on labor costs, which is a large part of the expense with wall projects such as these.

West end of the wall
Personally I think it turned out great, and it’s certainly tidied up the appearance of the slope below the bee hives.

The wall will enable us to plant above it more easily now the soils are better stabilized. I envision a lot of native sages here next spring!
So now we’ve built the ‘great garden wall’ we can FINALLY turn our attention toward the construction of our greenhouse…

The greenhouse will sit parallel to the east end of the wall near the redwood grove
If all goes well, I’m hoping to show off a greenhouse where this patch of bare gravel is within the next couple of weeks. Stay tuned!


You must be shattered after all that work. The colour and different sizes of the blocks really makes the wall blend into the surroundings. I am sure Mr Lizard is off to tell his pals about the new apartment block 🙂
It was a little exhausting to put in, but it was that good sort of tired, knowing we accomplished something of this scale. I think word is out, I’ve seen a few lizards scampering across the wall today! 🙂
The wall was quite a necessary undertaking. It looks great. Thank goodness for big machinery to make such jobs easier. I am eager to see the greenhouse.
Honestly, the tractor was the smartest ‘garden tool’ we ever bought. Our elevation changes almost 300 feet across seven-and-a-half acres. Even simple tasks, like moving firewood, are so much easier with the tractor. Pushing a wheelbarrow around here is difficult at best (especially when it runs away on the downhill slope!)
Wow that is fabulous. When we build our multi level wall we were unsure how to do the drainage from the downspouts. I almost put in the pipe as you did but opted for french drains. I love this wall and the beehives above.
I wasn’t fond of this pipe. I’ve seen it get crushed when it’s not installed correctly, but it is a major step up from that black flexible pipe you see in the big box stores. The triple wall, with the gravel and dry well, should be fine, and is what the manufacturer recommended for this system. Now we’ll just have to wait and see 😉 I love having the bees in the garden, and being up on the slope, they fly up and out from the hive entrance, so we never really end up walking in front of the hives, as they’re above us.
It looks great! As usual I can tell you two took you time to do it right the first time. I know just setting a row of similar block is a lot of work, especially the leveling part. Looking forward to seeing the greenhouse up.
Being picky has its drawbacks though, it usually means things don’t happen very fast around here 😉 That’s ok though. I’m thrilled with how it turned out. I think the pattern is actually quite attractive, and don’t feel compelled to hide the wall at all. Some of the blocks we looked at were just downright UGLY. I’m looking forward to the greenhouse too! I’ve got seeds to start!
Wow looks fabulous! We have used those prefab wall unit things – the more basic ones – to make some terracing and they’ve held up marvelously. The difference in appearance is tremendous – you’re really going to enjoy this space – and your new greenhouse! How big are you going to go? BTW I just signed up for a Foothill college Hort dept class on managing greenhouses and small commercial nurseries – I’ll give you my class notes if they’re any good!!
The green house won’t be huge, it’s 8 feet x 12 feet. Plenty big enough for seed starting and propagating, but not so large that we need to deal with permits. It has benches along both long walls, and the back though, so there’ll be plenty of space for what we need. I probably will need to add a shade-cloth over the roof on the south side in summer though, as it gets really sunny in that location (well, in a normal summer without all this fog). I’ll be curious to see how your class goes!
Great work, and looks fantastic! You definitely need to plant something that trails a bit at the top of the wall — that will really soften it.
This was quite informative too — thanks for all of the detail, especially about the geo-fabric.
I agree, something like evergreen trailing rosemary that cascades over the top would help provide both structure above the wall, but also soften the look. Bonus is, it will provide late winter nectar for the bees too. I can see it all in my mind’s eye, now I just have to make it all come to fruition!
Clare, That’s a beautiful wall! I loved seeing the beehives , too. Now for the greenhouse! Can’t wait to see it. gail
Thanks Gail! If all goes well, greenhouse construction should start this weekend!
you must be very proud…
We are! I must admit, this wall system makes us looks good 😉 It turned out better than either of us expected.
ok, so I am wha whaaa’ing about some flower beds and meantime you are excavating and building a wall that the Romans would be proud of!! WOW Clare! You are sommat else. Now that you are done, can you come to Urban Dirt Farm and build me a vegetable garden wall? You seem so good at it! Michaela
I suspected Viking genes with my red hair, but maybe I do have some Roman ones mixed in there too 😛 I know you have a tractor, and lots of FLAT ground. Building one of these walls in your veggie garden would be easy. Not sure if these blocks are available where you are, but I’m sure you probably have something similar. Honestly, if WE can do it, I KNOW you can! 😀
What an accomplishment! I think your new wall will be lovely with native sages planted above it. No doubt the lizards are already moving in and will be happy to supervise the construction of the new greenhouse. I want to build a rock wall in an area of my garden. I got an estimate for it to be built professionally, and it was a small fortune, so I am seriously thinking of doing it myself. You have shown that with careful preparation and execution, a DIY wall can be beautifully successfu.
That was our motivation to do it ourselves, the labor costs for these walls can make them prohibitively expensive, but the materials themselves, although not cheap, really aren’t that bad. Especially considering that if installed correctly, these walls are much more permanent than wooden structures that need replacing or repairing over time. I think choosing the right product for the project is important, and not rushing it. It’s also important to stretch in the morning so you don’t pull something! 😉
Wow! Is there anything you can’t do? I’m very impressed.
There are lots of things we can’t do, but we can always learn, and that’s part of the fun 🙂 We have had some hardscaping experience with our last garden, although that was mostly an enormous cobblestone patio installation. The base prep for that patio, and this wall were remarkably similar, so that helped. Now the question is can we put up a 10 foot tall greenhouse between us!? 😛
No wonder you all have been busy, that is quite a project. And I have to say I admire the finished product. Looks like a great work of engineering and construction – indeed a Great Wall!
I have to give credit to the manufacturer for the design of this wall system. A number of the blocks we looked at were solid, and in hindsight I’m so glad we didn’t go that route, as cutting those blocks would have been a nightmare for the curves (unless you use a block that’s angled at the back). They really made the blocks easy to work with, and provided a lot of detailed installation information. I was shocked how quickly it all came together, and am very pleased with the finished appearance!
You completed your wall just like a professional. We use this block often in commercial projects and like you, do not install the fabric at the rear of the wall for the reason you stated. Your research and attention to the first course really paid off in a nice looking finished product. When you do the geo-grid (I am impressed you know about this), make sure the manufacturer does the engineering for you. They usually do this as a courtesy. The cut back, coursing and layering of back fill is very important to the structural stability of the wall.
My question is how did the bees take to the construction? Were they stressed and buzzing like crazy? I always notice on site that the insects get extra antsy when the big equipment and wet saws are in operation. I guess they think that rumbling of the ground is a big predator coming and the buzzing of the saw is the supreme leader of the insect world paying a visit.
I had a lot of concern about the reaction of the bees at first, especially because of the vibration from the tractor. We initially took it slow with the backhoe until we could gauge the bee’s response, but they really didn’t seem to care. It probably helps that with the slope the hives were actually above where we were working, so we weren’t working right in front of the hives, or interfering with the bee-line (the freeway of field workers returning to the hive). For all the dirt moving, tamping, and shoveling that was going on, I was happy to see that the bees just went about their business, and completely left us alone! However, we didn’t hire anyone to help us with this wall for just that reason. If the bees had responded differently, we didn’t want to subject someone to unnecessary honey bee angst 😉
Wow, you guys are hard-core! I’m still vacillating about buying a wheelbarrow (do I have room?) while you’re roaring around with your backhoe!
The wall looks great. You really picked a nice block material. There are quite a few Fu-u-u-ugly ones on the market. Yours integrates beautifully into the landscape.
Oh, but you’ve been doing some fabulous things sprucing up your house! Wheelbarrows are hazardous with our slopes here. Until they can invent a wheelbarrow with power steering, and brakes, the tractor is MUCH safer (not to mention more efficient). We do have to use wheelbarrows in some places, but I’ve had a full wheelbarrow get a way from me a couple of times here…darned gravity! 😛
There really are some hideous wall materials on the market. Just the assortment of block sizes made a huge difference in the aesthetic. We’d seen some sample walls built at some of the local stone yards, and much preferred this look, to the walls built with all the same size large blocks. My eye tends to obsess on patterns that are too regular 😉
Clare I think that wall looks amazing and you are certainly blessed to have such a talented Mr Curbstone. I can just imagine how sore you both were every evening during this project and how excited you must be that you’re finally getting the greenhouse constructed. I think your bank will look lovely with drifts of sage next summer.
Mr. Curbstone is very talented. It’s handy having a resident engineer here! 😉 With the wall done, I can’t wait for fall planting season…although I shouldn’t rush that with green peppers and tomatoes still waiting to ripen in the garden. I’d really like to focus on bee friendly natives in the area above the wall. We have a few native sages up there already, which should fill in by next spring, but I’d like to add more, and an assortment of Penstemons, more Sulfur and Rosy Buckwheat, and maybe some native Helianthus too!
Hi CV,
Very nice! Now if you’d like to bring your expertise over to Merry ole England I’m sure I could find some jobs for you to do here! 😀
Seriously though, I don’t know how some people have such patience to be so precise with something… I know how it would go if we were to attempt such a job. My boyfriend, no doubt likes to believe he knows what he’s doing… But, well… I’m not so confident the end result would be quite so perfect.
I love a trip back to England, but probably more for a holiday. You might convince me to supervise construction though 😛 Honestly, once that first row is in, except for the heavy lifting, the wall just sort of comes together on its own. It’s difficult to mess it up!
The wall looks great. I really like the informal look with the curves and the tapered ends.
Welcome Flâneur Gardener! We were a little concerned that this block wall could have looked too formal, or too sterile in appearance in the garden, but we’re pleased with how the look was softened by varying the wall height. I think it made quite a difference!
Fabulous! That wall will be gorgeous with flowers cascading over its edges. What a releif for you to finally have this done! 🙂
It is a relief…I think we mumbled something the blog about a year ago in regards to getting this done. That’s the trouble with gardening, there’s always something else to distract you! 😉
Beautiful wall! I can hardly wait to see a “later” photo with the rosemary cascading over the wall. The bees will love it. I hope you put rebar in the blocks to keep the wall in place. I didn’t note that in your building details. I’ll tell you, that’s too difficult a project for me to tackle. I’m guessing that building the greenhouse will be easy compared to the wall.
Actually, this wall doesn’t use rebar, it doesn’t need it. The natural 6 degree step back (there’s also a 12 degree version for steeper slopes), coupled with the gravel in-fill is all that’s needed. That’s one of the reasons we went with a mortarless wall system. Wall strength is enhanced though by burying at least part of the first block below grade, which we did do (although I don’t think I made that clear in this post).
We consulted a Geotechnical Engineer about our other wall that needs building at the base of a much steeper slope, and it was pointed out that if the wall steps back to follow the toe of the slope the wall has more even pressure behind it. A straight wall, a true ‘retaining wall’ that’s vertical, over time has to bear tremendous pressure from soils building up behind it, mostly at the bottom of the wall, which is why straight mortared cinder block walls fail at the base over time, especially when constructed without rebar. This wall system I think is easier to use, and much prettier than your average block wall, and hopefully will hold up better over time too!
I have to say that’s a great wall even if I’m not a big fan of block. Sometimes using stone is out of the question and as you imply – wood of any kind for a retaining wall is a poor choice.
We considered stone, and the aesthetic of natural stone would have been better for our woodland setting. With the variable slopes here though it would have been far beyond our expertise to construct a stone wall that would have been sound enough to hold up over time. This seemed like a reasonable compromise though, and thankfully block walls aren’t as hideous-looking as they used to be 😛
Clare, we also did a wall, required to get our home building permit, and it is HARD work. We started out all bouncy and eager to get it built. We had a weekend and did the work all by hand, so by Sunday, we thought we had worked on a chain gang. I This was where I planted the rosemary and lavender which could only be watered once a month. Now they are trailing down and doing great. I still rarely have to water.
Ours is a similar shape, freeform, but at the time the style of yours wasn’t available. I like it very much….great design job!
I love the elegant curves of your new wall and the detailed wall building for us. I really enjoyed this post. It will look beautiful with the sages above next year. Well done! Beautiful!
You guys constantly amaze and inspire me. You never seem to back down from a challenge. I really admire how you approached the wall building and did the work yourselves. Do you have a background in construction or did you have to research it all yourselves first? Either way, as a book-worm who attempts DIY, I’m highly impressed.